It can be very frustrating when your SATA hard drive shows up in BIOS but not in Windows. This issue prevents Windows from detecting and accessing the files on the hard drive, which often contains important data.
This article will outline some troubleshooting steps to help the hard drive show up properly in Windows. The key sections will cover verifying the hard drive connections, updating drivers, changing drive letters, initializing and formatting the disk, checking for bad sectors, and replacing cables as needed.
Following these steps systematically should help identify and resolve the underlying cause so the SATA drive will function normally again in Windows.
Verify the Hard Drive Connection
The first step is to check the physical connections between the hard drive and the computer. Unplug the power cable from the hard drive and reseat it firmly. Do the same for the SATA data cable connected to the motherboard. Check that the cables are not damaged, bent, or crimped. Ensure the SATA data and power connectors are securely inserted all the way into the hard drive and motherboard ports. Improper cabling is a common cause of drives not being detected.
If reseating the cables does not work, try replacing the SATA data cable with a new one, as the cables can wear out over time. When replacing a SATA cable, be sure to use a certified cable that complies with the SATA 3.0 standard. Lower quality cables may lose signal integrity resulting in connectivity issues. Refer to the hard drive and motherboard manuals to confirm the correct SATA ports and cable types.
Additionally, check that the power supply is working properly and delivering consistent voltage on the SATA power cable. Use a multimeter to test the voltages. If the power cable or supply is faulty, replace it.
Citations:
[1] https://www.startech.com/en-us/faq/sata-cables-general-troubleshooting
Check if the Drive is Detected in Disk Management
The next step is to open up Disk Management to see if your hard drive is being detected there. To open Disk Management on Windows 10, you can right-click on the Start menu and select “Disk Management”. Alternatively, you can search for it in the Start menu search bar.
Once Disk Management is open, look in the lower panel for a list of all the connected disk drives. Check if your SATA hard drive shows up here. If you see the drive with a partition and a drive letter assigned to it, then Windows is detecting the drive.
However, if you don’t see the SATA drive listed at all, then there is an issue with Windows detecting it. This could mean faulty SATA cables, drivers, BIOS settings, or a dead drive. If it is listed but does not have a drive letter, try assigning one as explained further in this guide.
For reference, see: Help in Disk Management
Update Storage Drivers
Updating your motherboard’s storage and SATA drivers can often resolve issues with hard drives not being detected in Windows. Motherboard manufacturers frequently release updated drivers that improve compatibility and fix bugs. Go to your motherboard manufacturer’s website and search for the latest SATA, RAID, or chipset drivers available for your specific model.
For example, on an ASUS motherboard you would want to install the Intel Chipset Driver as well as the ASMedia USB 3.1 Driver for full SATA controller support. For Gigabyte motherboards, look for the Chipset, SATA, or RAID drivers. On MSI boards, get the latest Chipset or SATA RAID driver. Just make sure you are downloading the drivers for your exact motherboard model.
Many Windows users also recommend installing the Standard SATA AHCI Controller driver available from Microsoft, as the generic Windows driver may not provide full functionality.
After installing the latest motherboard and SATA drivers, reboot your PC and check if Windows can now detect the SATA hard drive.
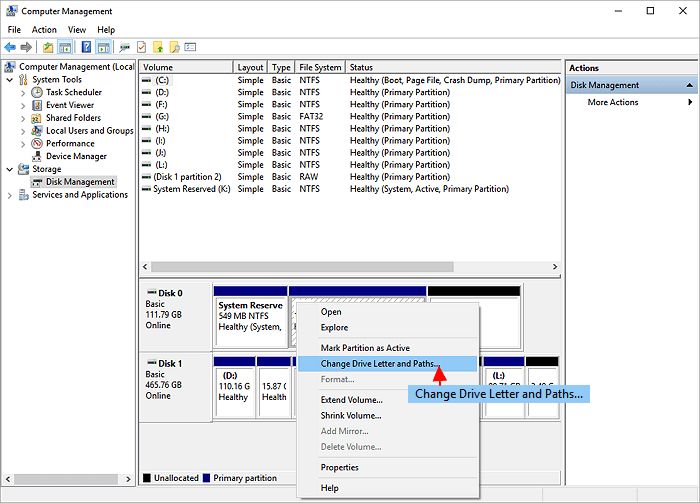
Change or Assign Drive Letter
If the hard drive shows up in Disk Management but not in Windows Explorer, the issue is likely that the drive does not have a drive letter assigned to it. Here are the steps to change, add or reassign a drive letter in Windows:
1. Open Disk Management (right-click the Start menu and select “Disk Management”).
2. Right-click on the disk that needs a drive letter assigned and click “Change Drive Letter and Paths”.
3. Click “Add” to assign a new drive letter to the disk. Choose a letter that is not already in use.
4. Click “OK” to save the changes. The disk should now show up in Windows Explorer with the new drive letter.
If the disk already has a drive letter assigned but is not showing up, you can follow the same steps to change or reassign the drive letter. This will often resolve issues with a disk not appearing in Windows.
For more detailed instructions, refer to: How to Assign or Change a Drive Letter in Windows
Initialize the Disk
If the hard drive is detected in Disk Management but shows up as unallocated space or has a black bar at the top, it needs to be initialized before Windows can access it. To initialize the disk:
- Open Disk Management (press Windows key + R, type diskmgmt.msc, and click OK).
- Right-click the disk that says “Unallocated” and select “Initialize Disk”.
- Select MBR or GPT partition style. MBR is compatible with older operating systems like Windows 7, while GPT works better for drives over 2TB.
- Click OK. The disk will now say “Unallocated” without the black bar.
Now that the disk is initialized, a partition and volume need to be created for Windows to be able to access it. To create a partition and format the volume:
- Right-click the “Unallocated” space and select “New Simple Volume”.
- Go through the wizard, assigning a drive letter and formatting the partition.
- Once complete, the disk should show up as a new volume with unused space.
Now Windows should be able to detect the hard drive.
Format the Partition
Once the hard drive is partitioned, the next step is to format the partition. This assigns a file system to the partition, such as NTFS or exFAT, which organizes the drive so Windows can store and retrieve data from it.
To format the partition, open Disk Management, right-click on the newly created partition, and select “Format”. Choose the desired file system – generally NTFS is recommended for best compatibility with Windows. Make sure to check the “Quick Format” box to complete the process faster.
After formatting, the partition will be ready to use. Windows will assign a drive letter automatically so the hard drive will show up in File Explorer. If needed, the drive letter can be changed in Disk Management.
Formatting the partition is a crucial step to make the disk usable in Windows. Once completed successfully, data can be stored and apps installed on the hard drive partition just like any other disk volume in your system.
Sources:
https://support.microsoft.com/en-us/windows/create-and-format-a-hard-disk-partition-bbb8e185-1bda-ecd1-3465-c9728f7d7d2e
Check for Bad Sectors
One potential cause of a hard drive showing up in BIOS but not Windows is bad sectors on the disk. Bad sectors are areas of the hard drive that have become physically damaged and unusable. The CHKDSK utility can be used to scan for bad sectors and attempt to repair them.
To check for bad sectors using CHKDSK:
- Open an elevated Command Prompt window. To do this, search for “Command Prompt”, right-click it, and select “Run as administrator”.
- Type the following command and hit Enter:
chkdsk C: /f /r /x(Replace C: with the letter of your hard drive if different) - CHKDSK will start scanning your drive for errors. This process can take a while depending on the size of your hard drive and number of bad sectors.
The /f parameter tells CHKDSK to fix any errors found. /r scans the drive surface for bad sectors and recovers readable data. /x forces the drive to dismount before the scan, which is required for the scan to check sectors currently in use by the operating system.
If CHKDSK is able to repair the bad sectors, the hard drive may then become available in Windows. However, if the hard drive has developed too many bad sectors, it may need to be replaced. It’s a good idea to backup important data regularly in case a drive fails due to bad sectors.
Replace Hard Drive Data Cable
If all other troubleshooting steps fail, the issue may be a bad or faulty SATA data cable connecting the hard drive to the motherboard. SATA cables can degrade over time from wear and tear, especially from frequent plugging and unplugging.
To replace the SATA cable, first unplug the existing cable from both the hard drive and motherboard ports. When removing the cable, pull straight out to avoid damaging the SATA connectors [1]. SATA cables are designed to click in and out of the ports, so gentle force in a straight motion should be sufficient to detach them.
Next, connect a new SATA cable to the same hard drive and motherboard ports. Make sure both ends are securely inserted. Use a cable specifically designed for SATA hard drives, and match the orientation of the connectors (straight or angled) used by the existing ports.
After connecting the replacement cable, check if the hard drive now appears in Windows. If the new cable resolves the issue, the original was likely faulty or damaged. Proper SATA cabling is essential for maintaining a healthy connection between the hard drive and motherboard.
Conclusion
When a hard drive shows up in BIOS but not Windows, there are several troubleshooting steps you can take:
First, verify the hard drive is properly connected to the motherboard and has power. Reseat both the power and data cables.
Next, check Disk Management to see if Windows detects the drive. If not, try updating your storage drivers and chipset drivers.
You may also need to change or assign a drive letter so Windows recognizes the disk. Go into Disk Management and assign a letter if none is set.
Initializing and formatting the hard drive partition can also help it show up. Use Disk Management to initialize the disk if it is brand new.
Checking for bad sectors with CHKDSK or hard drive utilities can identify any underlying issues. Replace the hard drive if it has developed bad sectors.
Finally, try replacing the hard drive data cable if it is damaged. Use a known good SATA cable to connect to the motherboard.
Following these troubleshooting steps should help identify and resolve the underlying issue that is preventing a SATA hard drive from being detected in Windows.