It can be frustrating when you install a new SSD and it does not show up as a boot option in your computer’s BIOS. There are several potential reasons why your SSD may not appear as a boot device.
This article will walk through the steps to troubleshoot and resolve this issue. First, we will verify the SSD is installed properly and detectable by the operating system. Next, we will check BIOS settings related to storage devices and boot order. Then, we will look at initializing the SSD and updating drivers or firmware. Finally, if the issue persists, we will explore hardware-related troubleshooting.
By the end of this guide, your SSD should be properly recognized by your computer as a bootable drive.
Verify the SSD is Properly Installed
To verify your SSD is properly installed, first check that it is seated correctly in the motherboard or drive bay. Refer to your computer or motherboard manual for the exact SSD slot location and orientation. Make sure the SSD is fully inserted into the slot and the retention screw or latch is secured. Improper installation can prevent the drive from being detected.
Next, check that the SSD’s SATA or PCIe power and data cables are firmly connected. Reseat the cables on both ends to ensure a proper connection. Verify the cables are not damaged or bent, as this can cause connection issues. Using the manufacturer-provided cables is recommended, as some aftermarket cables may not work properly.
After checking the physical installation, inspect inside your computer case and make sure the SSD’s activity light blinks when powered on, indicating it is receiving power. If the SSD tray has an activity light, check that as well. If the lights do not come on, the cabling or power supply may be faulty.
Finally, consult your motherboard manual again and verify that you have the SSD plugged into the correct SATA port designated for boot devices. Having the SSD in the wrong port can prevent booting.
Check for SSD in BIOS
To check if your SSD is detected in the BIOS, you will need to access the BIOS setup utility on your computer. Here are the steps:
- Restart your computer and press the BIOS access key, usually F2, F10, F12 or Delete, during the initial boot process. The key will vary depending on your motherboard or computer manufacturer. Refer to your manual or on-screen instructions if you’re unsure.
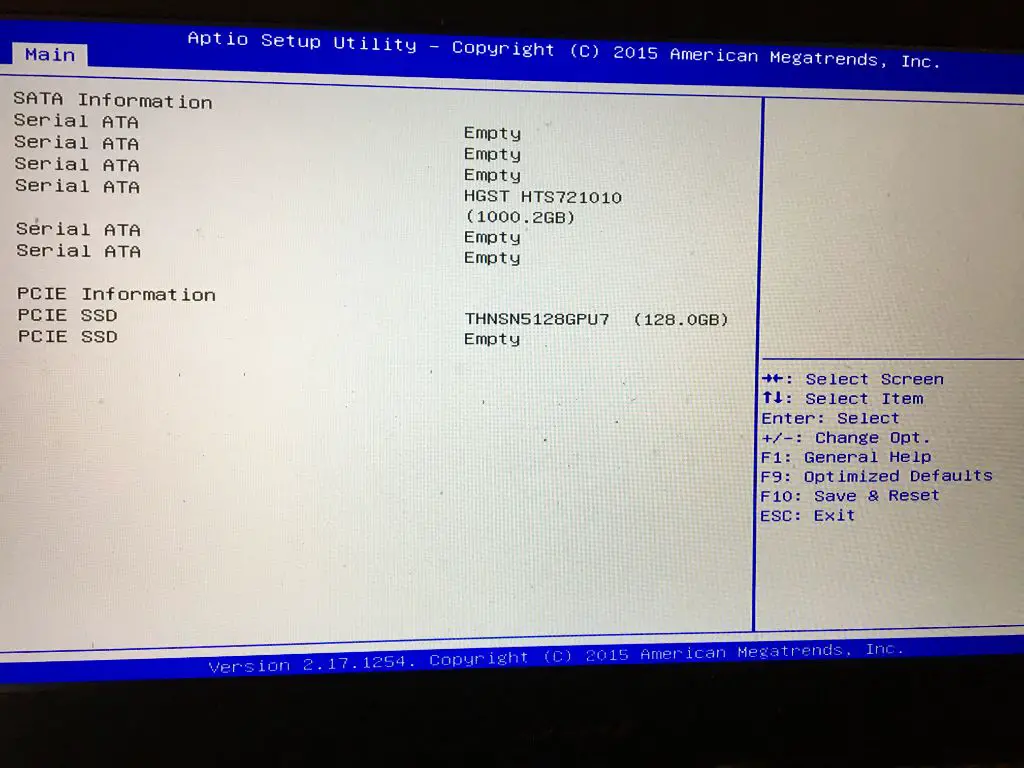
- Once in the BIOS, look for the storage information section, often called “Storage”, “SATA” or “Drives”. This will show a list of connected storage drives.
- Check if your SSD is listed here. It may be labeled with the SSD name, size and connection type, like “Samsung 850 EVO 250GB SATA”. If the SSD is not listed, it is not being detected properly.
- If the SSD is listed, the BIOS is detecting it. The boot issue likely lies elsewhere, like the boot order configuration.
- To exit, save changes and reboot from the BIOS directly. Refer to your manufacturer’s instructions for the exact steps.
If your SSD is not showing up in the BIOS, it indicates a connection or hardware issue, like a faulty cable. You will need to troubleshoot further or contact support. Refer to this guide for more detailed steps on verifying SSD detection in different BIOS versions.
Enable AHCI Mode
One potential reason an SSD may not show up as a boot option is if the SATA controller is not set to AHCI (Advanced Host Controller Interface) mode. AHCI mode is recommended for SSDs as it enables advanced Serial ATA features that maximize SSD performance.
To check if AHCI mode is enabled:
- Restart your computer and enter the BIOS setup utility, usually by pressing F2, F10 or Delete during startup.
- Navigate to the “Advanced” tab and look for the SATA configuration options.
- Verify the SATA mode is set to AHCI. If not, change the setting to AHCI and save changes.
According to Tom’s Hardware forums, operating systems like Windows are usually installed with AHCI drivers by default. Switching from IDE to AHCI after installation can cause boot issues, so it’s best to ensure AHCI mode before installing Windows onto an SSD.
Some systems may not support AHCI or have it disabled by default. Checking your motherboard manual on how to enable AHCI is recommended. For HP devices, the HP forums provide instructions on enabling AHCI in the BIOS.
Update BIOS
One of the main reasons an SSD may not show up as a boot option is an outdated BIOS version that doesn’t properly detect or initialize the SSD. Updating to the latest BIOS version can improve compatibility with newer storage devices like SSDs. As BIOS updates include fixes and optimizations for storage devices, updating can allow the BIOS to properly detect the SSD.
It’s recommended to update the BIOS to the latest available version. Consult your motherboard or system manufacturer’s website and support pages to find BIOS updates. Follow the instructions carefully to flash the BIOS update. This should update the necessary drivers, modules, and firmware to fully support SSD detection. With an updated, optimized BIOS version, the chances are high it will now properly recognize the SSD and allow it to be selectable as a boot option.
Cite: https://www.easeus.com/computer-instruction/ssd-not-detected-in-bios.html
Initialize the SSD
After installing the SSD, you may need to initialize it and create partitions before it can be detected as a boot drive. This is done using the Disk Management utility in Windows.
Disk Management allows you to view all connected drives, initialize disks, create partitions, format volumes, and assign drive letters. To initialize a new SSD:
1. Open Disk Management (press Windows key and type “diskmgmt.msc”).
2. Right-click the disk you want to initialize and select “Initialize Disk”.
3. Select the partition style (MBR or GPT) and click OK.
4. Right-click the unallocated space and create a new simple volume with the desired size.
5. Format the volume with NTFS file system.
Once the SSD is initialized and has an NTFS volume, it should be detected in the BIOS boot options and you can set it as the first boot device. Initializing the drive writes partition tables and file system structures the system needs to recognize it as a bootable drive.
For more details, refer to this guide on initializing a new SSD: How To Install A Second SSD
Change Boot Order
To set your SSD as the first boot device in the BIOS:
- Restart your computer and enter the BIOS setup utility by pressing the BIOS key during bootup (often Delete, F1, F2, F10 or F12 depending on your system).
- Navigate to the “Boot” section in the BIOS.
- Locate the boot device priority list and use the arrow keys to move your SSD to the top of the list. This will make the SSD the first boot device.
- Save changes and exit the BIOS. Your system should now boot from the SSD first.
If your SSD still does not show up as a bootable device in the boot order, you may need to enable AHCI mode in the BIOS. See this forum post for more details.
Verify Cables and Power
One of the most common reasons an SSD is not detected during boot is because it has become disconnected from the motherboard. Before looking into other potential issues, you’ll want to rule out any loose cables.
First, make sure the power and data cables are properly seated in the SSD itself. These connections can sometimes work loose over time. Check that the cables are snapped into place securely on both ends.
Also inspect the cables themselves for any damage. Cables can degrade over time and develop breaks or tears which disrupt the connection. Replace any cables that are damaged or frayed.
If your SSD uses a SATA connection, verify it is plugged into the correct SATA port on the motherboard. Try switching which SATA port it is connected to, as some ports may have issues. The same applies for M.2 SSDs – make sure the slot is working properly.
Finally, if you are using an external SSD enclosure, try connecting it to another computer to see if it is recognized there. This will help determine if the issue is with the SSD itself or something on your PC.
If after verifying the connections the SSD still does not show up, it’s likely an issue with the drive itself or motherboard settings rather than a physical connectivity problem.
Troubleshoot SSD
If the SSD is still not detected in BIOS or disk management after going through the previous troubleshooting steps, there may be an issue with the drive itself that requires further diagnosis. Some things to try:
- Run the SSD manufacturer’s diagnostic tool to check the health and status of the drive. Most major brands like Samsung, Crucial, WD, etc. provide a free bootable tool to test their SSDs.
- Use a tool like CrystalDiskInfo to view info like disk health, temps, interface stats, etc. This can help identify any problems.
- Check the SSD’s S.M.A.R.T. data with a tool like HD Sentinel. Any critical warnings could indicate drive failure.
- Update the SSD firmware to the latest available version from the manufacturer. Older firmware can sometimes cause boot issues.
If no issues show up after testing, but the SSD still does not boot properly, it likely needs to be replaced. Most SSDs come with at least a 3-5 year warranty, so contact the manufacturer about a replacement if it is still covered under warranty.
When to Seek Help
There are a few scenarios where it may be best to seek professional help with getting an SSD recognized as a boot drive:
If you’ve exhausted all the basic troubleshooting steps like checking connections, updating BIOS, enabling AHCI mode etc. and the SSD still does not show up as a boot option, professional assistance can help identify any underlying hardware issues or complex firmware incompatibilities.
If you are unfamiliar or uncomfortable updating the motherboard BIOS, a computer technician can help walk through that process safely. Improperly flashing the BIOS can render the system unusable.
For laptops or motherboards with proprietary designs, professional help may be needed to determine the optimal settings and steps to enable the SSD as a boot drive. The service manual for the specific hardware can provide guidance.
If data recovery or migration from the old hard drive to the new SSD is required, it’s best to seek professional data recovery services to ensure no data is lost in the migration process.
In general, if you’ve tried all the standard troubleshooting steps and the SSD still fails to boot, seeking assistance from a qualified technician or computer repair service can help identify any underlying issues and get your system up and running quickly.