Check That the SSD is Properly Installed
The first step is to ensure that your SSD is properly installed and connected inside your computer. Open up your computer case and visually inspect where the SSD is plugged in. Make sure that the SSD is fully seated in the motherboard slot and does not appear loose.
Also check that the SATA data and power cables are firmly connected to the SSD. Sometimes cables can become slightly disconnected, especially if you recently moved the computer. If the SSD is an M.2 drive, inspect that it is correctly inserted in the M.2 slot and secured in place with a screw.
Reseat the SSD by removing it and plugging it firmly back into the motherboard slot. Double check that all cables are correctly oriented and completely plugged in. Try rebooting your computer after ensuring a snug hardware connection. This basic check of the physical SSD installation is an important first troubleshooting step before trying other solutions.
For additional confirmation, consult your motherboard manual to verify you have the SSD in the correct slot. Improper installation can prevent the SSD from being detected.
Update Drivers
One common reason an SSD may not show up in File Explorer is because you need to update the motherboard drivers, especially the SATA controllers. Motherboard drivers provide the interfaces between the operating system and hardware, enabling proper communication. Outdated drivers can cause issues with SSD detection and performance.
To update your motherboard drivers in Windows:
- Open Device Manager by right-clicking the Start menu and selecting it.
- Expand the “IDE ATA/ATAPI controllers” section.
- Right click on each SATA controller and select “Update driver.”
- Click “Search automatically for updated driver software” so Windows can find and install the latest versions.
- Restart your computer and check if the SSD appears.
Updating to the latest motherboard drivers, especially SATA controllers, can often resolve SSD detection issues. Outdated drivers may not fully support newer storage devices. Keeping drivers updated ensures maximum compatibility between the OS and hardware.
If updating the drivers does not work, you may need to check for BIOS updates from your motherboard manufacturer. Newer BIOS versions can improve device detection and compatibility.
Initialize the SSD
One common reason an SSD may not show up in File Explorer is because it needs to be initialized first. Initializing the SSD prepares it for use in Windows by creating a partition table and file system on the drive.
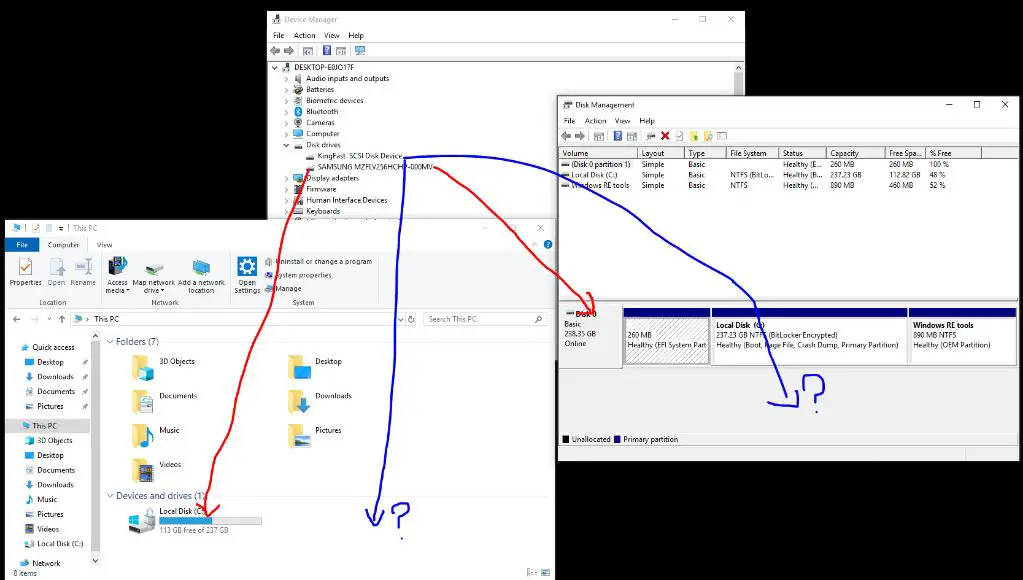
To initialize the SSD, open up Disk Management in Windows. This can be accessed by right-clicking the Start menu and selecting “Disk Management”.
In Disk Management, the new SSD should show up as an “Unknown” drive with unallocated space. Right-click on the disk and select “Initialize Disk”. This will launch the Initialize Disk wizard.
Make sure to select GPT or MBR as the partition style, depending on your configuration. GPT is recommended for SSDs and for drives larger than 2TB. Then Windows will setup the partition table and you can create a new volume on the disk.
Once the disk is initialized, it should now show up with a drive letter in File Explorer. If not, you may need to assign a drive letter manually in Disk Management after initializing.
According to Microsoft’s documentation, “initializing the disk prepares it for use by creating a partition table and file system for the disk.” [1] So initializing in Disk Management is an important first step to getting a new SSD recognized.
Assign a Drive Letter
If the SSD does not have a drive letter assigned, Windows will not display it in File Explorer even if the drive is installed and functioning properly. To assign a drive letter to the SSD in Windows:
1. Open Disk Management by right-clicking the Start menu and selecting Disk Management.
2. Locate the SSD disk that needs a drive letter assigned. It may show up as an “Unallocated” drive.
3. Right-click the unallocated SSD and select “Change Drive Letter and Paths…”
4. Click “Add” and assign any unused drive letter to the SSD.[1]
This will assign a drive letter to the SSD so that it shows up properly in File Explorer. Be sure to choose a drive letter that is not already in use by another disk.
[1] https://learn.microsoft.com/en-us/windows-server/storage/disk-management/change-a-drive-letter
Enable AHCI Mode
One reason an SSD may not appear in File Explorer is if AHCI mode is not enabled in the BIOS. AHCI (Advanced Host Controller Interface) is a storage driver that allows the operating system to optimize an SSD’s performance. Most SSD manufacturers recommend enabling AHCI mode.
To enable AHCI mode:
- Restart your computer and enter the BIOS setup utility, usually by pressing F2, F10 or Del during startup.
- Navigate to the “Advanced” tab and look for the SATA or Onboard Devices configuration.
- Set the SATA mode to AHCI instead of IDE or RAID. Save changes and exit BIOS.
After enabling AHCI mode, Windows may fail to boot due to the driver change. In this case, you’ll need to load the AHCI drivers during startup. Refer to your motherboard manual for instructions on loading AHCI drivers.
According to Superuser.com, enabling AHCI mode can optimize speed and performance of SSDs (https://superuser.com/questions/466254/should-ahci-be-enabled-for-an-ssd). Once enabled in BIOS, the operating system can take full advantage of the SSD’s capabilities.
Check Disk Partition Style
SSDs typically work best formatted with a GPT (GUID Partition Table) partition style rather than the older MBR (Master Boot Record) style. MBR only supports partitions up to 2TB in size, while GPT has no such limitation and is newer and more reliable. If your SSD was previously used in a different system, it may be formatted with MBR instead of GPT.
You can check the partition style of your SSD by going to Disk Management in Windows. Right click the Start menu and select Disk Management. Locate your SSD in the list of disks, right click it, and select Properties. In the Volumes tab you will see the Partition Style listed as either MBR or GPT.
If your SSD is formatted as MBR when it should be GPT, you will need to convert it. This can be done from Disk Management or the command prompt, but will delete all data on the drive. Be sure to backup anything important first. Microsoft provides instructions for converting an MBR disk to GPT here. PCWorld also has a good guide for converting without losing data here.
Update BIOS
A BIOS update may be needed for proper SSD compatibility. Older BIOS versions may not fully support SSDs or enable key features like AHCI mode. According to Quora, “Yes, you can update the BIOS from an SSD. Many motherboard manufacturers provide BIOS update files that can be downloaded and installed from an SSD” (source). Updating to the latest BIOS version can improve SSD performance and compatibility. On HP laptops, for example, a BIOS update is recommended before installing an SSD to ensure full support (source). Be sure to check your manufacturer’s website for the appropriate BIOS update file and installation instructions.
Replace Cables
If the SSD is not showing up in File Explorer, the issue may be a loose or faulty SATA data cable connection between the SSD and motherboard.
SATA cables can become damaged over time from repeated insertion and removal, bending, crimping, or general wear and tear. This can result in a loose connection or even broken/disconnected wires inside the cable.
Try replacing the existing SATA data cable with a brand new cable, preferably a high-quality one designed for SSDs. Make sure both ends are firmly inserted into the SSD SATA port and a SATA port on the motherboard. Listen for a click when fully inserted.
If the SSD appears after replacing the SATA cable, then the original cable was likely faulty. While rare, SATA ports on the SSD or motherboard could also have broken/damaged connectors. If issue persists with a new cable, further troubleshooting may be required.
For stubborn SATA connector damage, some advanced users have had success splicing a new SATA plug onto the SSD PCB by soldering replacement wires. However this requires electronics skills and tools. In severe cases, SSD PCB replacement may be necessary if the SATA port is totally unusable.
Check for Viruses
Viruses, malware, and other malicious software can sometimes prevent your SSD from being detected or accessed properly in Windows. If a virus has infected the boot sector or system files on the SSD, it may block Windows from reading the drive correctly.
To check for viruses, first run a full antivirus scan on your computer using a quality antivirus program like Malwarebytes or Windows Defender. Make sure to do a full system scan, not just a quick scan, to thoroughly check all files and sectors on your SSD and hard drives.
Pay attention to any detections related to boot viruses, rootkits, or other system-level malware. Removing this type of malware can allow Windows to regain proper access to the SSD. Reboot after cleaning any infections to see if Windows now detects the SSD.
For extra assurance, you can also boot to a clean OS environment like a Linux live USB, then run additional antivirus scans on the SSD from there. This helps ensure no malware is interfering as the scans run.
If infections are found and removed but the issue persists, you may need more advanced virus removal steps like completely wiping the SSD or reinstalling Windows afterward.
Clean Install the Operating System
If after trying all other troubleshooting methods your SSD drive is still not being detected in Windows, a clean install of the operating system may be necessary as a last resort. This will completely reformat the drive and install a fresh copy of Windows.
Before reinstalling Windows completely, be sure to back up any data you want to keep to an external drive or cloud storage. A clean OS install will wipe the SSD.
To do a clean install, first boot your computer from the Windows installation media. This can be a DVD, USB flash drive, or other external media containing the Windows installer. In the installer, completely format and delete all existing partitions on the SSD until it is shown as “unallocated space.” Then proceed with installing Windows on the blank SSD.
With the SSD formatted and Windows freshly installed, shutdown and reconnect the SSD. It should now be detected correctly in File Explorer. A clean OS install erases any residual software issues and ensures Windows is set up properly on the bare SSD.
Just be prepared that this will remove all your existing data and programs. Be sure to backup what you need before proceeding. Reinstalling Windows completely is often the surest way to get a stubborn SSD recognized if all else fails.
