Having issues deleting photos from your SD card can be very frustrating. There are a few common reasons why you may be unable to delete photos from your SD card:
The SD Card is Write Protected
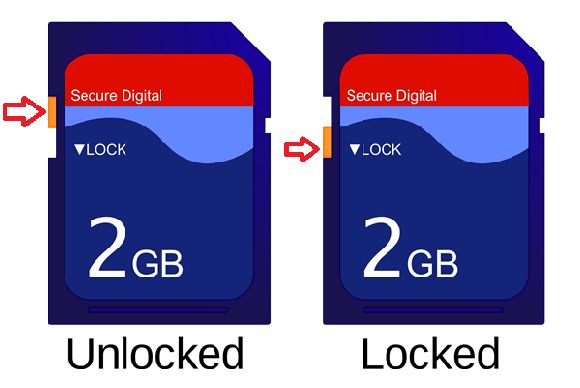
Many SD cards have a small switch on the side that toggles between locked and unlocked. When the switch is in the locked position, the SD card is write protected, meaning nothing can be deleted from it. To fix this, simply slide the switch on the side of the SD card to the unlocked position. Once unlocked, you should be able to delete photos as normal.
The Trash Folder is Full
When you delete photos on your SD card, they are not immediately erased. Instead, they get moved to a hidden trash folder. If this trash folder becomes full, you will no longer be able to delete additional photos until the folder is cleared out.
To fix this, you’ll need to permanently delete the contents of the trash folder. On Windows, you can do this by putting the SD card in your computer, right-clicking it, selecting “Properties”, then clicking “Disk Cleanup”. This will clear out the trash folder and free up space.
The SD Card is Corrupted
Unfortunately, SD cards can become corrupted over time, especially if not properly ejected from devices. A corrupted card may prevent you from deleting photos normally. Telltale signs of a corrupted card include error messages when attempting to access photos, inability to copy files to/from the card, and more.
To fix a corrupted SD card, you will likely need to reformat it. This will wipe all data from the card, allowing you to use it again. To reformat, put the card in your computer, right-click it, and choose “Format”. Be sure to back up any important photos before reformatting.
The SD Card has a Virus
Although rare, SD cards can become infected with viruses, just like regular computer hard drives. A virus on an SD card may lock or encrypt photos, preventing you from deleting them. Other strange symptoms like significant file size increases can also indicate a virus.
To remove a virus from an SD card, you will need to scan it with antivirus software like Windows Defender or Malwarebytes while inserted into your computer. The antivirus should detect and remove any infections, allowing you to delete photos again.
The Photos are Protected
Many cameras and phones allow you to “protect” photos from accidental deletion. Protected photos cannot be erased from an SD card until protection is disabled.
To remove protection, view your protected photos on the camera or device and disable protection for each photo individually. Once unprotected, the photos can be deleted as usual.
There is a File System Error
The file system manages how data including photos are stored on an SD card. If this system becomes corrupted, it can prevent deleting photos properly. Symptoms include inability to access certain photos or folders.
To fix file system errors, you will need to reformat the SD card. As mentioned above, this will wipe all data, so be sure to back up first. Reformatting rebuilds the file system, resolving the errors.
The SD Card Slot is Damaged
If your SD card slot or reader has become physically damaged due to drops, moisture, etc, it can sometimes cause issues deleting photos. This is because the SD card may not be making proper contact with the damaged slot.
Carefully inspect your SD card reader and slot for any signs of damage. If damage is found, you may need to replace the reader or slot in order to reliably use SD cards again.
You Lack Permissions
On some devices like phones, you may need proper user permissions to delete photos from the SD card. If your user account lacks these permissions, you will be unable to delete photos.
Check the app or camera settings for options related to SD card permissions. Grant your user account full permission to delete files from the external SD storage. This should resolve the permissions issue.
The Storage is Full
Trying to delete photos when your SD card is completely full can result in errors. This is because there is literally no free space left for the deleted photos to be moved to.
First, transfer photos you want to keep off the SD card to free up space. Once there is available space, you should be able to delete photos again. Avoid filling up your SD card completely in the future.
Conclusion
If you are unable to delete photos from your SD card, one of these common causes is likely the culprit. Start by checking for write protection or a full trash folder, then work your way through the other issues. Correcting the underlying problem will allow you to delete photos again.
Back up important photos regularly, avoid fully filling up your SD card, check for physical damage, and properly eject the card each time to help prevent deletion issues going forward. With a little diligence, you can keep your SD card working smoothly for photos.
Here is an example troubleshooting table for common deletion issues:
| Problem | Cause | Solution |
|---|---|---|
| Unable to access or view photos | Corrupted SD card | Reformat SD card |
| Error message when deleting | SD card is write protected | Disable write protection |
| Files increasing in size | Virus infection | Scan for viruses and delete infected files |
| Some photos cannot be deleted | Photos are protected | Remove protection on photos |
| Unable to delete new photos | Trash folder is full | Empty trash folder |
In summary, SD card issues that prevent photo deletion typically stem from physical damage, corruption, viruses, or simple settings changes like write protection. Backing up data regularly, safely ejecting the card, and keeping it free from viruses can help maximize longevity.
With a combination of troubleshooting, using antivirus tools, and reformatting as a last resort, you should be able to resolve most SD card photo deletion problems. Just be sure to exhaust other options before reformatting, as that will wipe the SD card completely. With the right steps, your SD card and photos can continue functioning smoothly.
Some key points to remember include:
- Check for physical write protection switch on SD card
- Watch for full trash folder preventing deletions
- Scan card for viruses if strange activity occurs
- Reformat only if other options fail
- Back up important photos frequently
- Grant user account permissions to modify SD card
- Carefully insert and eject SD card each use
- Avoid overfilling storage capacity
Following these tips will put you well on your way to avoiding and resolving issues with deleting photos from your SD card.
Additional Troubleshooting Steps
If you still cannot delete photos from your SD card after trying the steps above, here are some additional troubleshooting things to try:
- Try deleting photos using a different device like a computer or phone
- Check if your device needs a software or firmware update
- Remove and reinsert the SD card to get a better connection
- Use a different SD card reader if available
- Clean the SD card’s metal contacts gently with a rubbing alcohol wipe
- Contact SanDisk or your SD card manufacturer for further support
Getting help from the SD card manufacturer, especially if under warranty, is a good last resort if all else fails. They may be able to provide specialized diagnostic tools and repairs.
When to Replace an SD Card
If you’ve tried every trick and troubleshooting step without success, your SD card may simply be at the end of its lifespan. SD cards gradually wear out from repeated use and last 3-5 years on average. If your card is very old, replacement may be the most cost-effective option vs. continued troubleshooting.
Signs it may be time to replace your SD card include:
- Frequent error messages and performance issues
- Inability to delete photos after troubleshooting
- Corruption that reappears immediately after formatting
- Visible damage to the card’s shell or metal contacts
- SD card is 5+ years old
When purchasing a replacement, look for a name brand SD card from vendors like SanDisk, Samsung, or Kingston. Get a Class 10 card with U3 and V30 ratings for best performance. An SD card up to 512GB will suit most needs. Follow proper care and handling practices to maximize the new card’s lifespan.
Preventing Photo Deletion Issues
Following best practices for using and maintaining your SD card can help prevent headaches with photo deletion down the road:
- Avoid removing the card during photo transfers – Wait for the process to fully complete.
- Copy photos to a computer or cloud storage – Don’t store photos exclusively on the SD card.
- Know when to replace old SD cards – Cards wear out after 3-5 years.
- Check the physical lock switch – Slide it to the unlocked position before use.
- Don’t overfill the card – Leave 10-20% free space.
In addition, properly ejecting the SD card from cameras and computers before removal can prevent file corruption. Allowing adequate time for the device to fully complete writing data before ejecting is key.
Testing a new SD card with your device before an important photo shoot is also wise. This can identify any defects early while still under warranty. Taking a few simple precautions goes a long way toward avoiding later photo deletion headaches.
Recovering Deleted Photos from an SD Card
If you’ve deleted important photos from your SD card, don’t panic! There are recovery programs that may be able to restore them if the storage hasn’t been overwritten.
Here are some top options for deleted photo recovery software:
- Recuva – Free Windows utility with deep scan features. Can recover JPEGs, RAW files, videos, and more.
- Stellar Photo Recovery – Advanced paid tool finding photos based on format signatures rather than file extensions.
- EaseUS – User-friendly paid recovery software with positive reviews. Works on Windows and Mac.
- Disk Drill – Feature-packed paid software with free trial option. Scans quickly. Recovers 500MB free.
When using photo recovery software, it’s important not to save the recovered files back to the SD card, or they may be overwritten. Instead, save them to a computer hard drive or separate external media.
For best results, stop using the SD card immediately after accidental deletion. The sooner recovery is attempted, the higher the chances of retrieving photos before they are overwritten.
Tips for Using Photo Recovery Software
- Stop using the SD card right after deletion occurs
- Recover files to a separate hard drive, not back to the SD card
- Scan using the “Deep Scan” or similar option for best results
- Look for software with SD card-optimized recovery algorithms
- Sort recovered files by type to easily identify photos
With the right software and careful usage after deletion, you stand an excellent chance of getting photos back intact. Just don’t continue shooting photos or transferring files after the deletion, as this can overwrite your deleted pictures for good.
Preventing Future Deletion Issues
To avoid dealing with accidental photo deletion again in the future, here are some tips:
- Enable “Protected” status for important photos
- Back up photos regularly to a computer and cloud storage
- Add redundancy by saving photos to two SD cards if possible
- Delete photos intentionally after each shoot, don’t just format
- Turn off automatic photo delete features in-camera if present
You can also set cameras to not format SD cards by default. And never format or delete photos from the card using your computer, as this bypasses protected status.
Exercising caution when deleting and formatting along with redundant backups are your best defenses. An SD card is just one fallible component in a photo storage workflow.
Final Thoughts
Trouble deleting photos from an SD card can certainly be frustrating. But in most cases, it can be resolved by methodically checking for issues like:
- Write protection toggling
- Full trash folders
- Corruption
- Viruses
- Protected status
Correcting the underlying problem will typically get deletion working again. Reformatting or replacing older SD cards may be necessary as a last resort.
To avoid deletion issues altogether, handle your SD card with care, don’t overfill it, eject it properly each time, and maintain backups. With robust photo management habits, you can minimize the chances of finding yourself in deletion troubleshooting scenarios.
