It can be frustrating when a disk is showing up in Disk Management but not File Explorer on Windows. The disk may have the expected capacity, but for some reason the full space is not accessible in File Explorer.
There are a few key differences between Disk Management and File Explorer:
- Disk Management shows all disks connected to the system, including their full raw capacity and whether they have partitions and volumes.
- File Explorer only shows volumes that have drive letters assigned. It does not show the full raw disk capacity.
So if a disk shows up in Disk Management but not File Explorer, it usually means the disk is recognized by Windows but does not have a drive letter or accessible volume associated with it. This guide will go through the steps to make the disk space accessible in File Explorer.
Check Drive Letter
Windows uses drive letters like C: and D: to assign paths to volumes and partitions. Drive letters allow you to easily identify and access the various drives on your system. Each partition and volume, including internal hard drives, external storage devices, CD/DVD drives, and network shares, is assigned a drive letter (Source).
When a new disk is connected to your computer, Windows will automatically assign the next available drive letter. However, if the drive is not showing up in File Explorer, it may not have been assigned a drive letter. You can check this in Disk Management.
Disk Management is a built-in Windows utility that allows you to view all the connected disks and storage volumes on your PC. Here you can see if a drive letter has been assigned to the disk. If there is no drive letter, that would explain why the disk is not visible in File Explorer (Source).
Initialize the Disk
Disk initialization is the process of preparing a new disk for use by formatting and structuring it. When a disk shows up in Disk Management but not File Explorer, it usually means the disk is not initialized. Initializing a disk erases any existing data and partitions on the disk.
To initialize a disk in Windows 10 or 11:
- Open Disk Management (press Windows key + R and type “diskmgmt.msc”).
- Right-click the disk that says “Not Initialized” and click “Initialize Disk”.
- In the “Initialize Disk” window, select either MBR (Master Boot Record) or GPT (GUID Partition Table) partitioning style based on your needs.
- Click “OK” to begin initializing the disk.
MBR partitioning is compatible with older operating systems while GPT supports larger partition sizes. Initializing with MBR is quick but can result in data loss if the disk is over 2TB. GPT takes longer but is more reliable for modern systems.[1]
After initializing the disk, it will say “Unallocated” in Disk Management. You can then create a new volume on the disk so it shows up in File Explorer.
Create a Volume
If the disk shows up in Disk Management but not File Explorer, it likely does not have a drive letter assigned. To assign a drive letter, you need to create a volume on the disk.
In Disk Management, right-click the unallocated space on the disk and select “New Simple Volume”. This will launch the New Simple Volume Wizard.
Follow the steps in the wizard to create a new volume on the disk. Make sure to assign a drive letter in the wizard so the volume will show up with a drive letter in File Explorer.
As an example, this Creodias tutorial shows the steps to create and assign a drive letter to a volume in Disk Management.
Check Volume Status
The volume status indicates whether the volume is functioning properly or experiencing issues. There are four main volume statuses in Windows:
- Healthy – The volume is working normally and accessible in File Explorer. This is the status you want to see.
- Failed – There is a serious issue with the volume that makes it inaccessible. This could be due to file system corruption, disk errors, or hardware problems. You may need to initialize, format, or replace the disk to fix a failed status.
- Missing – Windows recognizes the disk but cannot access the volume. This usually happens when a disk containing the volume is disconnected or unmounted. Reconnecting the disk should restore access.
- Unknown – Windows cannot determine the status of the volume. This typically occurs when there are communication issues between the operating system and the disk hardware. Updating disk drivers may resolve an unknown status.
You can check a volume’s status in Disk Management. A healthy volume will show up as “Healthy” with a blue icon. Failed, missing, or unknown statuses will be indicated with orange, red, or yellow icons respectively. If a disk volume does show up in Disk Management but not File Explorer, an unhealthy volume status is likely the cause.
Some steps to resolve a problematic volume status include using the Check Disk tool, enabling the volume if it is disabled, reconnecting disk hardware, and updating disk drivers. Diagnosing and repairing the underlying issue causing the unhealthy status will be necessary to restore full access to the volume in File Explorer again.
Enable the Volume
Sometimes a disk volume can become disabled in Windows and will not show up in File Explorer even though it appears in Disk Management. To enable the volume and make it accessible again:
1. Open Disk Management (press Windows Key + R and type “diskmgmt.msc”).
2. Right-click on the volume you want to enable and select “Change Drive Letter and Paths”.
3. Click “Add” and assign a new drive letter to the volume if one is not already assigned.
4. Click “OK” to save the changes.
The volume should now have a drive letter assigned to it. You may need to restart File Explorer for the drive to show up. Additionally, check that the volume is not offline by right-clicking on it in Disk Management and making sure “Online” is selected.
Enabling the disk volume and assigning a drive letter will make the disk accessible through File Explorer again (source). This should resolve the issue if the volume is disabled but still appears in Disk Management.
Fix File System Errors with CHKDSK
CHKDSK is a command-line tool built into Windows that scans the file system and fixes logical file system errors. It verifies the integrity of file, folder, and drive structures and repairs issues to restore proper functionality.
To run CHKDSK and check for errors, open an elevated Command Prompt window and type “chkdsk C: /f” where C: is the drive letter you want to scan. The /f parameter tells CHKDSK to fix any errors it finds.
CHKDSK will scan the file system and display any issues it detects. It can fix a variety of problems like cross-linked files, bad sectors, directory errors, and invalid file record segments. After the scan completes, CHKDSK will display a report summarizing errors found and repaired.
For more comprehensive scans, you can add additional parameters like /R to locate bad sectors and recover readable data, or /X to force the volume to dismount first before the scan. Running CHKDSK regularly can help identify and prevent file system corruption issues.
Update Disk Drivers
Disk drivers are software programs that allow Windows to communicate with the hard disk drive or SSD. Just like other hardware components, disk drivers can become outdated and cause issues. If Windows detects an external drive but it does not show up in File Explorer, the disk drivers may need to be updated.
To update disk drivers in Windows 10 or 11:
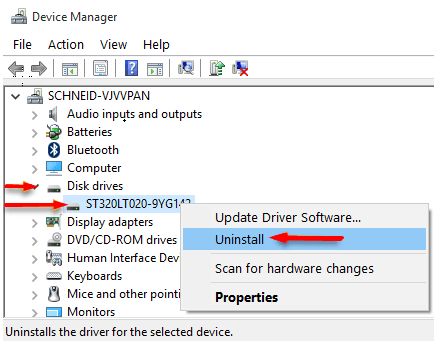
- Open the Device Manager by typing “device manager” in the Windows search box and selecting it.
- Expand the Disk drives category.
- Right-click the disk drive and select “Update driver.”
- Select “Search automatically for updated driver software.” Windows will search and install the latest driver for that hardware.
- Restart your computer and check if the external disk now shows up in File Explorer.
Updating the drivers ensures Windows has the proper software to communicate with disk hardware. Outdated drivers commonly prevent external drives from being detected properly. If the drive shows up in Device Manager but not File Explorer, updating the drivers often resolves this disconnect.
Replace Damaged Cables
If a hard drive is detected in Disk Management but not File Explorer, it could be caused by a damaged cable connecting the hard drive to the motherboard. Over time, cables can become frayed or connectors can become bent or loose, resulting in an intermittent connection.
To check for cable issues, first power down the computer and open the case. Visually inspect the data and power cables connected to the hard drive to see if there are any obvious signs of damage like exposed wires or cracked connectors. Check that the connections at both ends are snug and properly seated. Try disconnecting and reconnecting each cable to ensure a tight fit.
If wiggling or reseating the cables causes the drive to appear or disappear from Disk Management, that points to a faulty cable. Replacing the damaged SATA or power cable with a new one should resolve the issue. High quality, well shielded cables reduce the likelihood of future connection problems.
Additionally, inspect the physical SATA ports on the hard drive and motherboard for bent pins or other damage. If the ports are damaged, the drive may not make proper contact. In that case, the drive, motherboard or both components may need replacement.
Properly functioning and undamaged cables are essential for maintaining a consistent connection between a hard drive and the rest of the computer. Periodically inspecting and replacing aged cables can prevent headaches caused by flaky disk detection issues.
Conclusion
In summary, there are several potential reasons why a disk may show up in Disk Management but not File Explorer in Windows. Some common solutions include checking the drive letter assignment, initializing the disk, creating a new volume, enabling the volume if it’s disabled, and fixing file system errors or updating disk drivers.
If the above troubleshooting steps do not resolve the issue, it may be caused by physical damage to cables or the disk hardware itself. Replacing damaged SATA cables or USB connections can often resolve missing disk drive issues.
As a final tip, always remember to back up your data regularly to prevent permanent data loss. Disk issues can appear out of nowhere, so having backups ensures you can recover your files if needed. Persistence and methodically trying different solutions is key for making unrecognized disks appear again in File Explorer.