Check Physical Connections
One of the most common reasons an M.2 drive may not be detected is because of a poor physical connection. Here are some things to check:
Make sure the M.2 drive is fully inserted into the M.2 slot on your motherboard. There will often be a retaining screw or latch to lock the drive in place – ensure this is properly tightened down. An improper insertion can lead to a loose connection between the drive and slot contacts.
Inspect the contacts on both the M.2 drive and the slot itself. Make sure no debris, dust, or other particles are present, and that the contacts are clean. You can use a can of compressed air to clean out the slot if needed. Proper electrical contact is required for the drive to be detected.
Check that the drive is inserted in the correct orientation – notch side first in most configurations. Refer to your motherboard manual for details on M.2 slot keying and installation. An improper insertion angle can prevent proper drive detection.
If your motherboard has multiple M.2 slots, try inserting the drive in a different slot if one is available. This can determine if the issue is with the specific M.2 slot.
Finally, reseat the drive by removing and reinserting it into the slot. Press down firmly when reinserting to guarantee a tight fit in the slot. This simple step can fix transient connection problems.
Verify M.2 is Compatible
Before we look at other potential issues, it’s important to first verify the M.2 drive itself is fully compatible with your system. There are a few key factors to check:
Confirm M.2 Type – M.2 drives come in SATA and NVMe formats. Make sure your motherboard socket supports the protocol your drive is using. Refer to your motherboard manual for details.
Check Socket Compatibility – There are several different M.2 socket keys used, with the most common being M and M+B. Your M.2 drive and motherboard socket must match. For example, an M key drive will not work in a B key slot.
Ensure BIOS Settings Support M.2 – Most motherboards with M.2 slots require you to enable the slot in BIOS for the drive to be detected. Check your BIOS settings and make sure the slot is enabled. You may need to adjust related settings like SATA mode as well. Refer to your motherboard manual if unsure.
Checking these compatibility factors first will help determine if the M.2 drive itself is the reason it’s not being detected in Windows. If still not showing up, you can move on to troubleshooting other potential issues.
Initialize Disk in Disk Management
If the M.2 drive is showing up in Disk Management but is unallocated, you will need to initialize it before Windows can access it. Here are the steps:
1. Open Disk Management by right-clicking on the Windows button and selecting “Disk Management”.
2. Find the unallocated disk, which should correspond to the M.2 drive. Right-click on it and select “Initialize Disk”.
3. In the Initialize Disk dialog box, select either MBR or GPT partitioning. MBR is compatible with older operating systems while GPT supports larger partition sizes.1
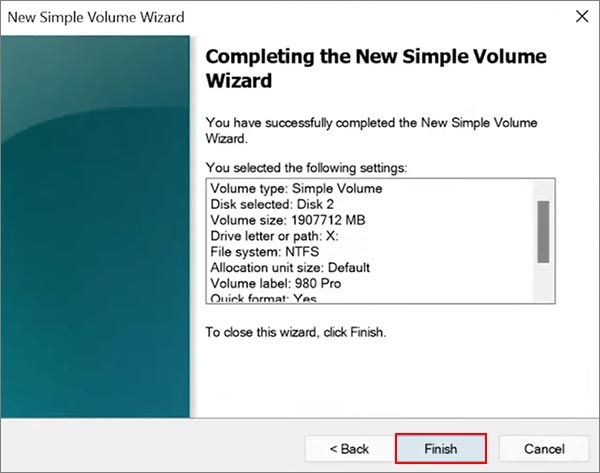
4. Right-click the volume again and select “New Simple Volume”. Go through the wizard, assigning a drive letter and formatting the volume.
Once complete, the M.2 drive should show up in File Explorer with the new drive letter. Initializing the disk allocates space on the drive so Windows can access and store data on it.
Update Storage Drivers
One potential reason for an M.2 drive not showing up in Windows 11 is outdated or missing storage drivers. Updating the storage drivers can often resolve this issue.
To update the M.2 drive’s drivers, first open the Device Manager in Windows by searching for “Device Manager” in the Start menu and selecting the option when it appears.
In Device Manager, expand the “Disk drives” category. Right-click on the M.2 drive listed here and select “Update driver”. This will launch the update driver wizard.
Select “Search automatically for updated driver software” to allow Windows to search online and install the latest driver for your M.2 drive.
If this doesn’t find a new driver, select “Browse my computer for driver software” and navigate to the manufacturer’s website to download the latest driver manually. Make sure to get the correct driver for your specific M.2 drive model.
Install the downloaded driver and restart your PC. After updating the storage driver, check if your M.2 drive now appears in File Explorer in Windows 11.
Enable M.2 in BIOS
Sometimes the M.2 drive may be disabled in the BIOS by default. To enable it:
1. Restart your computer and press the key to access the BIOS settings on boot, which is often F2, F8, or Delete.
2. Once in the BIOS, locate the setting for M.2 drives. This may be under a menu like Advanced, Storage Configuration, NVMe Configuration, or NVMe RAID Configuration.
3. Find the M.2 drive you want to enable and make sure it is set to Enabled.
4. Save changes and exit the BIOS. The computer will reboot.
Enabling the M.2 drive in the BIOS will allow it to be detected by Windows. If it was previously disabled, this should make it show up after rebooting. Refer to your motherboard manual for exact steps if needed, as BIOS menus vary between manufacturers 1.
Run Hardware Troubleshooter
The Hardware and Devices troubleshooter can automatically detect and fix issues with hardware components like the M.2 drive. To use the troubleshooter:
- Search for “troubleshoot” on the Windows search bar and open Troubleshooting.
- Select “Hardware and Devices” from the list of troubleshooters.
- Follow the on-screen prompts, which will guide you through testing your hardware. The troubleshooter will try to automatically detect and resolve any issues with the M.2 drive.[1]
This built-in Windows tool can diagnose problems with the M.2 drive connectivity or drivers and attempt to fix them automatically.
Check for Drive Letter Conflict
A common reason an M.2 drive may not show up in Windows 11 is if there is a conflicting drive letter assignment. Here are the steps to check for and resolve a potential drive letter conflict:
First, open Disk Management in Windows. You can access this by right-clicking the Start menu and selecting “Disk Management”.
In Disk Management, check if your M.2 drive already has a drive letter assigned to it. If so, it’s possible this letter is conflicting with another disk drive in your system.
To resolve, right-click on the disk that is not showing up and select “Change Drive Letter and Paths”. You can then assign it a new, non-conflicting drive letter.
This should allow Windows to now detect the M.2 drive with its new letter assignment. Be sure to reboot your system after making this change.
If the M.2 still does not show up, continue troubleshooting with the other steps outlined here. But a drive letter conflict is one of the more common reasons an M.2 may not be detected.
Update Windows
One potential fix is to update your Windows operating system, as Microsoft may have released an update that addresses M.2 drive detection issues. To update Windows:
- Open Windows Update by going to Settings > Update & Security > Windows Update.
- Click “Check for updates.” Install any available updates.
- Restart your computer after the updates finish installing.
Updating to the latest Windows version ensures you have all the newest fixes and improvements, which may resolve problems with M.2 drives not being detected properly. According to EaseUS, Windows Updates have addressed M.2 issues in the past.
Try Alternate M.2 Slot
One potential solution is to try inserting the M.2 drive into an alternate M.2 slot on your motherboard, if available. Many motherboards have multiple M.2 connectors that support NVMe drives. Refer to your motherboard manual to locate all the M.2 slots and identify their capabilities.
Insert the M.2 drive into a different M.2 connector and see if it is detected in the BIOS or operating system. Some of the slots may share bandwidth with other ports, so refer to the manual to ensure you are using an optimal slot for the M.2 drive. Sometimes a slot may be defective or not enabled, so trying another open slot can help rule out a bad slot.
If the drive is detected in the alternate slot, it points to an issue with the original slot you were using. If it still does not show up, then the issue lies with the drive itself or a different component. Make sure to secure the drive properly and install the standoff screws before retrying detection.
Reset CMOS
Resetting the CMOS can help resolve M.2 detection issues by restoring the BIOS settings to default. Here are the steps to reset the CMOS on your motherboard:
Locate the CMOS reset jumper on your motherboard. It’s usually labeled “CLR_CMOS” and located near the battery. Refer to your motherboard manual for the exact location.
Power down your PC and unplug the power cable. Wait a few minutes for any residual power to dissipate. Use a jumper cap or metal screwdriver to short the CMOS pins for 5-10 seconds. This will reset the CMOS and BIOS settings.
Remove the jumper cap/screwdriver, plug the PC back in, and power it on. Press the BIOS access key (F2, Delete, etc.) to enter the BIOS. Navigate to “Optimized Defaults” and press Enter to reset the BIOS to factory settings. Save changes and exit.
This will reset the motherboard to a fresh state with default settings. Any custom BIOS settings that may have caused M.2 detection issues will be cleared. After resetting CMOS, check if the M.2 drive is now detected in BIOS and Disk Management.