It can be frustrating when your Maxtor external hard drive is not being recognized by your computer. There are a few common reasons why a Maxtor drive may not show up: connection issues, driver problems, drive letter conflicts, hardware or software malfunctions, and physical damage to the drive. In this guide, we will go through the troubleshooting steps to diagnose and fix a Maxtor external hard drive not being detected.
Checking Physical Connections
One of the most common reasons for a Maxtor hard drive not being recognized is because of loose cable connections. Make sure all the cables are properly seated and securely connected at both ends. This includes the power cable, USB cable for external drives, and SATA data cable for internal drives.
Try connecting the Maxtor drive to another USB port if it’s an external drive. Use the rear ports if possible, as they are often more reliable than front ports. Also try a different USB cable in case the current one is damaged. For internal drives, switch to another SATA port and cable on the motherboard.
According to this source, connection issues from a loose cable or port are a leading cause of drives not being detected. Reseating all connections firmly often resolves the issue.
Updating Drivers
One potential cause of a Maxtor hard drive not being detected is outdated drivers. Drivers act as the software interface between the hard drive and the operating system. Outdated drivers can prevent the system from properly recognizing the hard drive.
Try updating the motherboard drivers, especially for USB and SATA connections. Motherboard drivers allow proper communication between internal hard drives and the motherboard. An outdated USB or SATA driver could prevent the system from detecting the Maxtor drive. Go to the motherboard manufacturer’s website and download the latest chipset, USB, and SATA drivers. Install these updated drivers and restart the computer.
You should also try updating the drivers for the Maxtor hard drive itself. Go to Seagate’s website (they now own Maxtor) and see if there are any updated drivers available for your specific Maxtor drive model. Install these drivers and restart. With the latest motherboard and Maxtor drivers, Windows should now detect the drive properly.
According to this source, driver issues are a common cause of new hard drives not being detected. Updating the drivers can often resolve the problem and allow Windows to recognize the drive.
Checking Disk Management
Disk Management is a built-in Windows tool that allows you to manage partitions and drives connected to your computer. To open it, right-click the Start button and select “Disk Management”.
In Disk Management, look for your Maxtor hard drive in the list of disks. If you see the drive but it says “Unrecognized” or “Not Initialized”, you may need to initialize it. Right-click the disk and choose “Initialize Disk”. This will wipe all data but allow Windows to access it again.
If the disk shows as “Offline”, right-click it and select “Online”. Then you should be able to access it in File Explorer.
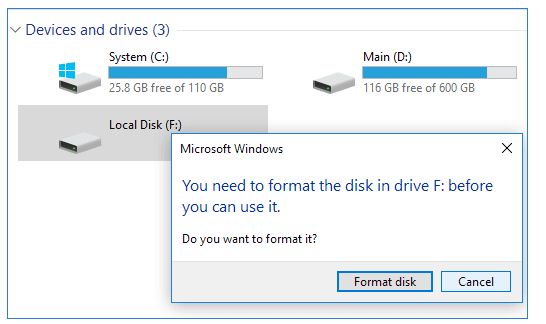
As a last resort, you can try formatting the drive by right-clicking it and choosing “Format”. This will also erase all data but may resolve issues accessing the drive.
For detailed steps, refer to this guide: [Solved] Hard Drive Not Showing up in Windows 10
Changing Drive Letter
One common reason a Maxtor hard drive may not be detected is because it does not have a drive letter assigned. Windows assigns letters (C, D, E, etc.) to all mounted drives, and relies on the drive letter to access the contents of the drive. If for some reason no drive letter was assigned, Windows will not be able to detect the Maxtor drive.
To fix this, you can manually assign a new unused drive letter in Disk Management. Here are the steps:
- Open Disk Management. You can access this by right-clicking “This PC” and selecting “Manage”.
- Locate the Maxtor hard drive in the list. It may show up as an “Unknown” drive with no letter assigned.
- Right-click on the drive and choose “Change Drive Letter and Paths”.
- Click “Add” and assign an unused letter like M, Z, etc.
- Click OK to save the changes.
This will assign a new drive letter to the Maxtor hard drive so that Windows can access it properly. Check if the drive appears now under “This PC”. If the drive contains data already, you may need to restart the Virtual Disk service for the changes to fully take effect.
Testing on Another Computer
One way to troubleshoot whether the issue is with the Maxtor hard drive itself or a problem with your computer is to connect the drive to another computer and see if it is recognized. This helps rule out whether the drive is faulty or if there is something wrong with the original computer that is preventing it from detecting the drive.
To test on another computer:
- Connect the Maxtor drive to another computer using the same cables and connections.
- Power on the drive and allow the computer to detect it.
- Check if the drive appears in File Explorer/Finder and Disk Management on the other computer.
If the Maxtor drive is detected on another computer, then the issue likely lies with the original computer’s drivers, connections, or USB ports. You can then troubleshoot further on that original computer.
However, if the drive is still not recognized on other computers, then the drive itself is likely faulty and may need professional data recovery or replacement.
Using Data Recovery Software
If your Maxtor hard drive is not being detected due to physical damage or corruption, data recovery software may be able to find and mount the drive to recover data.
Utilities like EaseUS Data Recovery can scan connected and undetected drives to find lost partitions and allow you to copy data from them. This can help recover important files if the drive is damaged or has corrupted sectors.
Data recovery software works by looking at the raw sectors of the disk rather than relying on the operating system to mount it. This allows it to access data even if the drive’s file system is corrupted. Features like disk imaging can clone failing drives before attempting data recovery as well.
Before using data recovery software, it’s a good idea to first try the drive on another computer and check for physical damage. But if the data is inaccessible through normal means, utilities like EaseUS provide a last resort for recovering data from the drive before it fails completely.
Checking Enclosure and Cables
If the hard drive is in an external enclosure, the enclosure itself or the connecting cables could be causing the issue. First, check that the hard drive is properly secured in the enclosure and that all cables are firmly plugged in to the enclosure and computer [1]. Try using a different USB port and cable to connect the enclosure to the computer. If the drive is still not detected, remove the hard drive from the enclosure and connect it directly to the computer’s motherboard via SATA connection (if possible) to isolate the enclosure as a potential cause. If the bare drive functions properly when directly connected, the external enclosure itself may be defective and need to be replaced before the drive can be used as external storage again.
Replacement USB bridges or SATA adapters for external enclosures are available [2]. However, if the hard drive itself is not being detected even when directly connected, then the enclosure and cabling is likely not the cause. At that point, the drive itself may be damaged or non-functional.
[1] https://www.minitool.com/data-recovery/external-hard-drive-not-showing-up-recognized.html
[2] https://www.stellarinfo.co.in/blog/how-to-fix-external-hard-disk-drive-not-recognized/
Examining for Physical Damage
Look for any signs of physical damage to your hard drive, as this can indicate hardware failure. Listen closely to your hard drive when it is powered on – loud clicking or grinding noises may signify the read/write heads are stuck or damaged (https://www.avg.com/en/signal/hard-drive-failure-signs-and-test). This will often lead to failure soon. Strange noises like buzzing or humming could also be a clue.
Closely monitor the temperature of your hard drive as well. An overheating hard drive is often a precursor to failure, as excessive heat can degrade components over time (https://drivesaversdatarecovery.com/hard-drive-failure/). Use a tool like SpeedFan to track the drive temperature. If it is consistently above 50°C, the drive may be prone to failure.
Also check for any warped circuit boards or connectors on the hard drive itself. Physical damage like cracked casing or bent SATA connectors can prevent proper function. Opening up the hard drive enclosure may reveal issues not visible externally. Any signs of physical damage likely mean a replacement hard drive is needed.
When to Seek Professional Help
At a certain point, DIY troubleshooting methods may be exhausted without solving the hard drive issue. Complex cases like physical damage to the disk, corrupted firmware, or catastrophic mechanical failure require advanced tools and expertise that a professional data recovery service can provide. According to Secure Data Recovery, “Data recovery pros have access to specialized equipment like clean rooms and advanced forensic tools to safely extract data from failed drives.” If important personal or business data is stored on the unrecognized Maxtor drive, the cost of professional recovery may be worth it to retrieve irreplaceable files and information.
Signs that it’s time to seek professional help include:
- The drive is making unusual clicking or beeping noises indicating physical damage.
- You’ve exhausted all DIY software and hardware troubleshooting steps.
- The drive does not show up at all in BIOS or disk management.
- There are noticeable issues like burnt circuit boards or cords.
- The data on the drive is critical and cannot be recreated.
Reputable data recovery services like Proven Data offer free evaluations to determine if a drive can be recovered before any costs are incurred. While professional recovery can be expensive, it may restore access to valuable and irreplaceable data.
