Check the Format of the SD Card
The first step is to check what file format your SD card is using. The two most common formats for SD cards are FAT32 and exFAT.
FAT32 has a maximum file size limit of 4GB and a maximum partition size of 8TB [1]. exFAT, on the other hand, supports much larger file sizes up to 16EB and partition sizes up to 128PB [2].
If your SD card is formatted as FAT32, that 4GB file size limit could be causing your Mac to show an incorrect available size if you have large files saved on the card. Reformatting the card as exFAT will eliminate the FAT32 limits and may resolve the size issue.
To check the format, open Disk Utility on your Mac, select the SD card, and look at the ‘Format’ listed. If needed, reformat the card as exFAT for expanded capacity.
Verify the Advertised Size
One common reason for an SD card showing the wrong size is that it has been mislabeled with an incorrect capacity. Manufacturers sometimes make mistakes when printing the advertised capacity on the SD card and its packaging. The actual usable capacity may be smaller than what is printed.
To verify the true capacity, check the manufacturer’s website or product documentation for the exact specs of that specific SD card model. Compare the advertised size on the physical card with the size listed on the manufacturer’s website. This will confirm if the capacity printed on the card matches the official specifications.
There are also free tools like h2testw that can scan your SD card and detect if the usable space is less than advertised. The utility will find any discrepancies between the printed and actual capacity.
If the tools reveal your micro SD is not as large as labeled, you may have accidentally purchased a counterfeit or improperly marketed card. Consider exchanging it for an officially branded SD card that offers the expected capacity.
Update Mac Drivers
Outdated USB or SD card drivers on your Mac can prevent an SD card from being detected properly. Apple releases periodic updates to macOS that include driver updates. To check for pending updates:
On macOS Ventura, go to Apple Menu > System Settings > General > Software Update. If any updates are available, click Update Now to install them. This can resolve SD card issues after a macOS update.
For older versions of macOS, go to System Preferences > Software Update. Again, install any available updates, focusing on USB and storage driver updates. Keep your Mac’s operating system up-to-date to have the latest drivers.
If no updates are shown, your Mac is current. However, outdated drivers could still cause SD card problems. You may need to contact Apple Support for further troubleshooting.
Eject and Reinsert the Card
One simple step to try is to eject the SD card properly and then reinsert it. Instead of just pulling out the card, you should always eject it first by either dragging it to the Trash icon on your desktop, or right-clicking it and selecting “Eject”. This ensures any writes are flushed and the card is unmounted cleanly.
After ejecting, remove the card fully from the computer or card reader, wait a few seconds, and then reinsert it. Allow the computer time to remount the card and read the capacity again. In some cases, this simple process is enough to show the correct advertised size.
Remounting ensures the file system is reread and may properly report the full capacity, especially if there was an issue with the original mount where it misread or didn’t fully read the card. Just remember to always eject properly first before removing an SD card.
[Cite Apple.stackexchange.com thread: https://apple.stackexchange.com/questions/62478/re-mount-ejected-sd-card-without-reinserting]
Try a Different Mac
One possible reason your SD card is showing the wrong available storage space is an issue with the specific macOS computer you are using. The SD card may function properly when used with a different Mac computer.
To rule out a problem with your particular Mac, try inserting the SD card into another Mac if you have access to one. Make sure the other Mac is running a similar version of macOS. If the storage space shows correctly on the second Mac, then you know the issue lies with your original computer.
Some steps to take on the second Mac:
- Insert the SD card and view it in Finder to check if the available space is now showing accurately.
- Run Disk Utility to verify the SD card and check its details.
- Copy some files to the SD card and confirm they take up the expected space.
If the SD card behaves as expected on another Mac, then the problem lies with your original computer’s operating system, drivers, or SD card reader. You will need to troubleshoot issues on that specific Mac device.
Check for Fake Cards
Counterfeit micro SD cards are unfortunately common, especially when purchasing from third-party sellers online. These fake cards often misreport their size, failing to store as much data as advertised. To identify if your card is counterfeit, specialized software can help.
Options like f3read and f3write can thoroughly test SD cards by writing test data across the entire capacity and verifying it. This reveals if the card falsely advertised its size. After installation via Homebrew, f3 tools provide a detailed report on the real capacity and any errors encountered. Fake cards usually fail this test or have much lower capacity than claimed.
Run Disk Utility
One of the first troubleshooting steps when an SD card shows the wrong available space on a Mac is to run Disk Utility. Disk Utility is an app included with macOS that allows you to verify and repair filesystem errors that may be causing the issue.
To run Disk Utility:
- Open Disk Utility (located in Applications > Utilities)
- Select your SD card drive in the sidebar
- Click “First Aid” and then click “Run”
This will check the SD card for errors and attempt to repair any issues it finds. Disk Utility can fix common problems like directory damage, permission issues, and invalid filenames that may be preventing the full capacity from being available.
If First Aid reports that it was unable to repair the disk, you may need to reformat the SD card after backing up any files you need. Go to Erase in Disk Utility to reformat and restore the card’s full factory capacity.
Running First Aid with Disk Utility should help resolve any filesystem errors that are causing available space issues on an SD card in macOS. This often resolves the discrepancy between the expected capacity and actual readable capacity. If Disk Utility is unable to repair the SD card, a deeper issue may be preventing access to the full space.
Reset NVRAM
Resetting the NVRAM (non-volatile random-access memory) can help resolve issues with SD card sizes not displaying properly on a Mac. The NVRAM stores information about system settings and other parameters. When you reset the NVRAM, it clears out these settings and caches, which can fix problems like incorrect SD card sizes.
To reset the NVRAM on a Mac, first shut down your computer. Then turn it back on and immediately press and hold Command + Option + P + R. Keep holding the keys down until you hear the startup chime a second time. This will clear the NVRAM and reset various system settings like the SD card cache.
After resetting NVRAM, eject and reinsert your SD card to see if it now shows the proper size. Resetting system settings like the cache can often resolve quirky issues like SD cards showing incorrect sizes on Macs. If it still doesn’t work, try some of the other troubleshooting tips like updating drivers, using disk utility, and contacting the manufacturer.
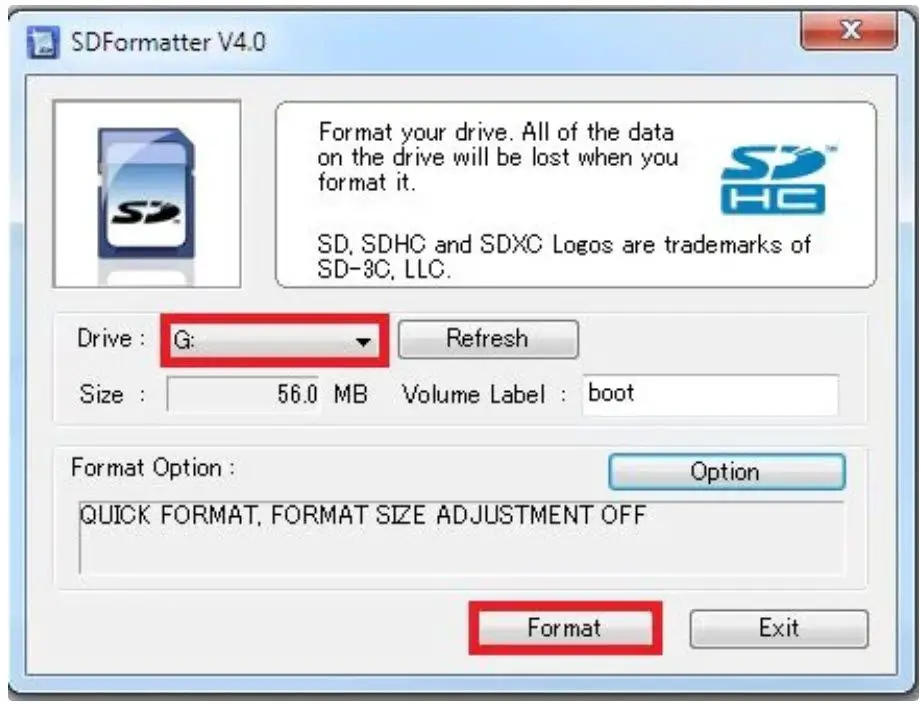
Try Third-Party Software
Sometimes the built-in disk utilities in macOS may not be able to fully erase, format, and analyze an SD card. In these cases, it can be helpful to try dedicated third-party utilities designed for SD card formatting and recovery.
One option is to use the official SD Card Formatter tool from the SD Association. This utility can perform a “full format” that does a complete overwrite of the card and tests the memory sectors for errors. It may be able to restore the card’s proper capacity if there are issues with the formatting or file table.
Another good SD card utility for Mac is SanDisk RescuePro Deluxe. In addition to deep formatting options, it can scan the card to recover lost photos and other data. The “Surface Scan” feature looks for bad sectors and attempts to repair them. Using these specialized third-party tools could potentially fix an SD card that is showing the wrong size.
Contact the Manufacturer
If you’ve tried the troubleshooting steps and fixes mentioned above and your micro SD card is still showing the wrong available size on your Mac, the issue could be caused by faulty hardware with the SD card itself. In this case, contacting the manufacturer about a replacement may be your best option.
Most name brand SD card manufacturers like SanDisk, Samsung, and Kingston provide at least a 1-year limited warranty on their cards. This means if your card has a hardware defect, you can get it replaced for free within the warranty period.
To start the warranty claim process, locate the serial number printed on the micro SD card and visit the manufacturer’s website. There should be information on how to file for a warranty replacement, often by filling out an online form. You may need to provide proof of purchase to verify the card is still under warranty.
If the manufacturer confirms your micro SD card is defective, they will generally ship you a brand new replacement card free of charge. This should resolve any issues of your card showing the incorrect available space on your Mac.
Warranty replacements can provide a simple fix if faulty hardware is the root cause of your micro SD card size issues. Just be sure to back up any important data first, as you’ll need to send back the original card.