Check Physical Connections
One of the most common reasons an SSD is not showing up in File Explorer is because it has become physically disconnected. Here are some things to check:
– Make sure the SSD is securely connected to the motherboard via the SATA cable. Wiggling cables can sometimes cause a loose connection.
– Check that both ends of the SATA cable are firmly plugged in. Unplug and reseat both the connection to the SSD and to the motherboard. Faulty cables are a leading cause of SSD connection issues.
– Try connecting the SSD to another SATA port on the motherboard. This will help determine if the issue is with the port or the cable/drive. See this Microsoft forum post for an example of a loose SATA cable causing detection issues.
Initialize the SSD
Most SSDs need to be initialized before they can be detected by Windows. Use Disk Management to initialize the disk.
To initialize the SSD in Windows 10 or 11, go to the search bar and type “Disk Management.” Open the Disk Management utility. Locate the new SSD, which may show as “Unallocated.” Right-click the SSD and select “Initialize Disk.” Select the partition style – MBR (Master Boot Record) or GPT (GUID Partition Table). Click “OK” to initialize the disk.
After initializing the SSD, it should show up as a new volume in File Explorer. If not, you may need to assign it a drive letter next. For more details, refer to this guide on initializing a new drive in Windows.
Assign a Drive Letter
One of the most common reasons an SSD may not show up in File Explorer is because it doesn’t have a drive letter assigned. Windows uses drive letters (like C: and D:) to identify different drives and storage devices. An unallocated SSD without a drive letter simply won’t appear in File Explorer even though it’s connected to your PC.
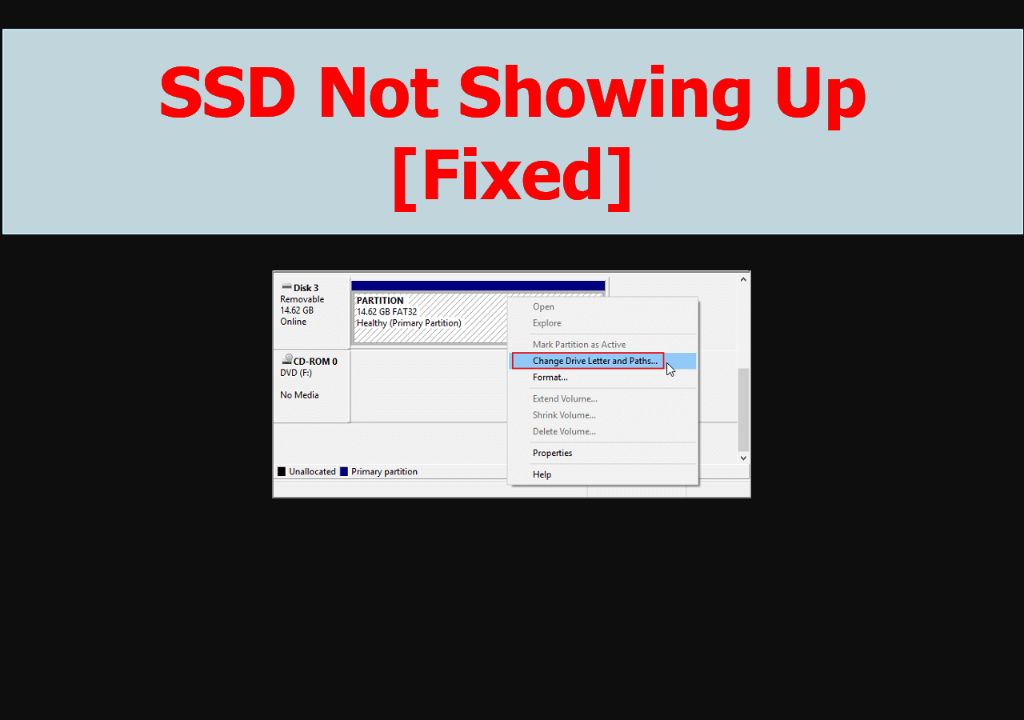
The solution is to use Disk Management to assign a drive letter. Disk Management is a built-in Windows utility that allows you to view and configure hard disks and SSDs. To open it, type “diskmgmt.msc” in the Windows search bar and select the Disk Management app.
In Disk Management, you should see your SSD listed. But instead of a drive letter, it will say “Unallocated.” Right-click on the unallocated SSD and choose “New Simple Volume.” This will launch the New Simple Volume Wizard.
Follow the prompts to assign a drive letter to the SSD. Make sure to select “Quick Format” when given the option to format the volume. Once complete, your SSD should now appear in File Explorer with the drive letter you assigned.
If your SSD still doesn’t show up, you may need to restart your computer or rescan for new disks in Disk Management. But in most cases, assigning a drive letter is all that’s needed for your SSD to be recognized.
Update Drivers
Outdated storage drivers can sometimes prevent an SSD from being detected properly in File Explorer. It’s important to keep your motherboard chipset drivers and SSD firmware up to date to avoid issues.
First, visit your motherboard manufacturer’s website and download the latest chipset drivers. Install these to update the SATA controller drivers and other critical components. Reboot after installing for the changes to take effect.
Next, go to your SSD manufacturer’s site and get the most recent firmware for your specific model. Follow their instructions to update the drive’s firmware. This keeps the SSD’s internal controller software current. Reboot after updating the firmware.
With updated motherboard and SSD drivers, Windows should now be able to properly detect the SSD. Check if it appears in File Explorer after the updates. If you still don’t see the drive, move on to the next troubleshooting steps.
Enable AHCI Mode
SSDs require Advanced Host Controller Interface (AHCI) mode to be enabled in the BIOS in order to function properly. Without AHCI mode enabled, the SSD may not be detected or may have performance issues.
By default, most computers have IDE or Legacy mode enabled in the BIOS for compatibility with older mechanical hard drives. However, this legacy mode does not fully support the advanced features of solid state drives.
Here are the steps to enable AHCI mode:
- Restart your computer and enter the BIOS setup utility, usually by pressing F2, F10 or Delete during startup.
- Navigate to the “Advanced” tab and locate the SATA or Onboard Devices configuration.
- Change the SATA mode from IDE/Legacy to AHCI.
- Save changes and exit BIOS.
After enabling AHCI mode, your SSD should be detected properly. You may need to reinstall your operating system using the AHCI drivers. Consult your motherboard manual for BIOS instructions specific to your model.
Troubleshoot USB Connections
If your SSD is connected via USB and not showing up, try troubleshooting the USB connection:
For external SSDs, try plugging into different USB ports on your computer. Switch between ports on the front and back of your PC. Also try using different USB cables and enclosures if possible. The cable or enclosure could be damaged and preventing the external SSD from being detected.
Plugging into USB 2.0 ports versus USB 3.0 can also make a difference. USB 3.0 offers faster transfer speeds but sometimes has compatibility issues. Try using a USB 2.0 port or adapter to see if that helps your external SSD show up.
If you have multiple external drives connected, try disconnecting some of them and only connect the SSD. Too many USB devices can cause power delivery issues. Also make sure your SSD has its own external power source if needed.
You may need to restart your PC after making any USB changes for the operating system to re-detect the external SSD. If the drive connects successfully, update its drivers and firmware to the latest available versions.
Check for Viruses
Malware or viruses can sometimes hide drives or make them inaccessible in File Explorer. If your SSD recently became undetected, it’s possible a virus or malware infection is the culprit.
Run a full system scan using Windows Defender to check for viruses and malware. You can also try scanning just the SSD itself by connecting it to another clean computer and running a virus scan directly on the drive. Use a robust and trusted antivirus program like Malwarebytes to scan for persistent infections.
If malware is found, take steps to fully remove it from your system. Reboot into safe mode and run multiple scans to eliminate any hidden viruses. You may need to format your SSD completely to wipe out stubborn infections that restrict access to the drive.
Once your system is clean, reconnect the SSD and see if it appears as normal in File Explorer again. Be very careful what you install and run on your computer in the future to avoid similar malware problems going forward. Maintaining a malware-free system is crucial for proper SSD functionality.
See this Microsoft forum thread for more on troubleshooting SSDs hidden by viruses: Viruses in my USB stick and external hard drive
Use Partition Software
Partition software tools like DiskPart, GParted, or EaseUS Partition Master can help detect drives that may not be showing up in Windows File Explorer. DiskPart is a command-line utility built into Windows that allows you to manage disks and volumes. You can use the “list disk” command in DiskPart to display all disks connected to your PC.
However, you need to be very careful when using DiskPart or other partitioning tools to make any changes to your disks and volumes. Any mistakes could result in data loss or corruption. It’s best to create backups before using these advanced tools. Only partition or format a disk if you are certain it does not contain any important data.
Format the SSD
If your SSD is brand new and has not been formatted before, you will need to format it first before it can be detected by Windows. According to Crucial, formatting an SSD involves the following steps:
1. Open the Control Panel in Windows, go to System and Security, click on Administrative Tools, and open Computer Management.
2. In Computer Management, select Disk Management on the left side. This will display all the connected disk drives.
3. Locate your SSD from the list and right-click on it. Select Format and choose your desired file system, such as NTFS or exFAT.
4. Give your SSD a name if desired, and make sure Quick Format is checked. Then click OK.
The formatting process may take a few minutes. Once completed, your SSD should now show up in File Explorer.
It’s important to backup any data on the SSD first before formatting, as formatting will erase all existing data. Once formatted, you can restore your backup to access your files again.
Replace Cables and Ports
Faulty SATA ports and cables are a common cause of SSDs not showing up. SATA cables can go bad over time due to wear and tear, even if they initially seem fine [1]. Replacing cables or enclosure ports that the SSD uses is an easy troubleshooting step.
Try connecting the SSD with a brand new SATA cable to eliminate the possibility of a damaged cable. Also try using different SATA ports on the motherboard or enclosure if available. Connecting the SSD externally using a USB enclosure or adapter can help determine if the issue is with the internal SATA connections.
Faulty ports or connections are a likely culprit if the SSD is not detected at all or disappears intermittently. Swapping cables and ports is an inexpensive fix that may resolve the problem.