Quick Answers
There are a few common reasons why your SSD may not show up when trying to install Windows:
- The SSD is not properly connected or the cables are loose
- The SSD is not initialized, formatted and partitioned correctly
- The SSD has a damaged file system or partition table
- The SSD is not detected in the computer BIOS
- The Windows installer does not have the proper SATA or NVMe drivers
- There is a hardware compatibility or firmware issue with the SSD
Check Physical Connections
First, check that your SSD is properly physically connected inside your computer. Make sure the power cable and SATA or NVMe data cable are firmly plugged into the SSD and motherboard. Loose connections can prevent the SSD from being detected during the Windows installation process.
If it’s a desktop computer, open up the case and check that the cables are snapped into place. For laptops, the SSD is often accessible by removing the bottom cover – refer to your manufacturer’s hardware maintenance manual for instructions.
While you’re checking the physical connections, also check that the SATA/NVMe port on the motherboard does not show any signs of damage or bent pins. A damaged port can cause connection issues.
Things to Check
- Power and data cables are properly connected
- Cables are not loose or wiggly
- Cable connectors are not damaged
- SATA/NVMe port does not have bent pins or damage
Make Sure SSD is Initialized and Partitioned
For a new SSD that has never been used before, it will need to be manually initialized and partitioned before Windows can install to it.
Here are the steps to initialize and format an SSD in Windows Disk Management:
- Open Disk Management (press Windows key and type “disk management”)
- Find the new SSD disk which may be listed as “Unknown” and “Not Initialized”
- Right click it and select “Initialize Disk”
- Choose either MBR or GPT partition table (GPT recommended for SSDs)
- Right click the “Unallocated” partition and create a “New Simple Volume”
- Follow the prompts to format the volume with NTFS
This will prepare the new SSD with a formatted volume that is visible to the Windows installer.
Things to Do in Disk Management
- Initialize new SSD disk
- Create partition table (MBR or GPT)
- Create new volume filling all unallocated space
- Format volume with NTFS
Troubleshoot SSD Partition Table or File System
If your SSD was previously used, it’s possible the partition table or file system has become corrupted or damaged, causing the SSD to not show up properly in the Windows installer.
You can use Disk Management’s properties window to check for errors with the disk. Right click the SSD, choose Properties, and scan the disk for errors. This can help identify and fix issues on the SSD.
Third party disk utilities like HDD Scan or Partition Wizard can also diagnose and repair damaged partition tables and file systems on drives.
In some cases, you may need to fully format the SSD to factory conditions to recover from partition or file system corruption.
SSD Troubleshooting in Disk Management
- Scan disk for errors
- Check filesystem type (should be NTFS)
- Use CHKDSK to fix detected errors
- Full format if necessary to fix corruption
Make Sure SSD is Detected in BIOS
For the Windows installer to see your SSD, the drive must be detected properly at the BIOS level first. So enter your computer’s BIOS setup utility and verify that the SSD is showing up there.
Usually it will be listed alongside other drives like your primary hard drive in the BIOS. If it’s missing, that indicates an issue with the SSD being detected at a hardware level.
If enabling AHCI mode in the BIOS fixes the detection issue, you can leave it enabled rather than switch back to IDE mode. AHCI mode is preferable for SSDs.
BIOS SSD Detection Checklist
- Enter BIOS setup utility
- Check for drive in BIOS drive list
- Enable AHCI mode if that helps detection
- Note any detection errors reported
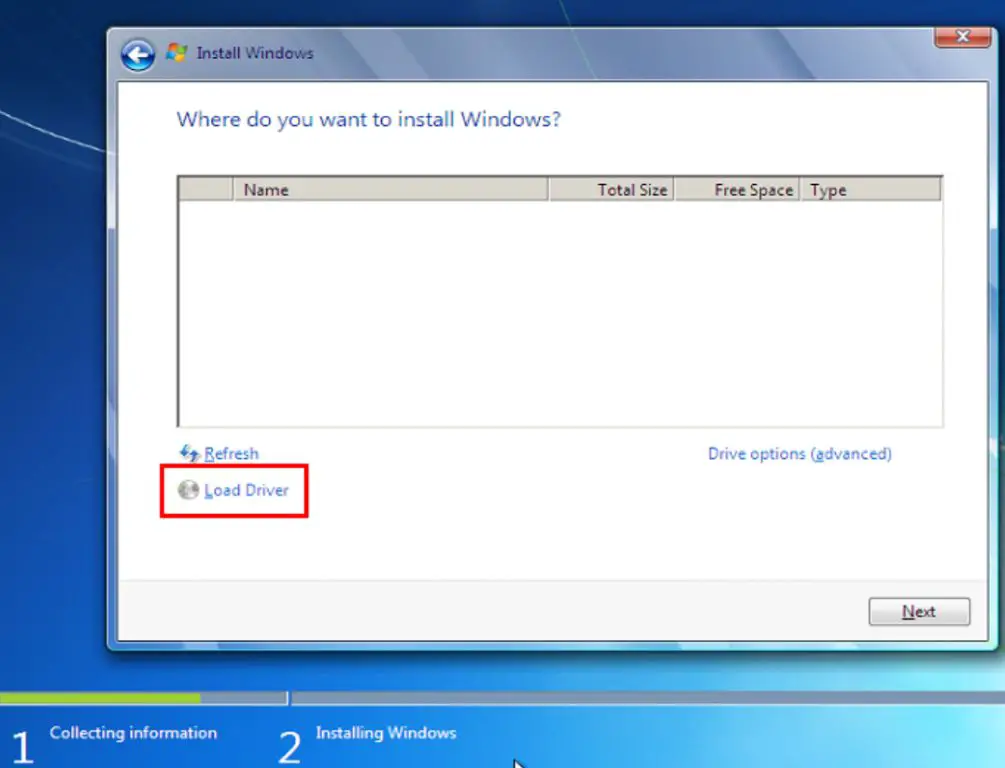
Add Missing SATA/NVMe Drivers
On some motherboards and systems, Windows Setup lacks the proper drivers to detect and install to certain SATA, NVMe or RAID devices.
If your SSD relies on an additional storage driver, you will need to supply that driver manually during the installation process.
To do this, load the driver files from a USB drive at the point in Windows Setup where it prompts you to load drivers. Browse to the USB drive and install the driver package for your SSD controller or hardware.
You can obtain these drivers from your motherboard or SSD manufacturer’s website if they are not already on your system.
Using Custom Drivers in Windows Setup
- Copy driver package to USB drive
- At install screen, load driver from USB
- Browse to USB and install storage driver package
- After loading, SSD should now be visible
Check for Hardware and Firmware Issues
In some cases, even when an SSD is detected in the BIOS, it may disappear or fail to show up properly when booting to Windows Setup.
This can indicate an underlying hardware, firmware or compatibility issue with the SSD itself.
Check if your SSD manufacturer has released any firmware updates that address detection issues. A firmware update can fix buggy behavior with an SSD.
Also try eliminating any external factors, like using a different SATA port, cable, or separate computer entirely if available to rule out other variables.
As a last resort, you may need to replace the SSD if it exhibits serious detection or stability problems during use and troubleshooting steps don’t isolate the issue.
Isolating Potential SSD Hardware Issues
- Update SSD firmware if available
- Test SSD in different port or computer
- Replace cables to rule them out
- Replace SSD if issue persists
Common Scenarios
Here are some common scenarios that can lead to SSDs not showing up properly in Windows Setup:
New SSD Not Initialized
A brand new SSD may not have a partition table or file system yet, preventing Windows from installing to it. Initialize and format the disk in Disk Management first.
Old SSD Not Detected
If using an old SSD, it may not be detected properly, especially in AHCI mode. Switch BIOS to AHCI if needed, or load chipset drivers.
Cloned Drive Not Visible
When cloning a drive, the cloned SSD partition sizes may not match perfectly. Delete all partitions and reformat target SSD.
Damaged Partition Table
A damaged partition table can render an SSD invisible. Scan for errors and recreate the partition table from scratch if corrupted.
RAID Drivers Not Loaded
With RAID cards, Windows Setup needs the RAID driver loaded first or else RAID disks will not show up properly.
Conclusion
In summary, if your SSD is not showing up during Windows installation, first make sure all physical connections are secure and cables are undamaged. The SSD may also need to be initialized and formatted beforehand in Disk Management if brand new.
If the SSD was previously used, check for partition table or file system errors using Disk Management’s tools. The SSD should also be detected in BIOS, if not, enable AHCI mode or supply missing chipset drivers at the Windows Setup screen.
As a last step, rule out potential hardware faults by testing the SSD in different configurations, updating firmware, or replacing if needed. Following this troubleshooting flowchart methodically can help identify why your SSD is not being detected during the Windows install process.