It can be frustrating when a solid state drive (SSD) is not showing up properly in Windows. Specifically, some users encounter the issue where their SSD appears in Device Manager but is not showing up in Disk Management. This prevents the user from initializing, assigning a drive letter, or formatting the SSD for use as extra storage. There are several potential causes for an SSD not showing up in Disk Management, ranging from driver problems to faulty cables or connections. Troubleshooting and resolving this issue involves verifying the SSD is correctly detected, updating drivers, checking physical connections, initializing or reformatting the drive if necessary, and replacing cables or the SSD itself if hardware problems are suspected.
Verify SSD is Recognized
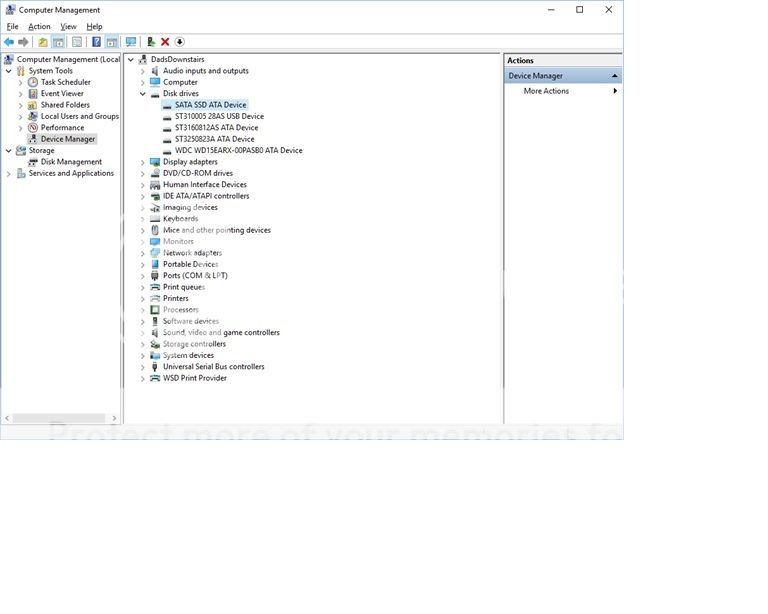
The first step is to check if your SSD is being recognized by Windows at all. The easiest way to do this is to open Device Manager and look under the Disk Drives section. If you see your SSD listed there, then Windows is detecting its presence, but something is preventing it from appearing in Disk Management.
According to experts on the Tom’s Hardware forums, seeing the SSD in the BIOS and Device Manager means the motherboard is able to detect the drive, but Windows is having issues accessing it for some reason [1]. So the next troubleshooting steps focus on making the drive usable in Windows.
Update Drivers
Updating your storage controller drivers can help resolve an issue where your SSD is showing up in Device Manager but not Disk Management. The storage controller manages communication between the SSD and your computer’s motherboard. Outdated or corrupt drivers for this component can prevent proper detection of the SSD.
To update your storage controller drivers:
- Open Device Manager on your computer (type “device manager” into the Windows search bar and click the result).
- Expand the “Disk drives” and “Storage controllers” sections.
- Right click on the storage controller device and select “Update driver.”
- Select “Search automatically for updated driver software” to allow Windows to find and install the latest driver.
- Restart your computer after the driver update completes.
With updated storage controller drivers, Windows should now be able to properly communicate with your SSD and display it in Disk Management. If the SSD still does not show up after updating drivers, move on to other potential solutions like checking connections or initializing the drive.
Initialize the Drive
If the SSD is showing up in Device Manager but not Disk Management, it likely needs to be initialized. Initializing the drive assigns it a partition style such as MBR or GPT, allowing Windows and programs to store and retrieve data from the SSD.
To initialize the SSD in Windows 10 or 11:
- Open Disk Management by right clicking the Start menu and selecting “Disk Management”.
- Find the disk that represents the SSD. It may show up as an “Unknown” drive with unallocated space.
- Right click on the disk and select “Initialize Disk”.
- Choose between Master Boot Record (MBR) or Guid Partition Table (GPT). GPT is newer and required for drives larger than 2TB.
- The disk should now show up as an initialized drive with unallocated space.
Once initialized, the SSD can be formatted and assigned a drive letter before it will show up like a normal disk drive for file storage. Initializing the drive is an essential first step when an SSD shows up in Device Manager but not Disk Management in Windows. For more details, refer to Microsoft’s guide on initializing new disks.
Assign a Drive Letter
If the SSD is showing up in Device Manager but not Disk Management, it’s likely that it doesn’t have a drive letter assigned. Disk Management is used to assign drive letters to partitions and drives. If a drive doesn’t have a letter, it won’t show up in Windows File Explorer.
To assign a drive letter in Disk Management:
- Open Disk Management (type “diskmgmt.msc” in the Windows search bar and hit Enter)
- Locate the disk that needs a drive letter assigned. It may show up as an “Unknown” disk with unallocated space.
- Right-click the disk and choose “Change Drive Letter and Paths”
- Click “Add” and assign a new drive letter
- Click “OK” to save the changes
This will assign a drive letter to the disk so that it shows up properly in File Explorer. If the drive has multiple partitions, repeat this process to assign letters to each partition.
If no drive letters are available due to other devices, you may need to change an existing drive letter before assigning one to the new drive. Just be careful not to assign the same letter to two devices. See this guide for help with dealing with unavailable drive letters.
Check Connections
One common reason an SSD may show up in Device Manager but not Disk Management is because of a loose cable connection. Over time, SATA data cables can work their way loose from the drive or motherboard, interrupting the connection. Check that both ends of the SATA data cable are securely attached to the SSD and motherboard SATA ports.
Wiggling the cable or lightly tugging on it can often reveal a loose connection. Reseat both ends of the cable to ensure a tight fit. SATA cables wear out over time and can develop faults, so trying a different SATA cable may resolve the issue if reseating the current cable does not. (Source)
Likewise, check that the SATA power cable from the power supply is firmly connected to the SSD. Loose power cables can cause the drive to be detected but not fully functional. Try a different power cable if simply reseating the current one does not fix the problem.
Check Power
One of the most common reasons an SSD may show up in Device Manager but not Disk Management is if the drive is not receiving consistent power. SSDs require a stable power source to operate properly. If the power connection is loose, faulty, or temporarily disrupted, the SSD may not be detected in Disk Management.
First, verify the SSD is securely plugged into a SATA power connector from the power supply. Reseat the connection by unplugging and firmly plugging it back in to ensure a solid connection. Also inspect the power cable for any damaged pins or frayed wires which could disrupt power delivery.
If the SATA power connection checks out, try connecting the SSD to another SATA power connector from the PSU if available. Or connect it to another system entirely to rule out a PSU issue.
A temporary power disruption like a power outage, power supply failure, or improper PC shutdown sequence can also cause the SSD to not be recognized properly. Allow the system to fully power down and restart to re-initialize the drive.
Finally, if the SSD is receiving power but still not detected, there could be a hardware failure. Contact the manufacturer or consider replacing the drive if power delivery issues are ruled out.
Update BIOS
One potential reason an SSD may show up in Device Manager but not Disk Management is because the BIOS needs to be updated. The BIOS (Basic Input/Output System) controls communication between the operating system and hardware devices. An outdated BIOS may lack proper support or compatibility for a newer SSD. Updating to the latest BIOS version can resolve this issue by adding support for the SSD.
To update the BIOS, first identify the computer or motherboard manufacturer. Visit their website and download the latest BIOS update file. Refer to the manufacturer’s instructions for how to perform the update, as the steps vary. Typically it involves copying the update file to a USB flash drive, rebooting into the BIOS setup utility, and applying the update from there. Make sure not to interrupt power during the update process.
After successfully updating the BIOS, reboot the computer and check if the SSD now appears in Disk Management. A BIOS update optimizes communication between the SSD and the rest of the system, enabling the drive to be properly detected.
Here are some tips when updating the BIOS to fix an SSD not detected issue:
- Backup important data before updating
- Confirm the update file is for the exact model/version
- Follow manufacturer’s instructions carefully
- Do not interrupt power during the update
- Reset BIOS to default settings after updating
If updating the BIOS does not resolve the issue, there may be a hardware-related problem. However, updating to the latest BIOS is an important troubleshooting step when an SSD is visible in Device Manager but not Disk Management.
Format the Drive
Formatting the SSD can resolve issues where the drive is detected in Device Manager but not Disk Management. Sometimes an SSD can become corrupted or unreadable by Windows. In these cases, formatting will reset the drive and allow Windows to access it again.
To format the SSD, go to Disk Management and find the unrecognized drive. Right click on it and choose the “Format” option. Select a file system like NTFS and give the drive a name if desired. Make sure to backup any important data first, as formatting will erase all data on the SSD.
According to this guide, formatting an unrecognized SSD resolves detection issues about 80% of the time. After formatting, reboot and check if the SSD now shows up properly in Disk Management with a drive letter assigned.
If formatting does not resolve the problem, the drive itself may be damaged or faulty. In that case, replacement of the SSD or its cables may be required.
Replace Cables/Drive
If the SSD is still not detected after trying all other troubleshooting steps, the issue may be caused by a faulty SATA cable or drive failure. Try replacing the SATA data and power cables with brand new ones to rule out a cable issue.
Carefully disconnect the existing cables from both ends and connect new SATA data and power cables. Make sure the cables are fully inserted at both the drive and motherboard ends and that the locking clips click into place.1 Restart and check if the BIOS and Windows Disk Management can now detect the SSD.
If trying a new SATA cable does not resolve the problem, test the SSD in another desktop PC or SATA slot on your motherboard, if available. An M.2 SSD can be inserted into an M.2 slot or M.2 adapter card in another PC. A 2.5″ SATA SSD can be connected via SATA cable to another desktop. This helps determine whether the issue is with the specific motherboard slot or with the SSD itself.
If the SSD fails to be detected in other systems as well, it likely indicates drive failure. You will need to replace the SSD if it is no longer being detected by the computer under any conditions. Choose a new compatible SSD from a reputable brand for a reliable replacement.
