It can be frustrating when Windows 10 does not detect a second SATA hard drive that is properly connected and powered on. This issue prevents access to data stored on the drive and reduces available storage space. Properly troubleshooting and fixing the problem is important to restore full functionality and access to the secondary drive.
There are several potential reasons why Windows 10 may not detect a second hard drive. The most common causes include loose connections, outdated drivers, drive errors, or incorrect BIOS settings. Thankfully, there are steps you can take to troubleshoot and resolve the issue.
In this article, we will walk through the top solutions to try when Windows 10 does not recognize your secondary SATA drive. Following the recommended troubleshooting steps can often identify and resolve the underlying problem, allowing Windows to once again detect and access the drive.
Check Drive Connections
One of the most common reasons a SATA drive is not detected in Windows 10 is because the data or power cables are loose or disconnected. Check that both the SATA data cable and SATA power cable are securely plugged into the back of the hard drive and into the appropriate ports on the motherboard. Sometimes cables can become slightly dislodged, especially if you recently moved the PC. Refer to your motherboard manual to verify you are using the correct SATA ports.
Inspect the SATA cables for any visible damage or bent pins, and replace them if necessary. Faulty or deteriorating cables are a frequent cause of disk detection issues. Try swapping in a known good SATA cable to rule out a bad cable.
If the drive is installed in a hot swap bay, remove it and connect it directly to the motherboard SATA ports to eliminate the bay as the source of the problem. Some hot swap bays can be finicky with detection. If the drive is then detected, the hot swap bay controller or cable may need to be replaced.
Double check that both the data and power connectors are fully inserted into the back of the hard drive. It’s easy to accidentally partially insert the SATA cable, resulting in a poor connection. Refer to this source for more details on improper cabling issues.
Update Drivers
Outdated drivers are a common cause of second hard drives not being detected in Windows 10. It’s recommended to update the motherboard chipset drivers and SATA controller drivers, as using older, incompatible versions can prevent drives from being detected properly.
First, visit your motherboard manufacturer’s website and download the latest chipset drivers for your specific model. Install these chipset drivers to update the SATA controller drivers and other system drivers. Restart your PC after installing for the changes to take effect.
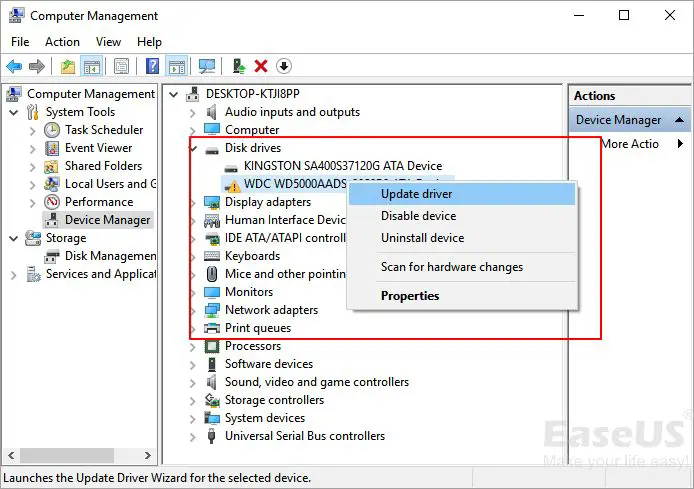
You can also update the SATA controller drivers directly in Device Manager. Open Device Manager, expand the Storage Controllers section, right-click on the SATA controller device (e.g. Standard SATA AHCI Controller), and select Update Driver. This will search and install the latest driver from Windows Update [1].
Keeping your SATA drivers fully updated often resolves detection issues with second hard drives in Windows 10. Be sure to get the latest versions from your manufacturer or Windows Update to troubleshoot the problem.
Check in Disk Management
Open Disk Management by right-clicking the start menu and choosing Disk Management. Look for the hard drive that is not showing up. If you can see the drive here but it says “Not Initialized” or does not have a drive letter assigned, that means Windows detects the hardware but has not set it up properly.
Right-click the disk that is not showing up and choose “Initialize Disk.” Select a partition style like MBR or GPT and click “OK.” This will allow Windows to format the drive.
After the disk is initialized, right-click it again and choose “New Simple Volume.” Follow the wizard to assign it a drive letter like D:, E:, F: etc. This will allocate space on the disk and make it accessible in Windows Explorer.
Now your hard drive should show up and be accessible. If you still have issues detecting the drive after following these steps, there may be a hardware or connection problem with that specific SATA drive.
Change SATA Port
If your second SATA drive is still not being detected in Windows 10 after trying the steps above, try changing the SATA port that the drive is connected to on the motherboard. Sometimes there can be an issue with a specific SATA port that prevents drives connected to it from being detected properly.
Carefully disconnect the SATA cable from the current port and connect it to a different open SATA port on the motherboard. Refer to your motherboard manual to locate an available SATA port if needed. After reconnecting to a new port, check in Disk Management again to see if the drive is now visible.
Port failure is one potential cause of drives not being detected, so trying a different physical SATA port connection can help rule that out. If the drive is detected after switching ports, you likely found the culprit. You may want to avoid using that particular port going forward if possible.
See this article for more troubleshooting tips on drives not detected due to motherboard port issues: [url=https://www.seagate.com/support/kb/the-bios-does-not-detect-or-recognize-the-ata-sata-hard-drive-168595en/]The BIOS does not detect or recognize the ATA / SATA hard drive[/url]
Check BIOS Settings
One reason a SATA drive may not be detected in Windows 10 is due to a configuration issue in the BIOS. You’ll want to enter the BIOS setup screen on bootup (typically by pressing F2, Delete, or a function key like F12 when your computer first turns on) and check if the drive is showing up correctly here.
If the SATA drive is not appearing in the BIOS, you’ll want to make sure the SATA controller is enabled. Look for options related to SATA, AHCI, or onboard devices and ensure they are set to Enabled. It’s also recommended to set the SATA mode to AHCI if it is not already, as this is required for hot-swapping drives.
After enabling the proper SATA and AHCI options, see if your drive appears. If it now shows up, you can exit and save changes to the BIOS which should allow Windows to detect the drive on boot up. If it still does not show, there may be a hardware connectivity or compatibility issue instead.
Reset CMOS
Resetting the CMOS can sometimes fix drive detection issues by resetting the BIOS back to its default settings. Here are the steps for removing the CMOS battery to reset the CMOS:
- Turn off the computer and unplug the power cable.
- Open the computer case and locate the CMOS/motherboard battery. This is usually a flat, circular battery on the motherboard itself.
- Gently remove the CMOS battery from its holder.
- Wait 5-10 minutes before reinserting the battery. This allows time for the CMOS to fully discharge.
- Put the battery back in its holder and reassemble the computer.
- Turn on the computer and enter BIOS. The BIOS settings should now be restored to their factory defaults.
- Check if the hard drive is now detected. If not, additional troubleshooting may be required.
Resetting the CMOS clears any custom BIOS settings that may be preventing drive detection. However, if the drive is still not recognized, the issue likely lies elsewhere, like a failed drive or faulty connection.
Test with Another PC
One way to determine if the issue is with the drive itself or something on your Windows 10 PC is to connect the undetected SATA drive to another computer. If the drive is not detected on a separate system, the drive itself may have failed.
Signs of a dead or failing hard drive include: performance degradation, freezing or crashing, strange noises, and corrupted or inaccessible data. Essentially if you notice your computer becoming slow, unstable, or unable to read files, the hard drive could be failing. Testing on another PC helps eliminate software issues and points to a potential hardware failure.
If the drive is recognized normally on another system, the issue likely lies with Windows 10 settings or drivers on your original computer. In that case, further troubleshooting like updating drivers, changing ports, and checking disk management tools is required.
Use Third Party Tools
If Windows still does not detect the drive after trying all the previous troubleshooting steps, a good next step is to use third party drive diagnostic and repair tools. Many free and paid options are available that can thoroughly test the drive and attempt repairs.
Seagate’s free SeaTools is one of the most popular HDD diagnostic tools and works for both Seagate and non-Seagate drives https://www.seagate.com/support/downloads/seatools/. It has options for basic tests like drive info and SMART status, as well as comprehensive tests that perform full read tests and scan for bad sectors. SeaTools can also attempt drive repairs.
Another good free diagnostic utility is Western Digital Data Lifeguard https://support.wdc.com/downloads.aspx?p=279&lang=en. Like SeaTools, it can run quick and extended tests, provide SMART drive status, and perform repairs. Data Lifeguard works on both WD and non-WD drives.
Using a thorough diagnostic tool can help identify any underlying problems preventing drive detection in Windows. They may also be able to repair bad sectors or file system errors so that the drive shows up properly again.
Conclusion
When troubleshooting why Windows 10 is not detecting your second SATA drive, it’s important to methodically go through potential solutions. First, check your drive connections and cables to ensure everything is properly plugged in. Trying a different SATA port or cable can help isolate the issue. Make sure your motherboard drivers, chipset drivers, and storage drivers are all up to date. Use Disk Management in Windows to see if the drive is showing up there but not in Explorer. Adjusting BIOS settings related to SATA or AHCI modes can sometimes resolve detection issues. Resetting the CMOS to default settings may also help. As a last resort, test the drive in another PC to determine if the issue is with the drive itself. Third party disk tools like Seatools can check the SATA drive for errors. Before reformatting or initializing a drive, remember to backup your important data as these operations may cause data loss. Following structured troubleshooting steps can often resolve secondary hard drive detection issues in Windows 10.
