If you’ve just set up a new computer and noticed that your iTunes library is missing, don’t panic! There are a few different reasons why your iTunes library may not automatically transfer over to a new machine, but the good news is that with a few simple steps, you can get your music, movies, apps and more back in no time.
Checking iTunes Media Folder Location
The first thing to check is whether the iTunes media folder path is set correctly on your new computer. By default, iTunes stores your library contents in a folder called “iTunes Media” on your primary hard drive. This folder contains all your songs, albums, movies, apps, and more purchased through or added to iTunes.
To check the location, open iTunes and go to Preferences > Advanced. Look at the current setting for “iTunes Media folder location.” Is it pointing to a folder on your new computer’s hard drive, or is it still pointing to a folder on your old computer or external hard drive? If it’s the latter, you’ll need to update this setting.
Point the iTunes Media folder location to an appropriate folder on your new computer – for example, you could create a new “iTunes Media” folder directly in the Music folder or under your user account. Then click OK. Restart iTunes and it should now reference the correct local folder location rather than a folder on your old machine or external drive.
Transferring Your iTunes Library File
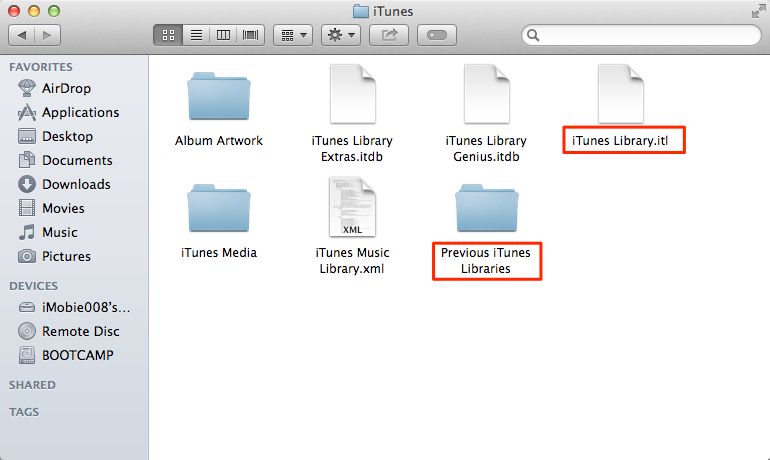
If the iTunes media folder location isn’t the culprit, the next thing to check is whether you transferred the iTunes library file itself from your old computer to the new one. This file – named “iTunes Library.itl” – contains all your iTunes metadata, including playlists, play counts, ratings, and other library data.
By default, this file is stored in the iTunes folder under Music or directly under your user account folder. If you didn’t copy it over, you’ll need to transfer it now from your old computer to have your full iTunes library available on your new machine.
You can copy the file over via external hard drive, cloud storage, network transfer or AirDrop. Just make sure to copy the file to the same location on your new computer – so for example, into the iTunes folder under Music. If prompted to replace the existing file, do so.
Authorizing Computers and Devices
If you’ve copied over both the iTunes Media folder location and iTunes Library file, the next thing to check are your computer and device authorizations.
Apple limits you to authorizing just 5 computers connected to your Apple ID to play content purchased through iTunes. If you’ve already reached this limit, you’ll need to de-authorize one of your existing computers before you can authorize the new one.
You can do this by opening iTunes on the old computer, going to Account > Authorizations > Deauthorize this Computer. Enter your Apple ID password when prompted.
Once deauthorized, open iTunes on your new machine and go to Account > Authorizations > Authorize this Computer. Again enter your password to complete authorization.
You’ll also want to make sure any iOS devices like iPhones and iPads are still authorized to access content from your iTunes library. You can check this under Account > Authorizations and looking for your device names under “Authorized Devices.” Re-authorize if needed.
Checking iCloud Music Library Settings
If you’re an Apple Music subscriber, you may also be using iCloud Music Library to store your music in the cloud. This feature allows you to access your full library from any device logged into your Apple ID.
Double check that iCloud Music Library is enabled on your new computer by going to Preferences > General and making sure “Show Apple Music” is checked. If you have “Sync Library” enabled here, you may need to temporarily disable it to fully show the contents of your local iTunes Media folder.
You can also open the Apple Music app on your iOS devices or other computers and ensure you’re still logged into the same Apple ID everywhere. This will allow you to stream your cloud-based music library on any authorized device, even if the local files aren’t all present.
Syncing Playlists, Ratings, and Other Metadata
If your iTunes media files, authorization, and iCloud Music Library all check out, another culprit for missing library data could be failed syncs of playlists, ratings, play counts and other metadata.
This data gets stored in the iTunes library database referenced earlier. If the file didn’t transfer properly or got corrupted, you may see the media files themselves but be missing data like playlists, play history, and more.
You can rebuild your iTunes library database file from scratch to attempt a fresh sync. To do this, hold Shift while launching iTunes until you see a dialog prompting you to create a new library or choose an existing one. Select the option to create a new library, which will build a new .itl file from the media content in your iTunes folder.
This should re-import your albums, songs, artwork and re-establish connections to any iOS devices. However, unique metadata like playlists, ratings and play history may still be lost unless you can recover the original database file.
Retrieving Data from iCloud Backup
If you previously had iTunes Match enabled or you back up your iOS devices to iCloud, another option you may have is to restore your library metadata from an iCloud backup.
Go to iTunes > Preferences > Devices and choose to back up your iOS device data to iCloud. Then under Advanced, select to sync iTunes content between computers. Click Apply to confirm the changes.
Next, on your iOS device go to Settings > [your name] > iCloud > Manage Storage > Backups and choose to back up now to iCloud. Once completed, return to iTunes Preferences > Devices and click Restore Backup. Select the backup you just made from iCloud and let the restore process run – this should retrieve your playlists, play counts, ratings and other metadata.
Scenarios and Troubleshooting for Common iTunes Library Issues
Here are some common scenarios that could lead to iTunes library issues when setting up a new computer, along with steps to troubleshoot and resolve them:
| Scenario | Solution |
|---|---|
| Upgraded to a new Mac and iTunes library is empty |
|
| Metadata like playlists missing after transferring library |
|
| Some songs/albums missing after transferring library |
|
| Receiving authorization errors in iTunes on new computer |
|
Preventing iTunes Library Issues When Switching Computers
To avoid iTunes library problems when migrating to a new computer in the future, here are some best practices you can follow next time:
- Always deauthorize your old computer before setting up iTunes on a new one
- Consolidate your library to gather any missing media files before transferring
- Backup iOS devices and iTunes metadata to iCloud for easy restore
- Use iTunes Match so all purchased songs are available in the cloud
- Manually transfer the iTunes Library.itl file when migrating computers
Conclusion
Troubleshooting iTunes library issues when moving to a new computer can be frustrating, but is usually fixable with the right steps. Key things to check are proper media folder location, library file transfer, computer authorization limits, iCloud Music Library settings, and metadata syncing.
Following best practices like consolidating, authorizing devices, backing up to iCloud, and manually transferring the library file can help avoid these issues in the future. With the right tools and knowledge, you can get your iTunes collection back up and running again on a new machine.