If you’ve just installed a new solid state drive (SSD) in your computer but it’s not showing up when you try to install Windows, don’t panic. There are a few common reasons why a newly installed SSD may not be detected during the Windows installation process.
Quick Fixes to Try
Here are some quick things to check if your SSD isn’t showing up in Windows installation:
- Make sure the SSD is properly seated in the motherboard SATA slot. Unplug it and plug it back in to get a good connection.
- Try connecting the SSD to a different SATA port on the motherboard.
- Check that both the power cable and SATA data cable are properly connected to the SSD.
- If you have multiple hard drives installed, make sure the SSD is set as the primary boot drive in the BIOS.
- Update the motherboard BIOS and SSD firmware to the latest versions.
- Reset the CMOS settings to default by removing the CMOS battery for a few minutes.
If none of those quick fixes work, don’t worry – the solutions below will help identify why the SSD is not detected and guide you to a resolution.
SSD Not Detected Due to Disk Driver Issues
One common reason a new SSD may not show up during Windows installation is because the disk drivers for the SSD are not included with the Windows setup media. Every SSD requires compatible storage drivers in order for Windows Setup to see and install to it.
There are a couple ways to make sure the proper SSD drivers are loaded during installation:
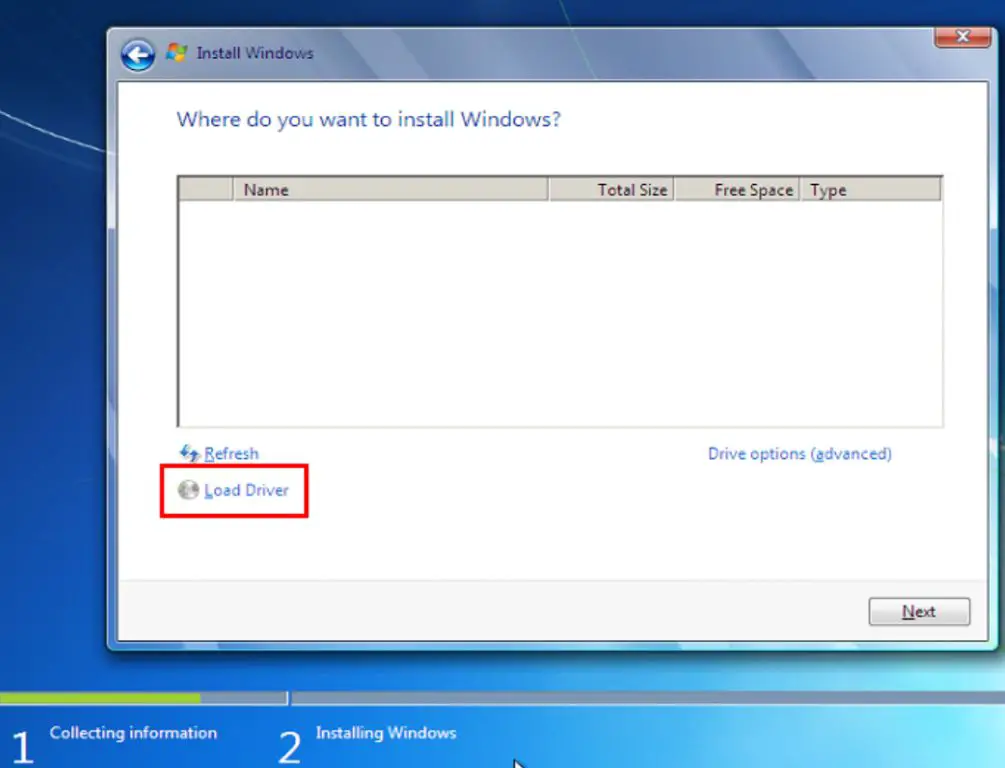
- Method 1: At the disk selection screen during Windows installation, click “Load driver” and insert the driver CD that came with your SSD. This will load the missing storage drivers.
- Method 2: Download the latest SSD drivers to a USB drive, and plug it in before starting the installation. Click “Load driver” and browse to the drivers on the USB.
If the SSD came with a disk or USB drive with drivers, using one of those methods should install the necessary drivers and allow Setup to see the SSD.
Incorrect Boot Mode Set in BIOS
Another common reason a newly installed SSD may not appear at the Windows installation stage is if the boot mode for the drive is incorrect in the BIOS.
There are two common boot modes for hard drives and SSDs:
- ACHI mode: Advanced Host Controller Interface, used by most SSDs and modern hard drives.
- IDE mode: Older legacy mode used by older mechanical hard drives.
If your SSD was installed while the BIOS was set to IDE mode instead of AHCI mode, the Windows installer likely won’t detect it. Here’s how to check and change the boot mode:
- Boot into the system BIOS, usually by pressing F2, F10 or Delete during bootup.
- Navigate to the “Boot” or “Advanced” section and look for a setting named “ACHI/IDE” or “SATA mode.”
- If set to IDE, change it to AHCI mode. F10 to save changes and exit BIOS.
Changing to AHCI mode should allow the Windows installer to detect the SSD. You may need to restart the installation media after making this change.
SSD Not Initialized or Partitioned
Brand new SSDs out of the box will be uninitialized and without partitions. The Windows installer requires both an initialized disk and a partition properly created on it before it can see and install to the SSD.
If your SSD is detected in the BIOS but not showing up in Windows Setup, it likely needs to be initialized and partitioned first before the OS can be installed on it.
There are a couple ways you can properly configure a new SSD:
- During Windows installation: At the disk selection screen, select advanced options. Initialize the disk, create a new partition, and format it NTFS. You should then be able to select the SSD to install Windows.
- Using Disk Management: Boot into Windows or WinPE, launch Disk Management, locate the SSD, initialize it as GPT, create a new simple volume spanning the full capacity, and format NTFS.
Once initialized and partitioned, restart the Windows installation process and the SSD should now be detected and available to install to.
Faulty SATA Cable or Port
If your SSD is being detected in the BIOS but still not showing up in Windows Setup, the issue may be caused by a faulty SATA cable or motherboard SATA port.
Try the following steps to troubleshoot defective cables and connections:
- Swap out the existing SATA data and power cables for new ones. Damaged cables can prevent disk detection.
- Connect the SSD to a different SATA port on the motherboard if available.
- Test the SSD on another computer if possible to rule out SSD hardware failure.
If a different SATA cable or connection to another SATA port allows your SSD to be recognized, the original cable or motherboard port are likely defective and should be replaced.
SSD is Dead or Damaged
In rare cases, the SSD itself may be DOA (dead on arrival) or damaged, preventing the Windows installer from recognizing it.
Try the following troubleshooting steps:
- Inspect the SSD for any physical damage to the circuit board or connectors.
- Listen for any buzzing or humming noise coming from the SSD, which can indicate hardware failure.
- Check if the SSD is recognized in the BIOS or UEFI setup. If it doesn’t show up there, the drive itself has failed.
- Try installing the SSD in another computer if possible to test if the drive works.
If the SSD itself ends up being dead or damaged, you will need to RMA and replace it under warranty if it’s a new drive. Otherwise, you will need to purchase a new drive.
Cloned Drive or System Image
Cloning your old hard drive’s contents directly to a new SSD or restoring a system image to it can also result in the new SSD not being detected on boot.
This happens because cloned drives and restored system images retain the disk signature of the original hard drive. When moved to new hardware like an SSD, the mismatch in disk signatures can prevent boot detection.
To properly migrate your old hard drive or system image to a new SSD, you should:
- Perform a clean Windows installation on the new SSD.
- Use migration software to selectively transfer files and applications over.
- Reinstall applications to ensure compatibility with the new hardware.
Starting fresh with a clean install avoids cloning issues and is recommended for moving to a new SSD.
Incompatible or Legacy Mode BIOS
On older systems, a legacy BIOS may not support larger capacity drives or newer technologies like UEFI for SSDs. Your BIOS must support GPT partitioning and UEFI boot mode for compatible SSD detection.
Check for a BIOS update from your manufacturer if your system BIOS is outdated. Upgrading to the latest BIOS version can improve SSD compatibility.
If your system only supports legacy BIOS, you may need to switch to an older, smaller SSD that uses legacy MBR partitioning instead.
Secure Boot Interfering
If your system has Secure Boot enabled in the BIOS, it can sometimes interfere with third party SSD drivers and prevent proper detection.
Try disabling Secure Boot to see if that resolves the SSD not showing up during installation. Just keep in mind that disabling Secure Boot reduces security and is not recommended for the final OS configuration.
Conflict With Other Storage Drivers
If using multiple storage drives, there can occasionally be driver conflicts that prevent all drives from proper detection in Windows Setup.
Try disconnecting other non-essential drives like secondary hard drives to see if the SSD will then be recognized when alone.
Once Windows is installed, reconnect the other drives one at a time while checking for conflicts.
Damaged Windows Install Media
A damaged installation DVD, corrupt bootable USB or OS files missing from the Windows Setup image can result in issues detecting hardware like SSDs during installation.
To rule out corruption in your install media, try the following steps:
- Check the DVD or USB drive for scratches, damage or dirt.
- Try installing Windows using new, undamaged installation media.
- Verify the integrity of the installation .ISO file before creating bootable media.
- Delete the partition on the USB drive and use the Media Creation Tool to completely rewrite the Windows installer onto it.
If using fresh, untouched installation files still fails to detect the SSD, then the media itself is likely not the issue.
Conclusion
SSDs not showing up during Windows installation can be frustrating, but are usually caused by a handful of common issues like improper driver loading, incorrect BIOS settings, or the drive not being initialized and partitioned yet.
By going through the SSD detection troubleshooting steps above, you should be able to identify the underlying problem and get your new SSD recognized by the Windows setup process.
The most reliable fixes involve updating BIOS and firmware, enabling AHCI mode, loading SSD drivers, initializing and partitioning the disk, or performing a fresh OS install rather than cloning drives. Getting your SSD detected properly before installation will prevent headaches down the road.
If the Windows installer still refuses to recognize your new SSD after trying all of the applicable solutions, there may be a deeper hardware, driver or compatibility issue at play requiring advanced troubleshooting.