Having issues seeing your solid state drive (SSD) in Disk Management is a common problem that can occur for various reasons. In this comprehensive guide, we will cover the most likely culprits and solutions to help you get your SSD recognized again.
Quick Overview of Common Reasons an SSD Won’t Show Up
Here is a quick overview of some of the most common reasons an SSD may not show up in Disk Management:
- Drive not enabled in BIOS
- Drive not properly connected
- Drive requires initialization
- Drive letter not assigned
- Corrupt or missing drivers
- Faulty or dying SSD
We will now go into more detail on each of these common culprits and how to fix them.
Checking Drive Connections
One of the first things to check is whether your SSD is properly connected. Here are some things to verify:
- Make sure the SSD is firmly plugged into the motherboard SATA port all the way.
- Try connecting the SSD to a different SATA port on the motherboard.
- Inspect the SATA data and power cables to ensure they are not damaged.
- Connect the SSD to another computer to see if it is recognized.
If the SSD is loose, connected improperly, or the cables are faulty, it can prevent communication between the drive and system. Reconnecting the cables or swapping SATA ports can often resolve SSD not showing up.
Enabling SSD in BIOS
For the system to communicate properly with the SSD, it needs to be enabled in the BIOS. Here is how to verify this:
- Boot into BIOS by tapping the appropriate key during bootup (F2, Delete, F1, etc.)
- Navigate to the “Advanced” tab and select “Storage Configuration”
- Locate the SATA port the SSD is connected to and make sure it is set to “Enabled”
- If you have a NVMe SSD, ensure NVMe ports are set to “Enabled”
- Save changes and exit BIOS
The system cannot see the SSD if that SATA port or NVMe port is disabled in BIOS. Double check it is enabled if your drive is not visible.
Initializing a New SSD
Brand new SSDs will be listed as “Unallocated” in Disk Management. This means that there is no partition table and file system created on the disk yet. Here is how to initialize a new SSD:
- Open Disk Management (press Windows Key + X and select Disk Management)
- Find the disk labeled as “Unallocated”. This is your new SSD.
- Right click on the Unallocated space and select “New Simple Volume”
- Go through the wizard to create a new partition taking up the full capacity
- Give the volume a drive letter
Once initialized, the SSD will show up with its assigned drive letter in Disk Management and File Explorer.
Assigning a Drive Letter
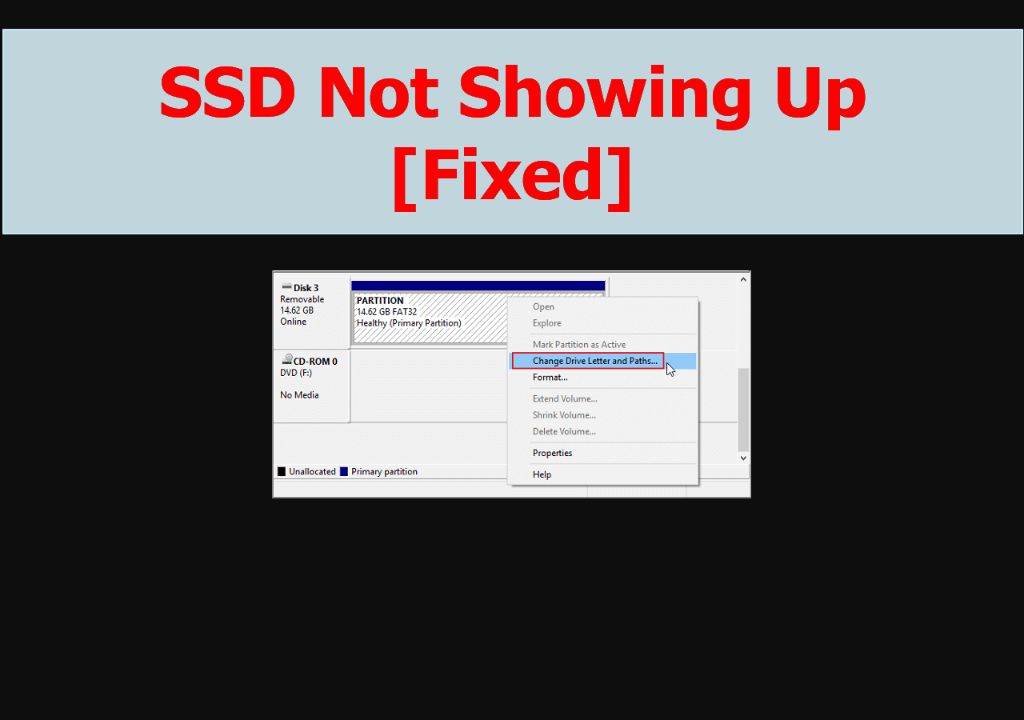
If your SSD shows up in Disk Management but just has no drive letter, here is how to assign one:
- Open Disk Management
- Right click on the SSD and choose “Change Drive Letter and Paths”
- Click “Add” to assign a drive letter
- Select a drive letter from the dropdown (like F: or G:)
- Click “OK” to apply the drive letter
The SSD will now show up with that drive letter assigned. Without a drive letter, it may not appear in File Explorer or some programs.
Updating Drivers
Outdated, corrupt, or missing drivers can result in SSDs not being detected properly. Here are some tips for updating drivers:
- Update SATA drivers – Open Device Manager, expand “Storage controllers”, right click on any SATA driver, select “Update driver”
- Update NVMe drivers – Get latest driver from SSD or motherboard manufacturer’s website and install
- Update chipset drivers – Get latest from motherboard OEM website
- Scan for hardware changes – In Device Manager, select “Action > Scan for hardware changes” to redetect devices
Keeping your motherboard and storage drivers updated can prevent many detection issues with SSDs in Disk Management.
Checking for SSD Errors
If your SSD was working before but now suddenly does not show up, there may be underlying errors with the drive. Here are some options to test for errors:
- Disk checks – Open command prompt as admin and run “CHKDSK X: /f” (replace X with SSD letter)
- S.M.A.R.T. status – Use free software like CrystalDiskInfo to check S.M.A.R.T. health status
- Drive repair – Use manufacturer’s SSD toolbox to run drive repair diagnostics
- Check Event Viewer – Open Event Viewer and look under “System” and “Disk” logs for disk errors
Finding and correcting any SSD errors can often resolve detection issues and make the drive visible again in Disk Management.
Troubleshooting SSD Not Detected in BIOS
If your SSD is not showing up at all, not even in BIOS, some steps to try are:
- Try different SATA cable and port
- Inspect SATA ports for damage
- Check SSD power cable connection
- Reset BIOS to default settings
- Flash motherboard BIOS to latest version
- Test SSD in another PC (to isolate issue)
Since BIOS is low-level, not being detected there indicates a physical connection or hardware problem. Examining cables, SATA ports, trying different computers, and BIOS updates can get the SSD recognized again.
When to Consider SSD Replacement
If you have exhausted all other troubleshooting steps and your SSD still does not show up in Disk Management or BIOS, it may be dying or faulty. At that point, replacement should be considered. Here are some signs to look out for:
- Frequent Blue Screens (BSOD) mentioning the SSD
- I/O errors when trying to access SSD
- SSD making abnormal noises during operation
- SMART errors and high wear level
- Testing SSD in known good computer yields same result
While SSDs can last many years, their failure rates are not zero. If all signs point to a hardware problem, then replacing the SSD with a new one is the definitive solution.
Initializing Replacement SSD
When installing a new replacement SSD, you will need to initialize it properly for it to show up in Disk Management:
- Physically install replacement SSD in computer
- Boot into BIOS and enable the SATA port/NVMe port it is on
- Boot into Windows installer media (USB or DVD)
- Delete all existing partitions on the SSD during custom install
- Create a new partition and format the SSD to NTFS
- Perform a normal OS install onto the empty SSD
This will initialize a blank slate on the new SSD so that it shows up properly in Disk Management once installation is complete.
Conclusion
SSDs not showing up properly in Disk Management is a fixable problem in most cases. Following the troubleshooting tips in this guide should help identify and correct the underlying cause. The most common fixes include:
- Checking SSD connections and cables
- Enabling the SATA/NVMe port it is connected to in BIOS
- Initializing and partitioning a new blank SSD
- Assigning a drive letter
- Updating drivers and firmware
- Running disk checks and repairs
In rare cases where the SSD has failed completely, replacement is the only option. But an SSD not showing up in Disk Management is usually repairable through systematic troubleshooting.