Having issues getting Windows 10 to recognize your solid state drive (SSD)? Don’t panic – this is a common problem with several potential solutions. In this comprehensive guide, we’ll walk you through the top reasons why Windows 10 won’t detect your SSD and show you how to fix it.
Quick Overview: Common Causes and Solutions
Before we dive into details, here’s a quick overview of the most common reasons Windows 10 won’t see your SSD:
- Faulty SATA cable – Replace SATA cable connecting SSD to motherboard
- Disabled in BIOS – Enable SSD storage controller in BIOS settings
- Drive not initialized – Initialize SSD using Disk Management
- Outdated drivers – Update SSD driver from manufacturer’s website
- Damaged SSD – SSD may be dead and need replacing
The good news is that in most cases, this issue can be fixed with some basic troubleshooting steps. Keep reading and we’ll walk you through how to diagnose and address the problem.
Step 1: Check Your SATA Cable Connection
The first thing to check is whether your SATA cable is properly connected. The SATA cable is what physically connects your SSD to the motherboard and provides the communication interface between the drive and the rest of your system.
Here’s how to check your SATA cable connection:
- Shut down your computer and unplug the power cable.
- Open the PC case and locate the SSD.
- Check where the SATA cable plugs into the SSD and make sure it’s securely attached.
- Follow the SATA cable to where it plugs into the motherboard. Make sure it’s snugly connected to the motherboard’s SATA port.
- If necessary, detach and reseat both ends of the SATA cable to get a tight connection.
While you’re checking the physical connections, inspect the SATA cable itself for any obvious damage or bent pins. If the cable is damaged, replace it with a new SATA III cable designed for SSDs.
SATA Cable Issues
A faulty SATA cable is one of the most common reasons for SSD detection issues. The cable may work fine with a traditional hard drive but fail to provide a solid connection for an SSD. Problems include:
- Loose connections resulting in intermittent detection
- Faulty or bent pins inside the SATA connectors
- Cable damage resulting in open circuits
- Excessive length or tight cable bends impacting performance
So if reseating the SATA cable doesn’t resolve your issue, replacing the cable should be your next step.
Step 2: Confirm SSD is Enabled in BIOS
Another easy thing to check is whether your SSD is actually enabled in your system BIOS. All storage devices connected to your motherboard need to be enabled in BIOS for Windows to detect them.
Here’s how to confirm the SSD is enabled in BIOS:
- Reboot your PC and enter the system BIOS, usually by pressing F2, F10 or Delete during startup.
- Navigate to the “Advanced” tab and select “Storage Configuration”.
- Locate the SATA port your SSD is connected to and ensure it is set to Enabled.
- If your SSD model is listed, make sure it is also set to Enabled.
- Save changes and exit BIOS.
This simple BIOS tweak could get your SSD up and running if it was somehow disabled. The next steps cover more advanced troubleshooting methods.
Step 3: Initialize and Format SSD in Disk Management
Disk Management is a built-in Windows utility for viewing and configuring hard drives and SSDs. If Windows 10 isn’t showing your SSD, initializing it in Disk Management can often resolve the problem.
Here is how to initialize and format the SSD to get Windows 10 to recognize it:
- Open the Start menu and type “disk management”. Open the Disk Management app.
- Look for your SSD in the list of disks. It may show as an “Unknown” drive with unallocated space.
- Right-click the disk and select “Initialize Disk”. Accept the default partition style of GPT.
- Right-click the area of unallocated space. Select “New Simple Volume”. Go through the wizard to format and assign a drive letter.
- Reboot your PC. Windows should now recognize your SSD.
This process essentially recreates the partition table and file system from scratch. Initializing in Disk Management forces Windows to detect the SSD and prepare it for use as storage.
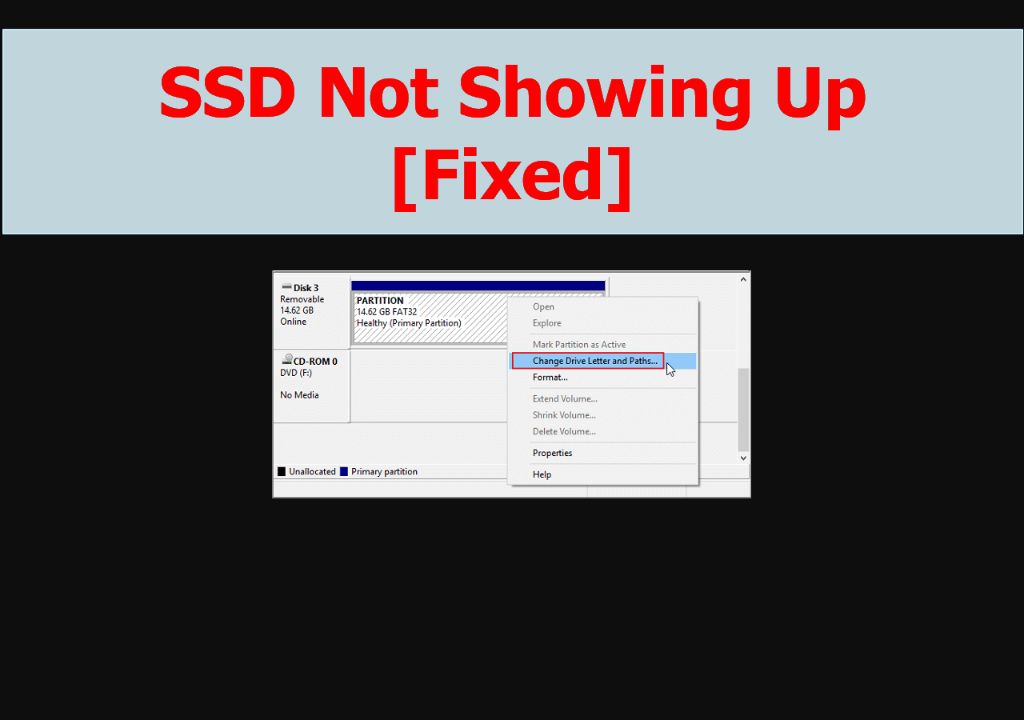
Other Disk Management Fixes
A couple other fixes you can attempt in Disk Management include:
- Change the drive letter and path if there’s a conflict with another disk
- Delete and recreate the volume to refresh the file system
- Convert the disk to Dynamic from Basic for added flexibility
So be sure to explore all the options in Disk Management to troubleshoot your unrecognized SSD.
Step 4: Update SSD Driver and Firmware
Outdated storage drivers and firmware can also cause SSD detection issues. Updating to the latest versions ensures maximum compatibility with Windows 10.
To update your SSD driver and firmware, follow these steps:
- Go to the manufacturer’s website and search for your specific SSD model.
- Download and install the latest driver package for your operating system.
- Also check for a BIOS/firmware update for your SSD and install it.
- Reboot your PC and see if Windows now detects your SSD correctly.
For additional drivers like RAID or AHCI controllers, also visit your motherboard manufacturer’s website. Keeping all storage-related drivers updated can prevent conflicts and detection issues.
Driver and Firmware Troubleshooting
Pay attention to the release notes for new driver and firmware versions. Vendors will often mention fixes for SSD detection and compatibility issues. Recent updates may address bugs experienced in your specific hardware configuration.
If the SSD is visible in BIOS but not Windows, a driver update is unlikely to help. Focus instead on disk initialization, changing drive letters, or reformatting the SSD.
Step 5: Test with Another PC
At this point if your SSD is still not visible, it makes sense to test it on another computer if possible. This helps determine whether the problem is with the drive itself or something on your PC.
To test your SSD on another system:
- Disconnect the SSD from your original computer.
- Connect it to another PC with a SATA port available.
- Boot into BIOS and confirm the SSD is detected.
- Boot into Windows and check Disk Management to see if the SSD shows up.
If the SSD works normally on a second computer, the issue lies with your original motherboard or Windows software configuration. Keep troubleshooting those areas.
However, if the SSD still doesn’t show up on another PC, it points to a hardware failure or compatibility problem with the drive itself.
SSD Compatibility
SSD compatibility issues can prevent Windows 10 from detecting the drive. Causes include:
- Older SSDs lacking proper Windows 10 drivers
- NVMe SSDs not compatible with older systems
- Conflicts between SSD firmware and your UEFI/BIOS version
For compatibility problems, updating BIOS, SSD firmware, and drivers could help. Or you may need a different SSD model known to work with your hardware.
Step 6: Check for Physical Damage and Repair
If your SSD passes testing on a separate system, the last resort is to check for physical damage and attempt data recovery.
Signs your SSD may be damaged or dead include:
- Visible damage like a cracked circuit board
- SSD makes unusual noises during operation
- Burnt smell coming from the SSD
- BSODs or frequent errors mentioning the SSD
First, check the SSD casing and circuit board carefully for any signs of drops, cracks, water damage or burnt components. Damage is often repairable by specialist data recovery services if the NAND flash chips are intact.
If the SSD hardware seems fine, use data recovery software to clone the drive before it completely fails. Then replace the SSD and restore your data from the clone.
Preventing SSD Damage
To keep your SSD healthy and avoid physical damage:
- Handle SSD carefully when installing to avoid impacts.
- Don’t expose SSD to liquids, humidity or temperature extremes.
- Don’t open SSD casing to avoid short circuits.
- Use surge protectors and shutdown gracefully to prevent corruption.
- Ensure sufficient airflow and don’t stack drives.
Recap: Top Fixes for SSD Not Showing in Windows 10
Here’s a quick recap of the solutions covered to troubleshoot an SSD not detected in Windows 10:
- Reseat SATA cable connections
- Enable SSD in system BIOS
- Initialize and format SSD in Disk Management
- Update SSD drivers and firmware
- Test SSD on another PC
- Check for physical damage and attempt data recovery
In most cases, issues like loose cables, disabled ports, or missing partitions can be easily fixed in under an hour. But for hardware failures or DOA drives, you’ll need to replace the SSD itself.
Persistence pays off – so run through all troubleshooting steps to get your SSD successfully up and running on Windows 10.
Frequently Asked Questions
Here are answers to some common questions related to SSDs not showing up in Windows 10:
Why does my SSD show up in BIOS but not Windows?
If your SSD shows up in BIOS but not Windows, typical causes are missing or corrupt drivers, no partition or file system, drive letter conflicts, or SSD hardware failures. Update drivers, initialize in Disk Management, change drive letter or test SSD on another PC.
How do I initialize an SSD?
To initialize an SSD in Windows, use these steps: 1) Open Disk Management, 2) Right-click the disk and select Initialize Disk, 3) Right-click unallocated space and select New Simple Volume, 4) Go through the wizard to create a partition and format.
Why is my external SSD not detected?
External SSD not detected issues can be due to loose cable connections, disabled USB ports in Device Manager, insufficient power, driver issues or dead drive hardware. Try different cables, ports and PCs to narrow down the cause.
How do I update SSD drivers?
To update SSD drivers, first identify the make and model. Then go to the manufacturer’s website and download the latest SSD drivers for your operating system. Install and reboot to troubleshoot driver issues.
Can I recover data from a dead SSD?
Recovering data from a dead SSD is difficult but sometimes possible. Specialist data recovery services can repair SSDs and attempt to clone data if the NAND flash chips are still intact. This is expensive but your only option if the SSD and data are very valuable.
Conclusion
SSDs not showing up in Windows 10 is a common issue with several potential fixes. Start by checking your SATA connections, enabling the drive in BIOS, and initializing in Disk Management. Updating drivers and firmware, changing the drive letter, testing on another PC, and checking for physical damage can also help troubleshoot. With some diligent diagnostics and the right solution, you can resolve SSD detection problems and get your drive up and functioning again.
