What is a Hard Disk Drive (HDD)?
A hard disk drive (HDD) is an electro-mechanical data storage device that uses magnetic storage to store and retrieve digital data using one or more rigid rapidly rotating disks (platters) coated with magnetic material (TechTarget, 2022). The platters are paired with magnetic heads, usually arranged on a moving actuator arm, which read and write data to the platter surfaces (Crucial, 2022).
HDDs use non-volatile memory, meaning they retain data even when powered off. Data is accessed in a random-access manner, meaning individual blocks of data can be stored or retrieved in any order rather than sequentially (Wikipedia, 2023). HDDs have traditionally been a common component of desktop and laptop computers, responsible for the mass storage of digital information. They offer high storage capacities at relatively low costs.
What is a SATA cable?
SATA stands for Serial Advanced Technology Attachment, which is a standard interface used to connect storage drives like hard disk drives (HDDs), solid state drives (SSDs), and optical drives to a computer’s motherboard. SATA was designed to replace the older Parallel ATA (PATA) standard with the goals of reducing cable size, increasing transfer speeds, and adding native hot swapping support.
SATA cables have a much thinner 7-pin connection than the wider 40-pin PATA ribbon cables. They transmit data in serial packets rather than parallel streams which allows for higher transfer speeds over longer cable lengths. SATA interfaces operate at speeds ranging from 1.5 Gbps up to 16 Gbps for the latest SATA III standard.
In summary, SATA cables are the most common interface used today for connecting storage drives inside a computer using a fast, thin serial connection to transfer data.
SATA Interface for HDDs
Most internal HDDs use the SATA interface to connect to the computer. SATA stands for Serial Advanced Technology Attachment and has become the standard interface for connecting internal storage drives like HDDs and SSDs in computers. SATA was designed to replace the older Parallel ATA (PATA) standard with faster data transfer speeds [1].
Whereas PATA used parallel communication to transfer data, SATA uses a serialized connection which allows for higher transfer rates. SATA connectors are much smaller and thinner compared to PATA connectors as well. SATA operates over a single cable instead of the wide ribbon cables used for PATA drives. The thin SATA cables allow for better airflow inside the computer case [2].
Currently most HDDs use the SATA III interface which provides transfer speeds up to 6 Gb/s. SATA has become the ubiquitous interface for HDDs, allowing for plug-and-play connectivity inside computers. Using a SATA interface and cable makes it very easy to install a new internal HDD.
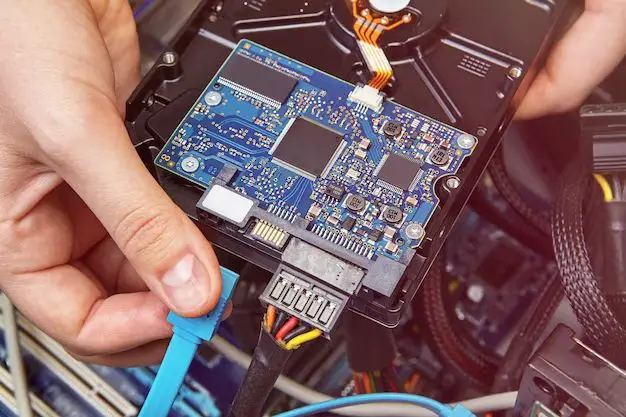
Using SATA Cables with HDDs
SATA cables provide the physical connection between the HDD and motherboard. The SATA interface uses a cable with a small L-shaped connector on each end. One end plugs into the motherboard, while the other end connects to the back of the HDD (Source). The SATA cable carries data between the HDD and the computer’s motherboard, enabling communication between these two components.
SATA cables are designed specifically to connect HDDs and SSDs inside modern desktop PCs and laptops. They provide a fast and reliable connection for storage drives to transfer data to and from the CPU and RAM. SATA cables support transfer speeds ranging from 1.5Gbps for early SATA standards up to 16Gbps for the latest SATA revisions. This makes SATA the preferred interface for connecting internal HDDs in a computer system.
Without a SATA cable, an internal HDD would have no way to send or receive data from the rest of the computer. The SATA interface allows seamless integration between the HDD and the motherboard. Every modern PC relies on SATA cables to utilize HDDs for data storage and retrieval.
SATA Cable Types
There are several different types of SATA cables that support different SATA revisions and speeds:
- SATA 1.0 – The original SATA interface, supports up to 1.5 Gb/s transfer speeds. Uses a narrower cable with a single row of pins.
- SATA 2.0 – Also called SATA 3Gb/s, supports up to 3 Gb/s speeds. Uses the standard SATA cable that is still common today.
- SATA 3.0 – Also known as SATA 6Gb/s, supports speeds up to 6 Gb/s. Uses the same cables and connectors as SATA 2.0, but requires both the cable and device to support SATA 3.0 for maximum speed.
Despite having different speed capabilities, all types of SATA cables use the same general 7-pin data connector design. Cables are backwards compatible, so a SATA 3.0 cable can be used with a SATA 1.0 hard drive, for example. But maximum speed depends on both devices supporting the fastest SATA version.
For more details, see this overview from Eaton: https://tripplite.eaton.com/products/sata-cables-and-speeds-compared
SATA Cable Connectors
SATA cables use small L-shaped connectors on each end that connect the cable to the HDD and motherboard. The connectors have 7 pins that align with the SATA ports on the HDD and motherboard. The connectors are keyed so they can only be inserted in one orientation, with the L-shape pointing towards the drive or port.
The 7 pins carry the power and data signals between the HDD and motherboard. One of the pins provides 3.3V power to the drive while the rest carry transmit and receive signals for data transfer. The small profile SATA connectors take up less space compared to older Parallel ATA connectors, allowing for better airflow and tighter cable routing.
According to Cablestogo, the L-shape also helps reduce cable strain and improve durability compared to straight connectors.
Connecting the SATA Cable
To connect a SATA cable to an HDD, you will need to plug one end of the cable into the HDD and the other end into a SATA port on your computer’s motherboard. According to WikiHow, the steps are:
- Locate an empty SATA port on your computer’s motherboard. SATA ports are typically labeled as SATA1, SATA2, etc.
- Identify the SATA data connector on the HDD. This will match the connector at the end of the SATA cable.
- Plug one end of the SATA cable firmly into the SATA port on the HDD.
- Route the SATA cable inside your computer case to the motherboard.
- Plug the other end of the SATA cable into the open SATA port on the motherboard.
- Make sure both ends of the cable are securely attached and the connectors are properly oriented.
Once connected, the HDD will be able to send and receive data from the motherboard using the SATA interface. Just be sure to also connect the SATA power cable from your power supply to power the drive.
Source: https://www.wikihow.com/Install-a-SATA-Drive
SATA Power Cable
In addition to the SATA data cable that connects the HDD to the motherboard, HDDs also need a SATA power connector from the power supply unit (PSU) to provide power to the drive. The SATA power cable has a different connector than the data cable and plugs into the HDD on one end and into the PSU on the other end.
According to ModMyMods, SATA power cables are designed to split, extend and redirect power from the PSU to HDDs using the standard SATA power connectors.
The SATA power connector on the HDD side usually has 15 pins while the connector on the PSU side may have 15 pins, or some may have 4 pins. It is important to verify the pin layout before connecting the SATA power cable between the HDD and PSU.
Configuring the HDD
Once the SATA cable is connected between the HDD and motherboard, the HDD may need to be initialized and formatted before it can be used. When a brand new HDD is connected, it will typically not show up in Windows File Explorer or Disk Management until it has been initialized. The initialization process essentially prepares the drive for use by creating a partition and file system.
To initialize a new HDD in Windows 10 or 11, go to Disk Management and locate the disk. Right click on the disk and choose Initialize Disk. This will launch the Initialize Disk wizard. Select the disk to initialize, choose a partition style (typically MBR or GPT), and click OK (Source).
After initializing the disk, the next step is to format it. Right click on the volume and choose New Simple Volume. Follow the wizard to specify the volume size, drive letter, file system (typically NTFS), and volume label. Click Finish to quickly format the volume.
The HDD should now show up in Windows File Explorer with the assigned drive letter. It is empty and ready to be used to store files and applications. The formatting process prepared the drive by creating the file system structure where data can be written and retrieved.
Benefits of SATA for HDDs
SATA provides several key benefits for connecting HDDs compared to older interfaces like PATA/IDE:
Enables fast data transfer speeds – SATA supports transfer rates up to 600MB/s, while PATA maxes out at 133MB/s. The faster speed allows quick access to files and programs stored on the HDD.
Hot swapping capability – SATA supports hot swapping, which means HDDs can be added/removed while the computer is running. This avoids downtime from powering down to change drives.
Thinner cables – SATA cables are much thinner and more flexible than PATA ribbon cables, improving airflow and tidiness inside the computer.
Longer cable length – SATA cables can be up to 1 meter long, compared to 18 inches for PATA. This enables more mounting flexibility.
Native command queuing – SATA implements NCQ to optimize drive requests and reduce rotational latency.
Point-to-point connectivity – With SATA, each drive connects directly to the controller without sharing bandwidth. This prevents bottlenecks.
Overall, the SATA interface provides significant performance and usability advantages for connecting HDD storage compared to older solutions like PATA/IDE.
