Reinstalling iTunes can be a necessary step to fix issues with the software or upgrade to a newer version. However, there are risks of losing your music library and playback data in the process. Thankfully, with the right preparation, you can safely reinstall iTunes without losing your music files or library organization.
Quick Answer
Yes, you can reinstall iTunes without losing your music by backing up your library and media files to an external hard drive prior to reinstalling. As long as you properly consolidate and back up your library, uninstall iTunes, and then reinstall the latest version, your music library should remain intact.
Steps to Reinstall iTunes Without Losing Music
Follow these key steps to safely reinstall iTunes and preserve your music library:
- Consolidate your library – Organize files into iTunes folder
- Back up iTunes library – Copy iTunes folder to external drive
- Deauthorize computer – Sign out of iTunes Store
- Uninstall iTunes – Delete current version from computer
- Install latest iTunes – Download and install newest version
- Authorize computer – Sign in to iTunes Store
- Transfer library backup – Copy iTunes folder back to computer
- Point iTunes to library – Direct app to media folder
Following this process correctly will ensure iTunes is completely removed and replaced without any data loss during reinstallation.
Why Reinstall iTunes?
There are a few main reasons you may need to reinstall iTunes on your computer:
- Software issues – Glitches, crashes, freezes, or problems syncing with iOS devices.
- Upgrades – Installing the latest iTunes version with new features and updates.
- New computer – Setting up iTunes and your library on a new Mac or Windows PC.
- Hard drive issues – Severe iTunes media file corruption requires full reinstallation.
Reinstalling can resolve common technical issues you may be experiencing with iTunes. It also provides a clean slate if you’ve made custom changes that have resulted in problems. Upgrading to the newest version also gives you the latest security patches and program features.
Risks of Losing Media When Reinstalling
Without proper backup procedures, reinstalling iTunes does run the risk of losing your music library and other media files. Here are some specific risks to be aware of:
- Missing media files – Individual songs, albums, movies, apps not transferring.
- Broken links to media – iTunes library still exists but links point to missing files.
- Lost playlists and play counts – Custom playlists and playback stats reset.
- Authorization loss – Deactivates computer from accessing iTunes Store purchases.
Thankfully, the proper reinstallation steps outlined in this article are designed to prevent all of these potential issues by fully backing up your library and safely transferring it to the new iTunes version.
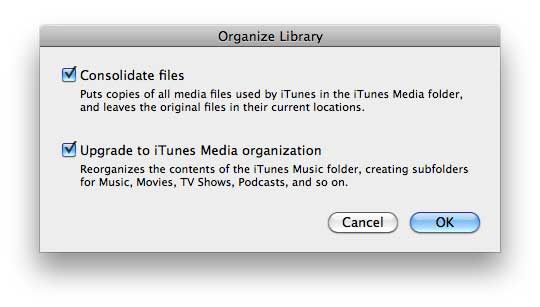
Step 1: Consolidate Your Library
Before backing up your library, you first need to consolidate your media files. This organizes your music collection and copies all media into the iTunes folder location:
- Open iTunes preferences from the Edit menu (Windows) or iTunes menu (Mac).
- Click on the Advanced tab in the preferences window.
- Check the box for “Copy files to iTunes Media folder when adding to library”.
- Click OK to save the change.
Next, you need to actually copy the files into the iTunes folder:
- Go to the File menu in iTunes.
- Select Library > Organize Library.
- Check the box for “Consolidate files”.
- Click OK.
This process can take awhile if you have a large media library. Once it finishes, all music and media will now be stored inside the iTunes folder rather than scattered across your computer. This lets you easily backup just this one folder.
iTunes Folder Location
The default iTunes folder locations are:
- Windows: C:\Users\Username\Music\iTunes
- Mac: /Users/Username/Music/iTunes
However, you can confirm the folder path by going to Preferences > Advanced and looking under “iTunes Media folder location”.
Step 2: Back Up iTunes Library
With your media files now consolidated into the iTunes folder, you’re ready to back up your library. This preserves all your music, playlists, play counts, ratings, and other important data.
To backup your library:
- Connect an external hard drive with enough free space to store your iTunes folder.
- Locate the iTunes folder path using the steps above.
- Copy this iTunes folder to your external hard drive.
- The copy process may take awhile depending on your library size.
On Windows you can right-click and select Copy to copy the entire iTunes folder. On Mac use Command-C to copy the folder.
This will create an exact copy of your current iTunes library that can be restored later. Make sure to store this backup in a safe place until you are ready to transfer it back after reinstalling iTunes.
What Gets Backed Up?
Here are some of the key iTunes library components that get preserved when you backup the iTunes folder:
- Music, movie, TV show, and book files
- Playlists, play counts, ratings, and metadata
- Podcasts, iTunes U content, and Internet radio presets
- iOS backups and sync settings
- iTunes Store purchase history and download information
- Album artwork and media file organization
Step 3: Deauthorize Computer
Before uninstalling iTunes, it’s important to first deauthorize the computer from the iTunes Store. This removes the link between your computer and iTunes account so that your purchases can be re-downloaded later.
To deauthorize your computer:
- Open iTunes and go to Account > Authorizations > Deauthorize This Computer.
- Enter your Apple ID and password to confirm.
- Repeat for any other Apple IDs authorized on the computer.
This will let you reauthorize the computer with your Apple ID during the reinstallation process, restoring your purchase history and downloads.
Step 4: Uninstall iTunes
With your library backed up and computer deauthorized, you’re ready to uninstall the current version of iTunes from your computer. This completely removes the software so it can be freshly installed.
On Windows:
- Go to Start > Settings > Apps.
- Search for “iTunes”.
- Select iTunes and click Uninstall.
- Confirm the uninstall process.
On Mac:
- Go to Applications in Finder and drag iTunes to the Trash.
- Go to Home > Library > Preferences and move all iTunes preference files to Trash.
- Empty Trash to fully delete iTunes and preferences.
Restart your computer after uninstall. This will wipe iTunes completely from your system.
Step 5: Install Latest iTunes Version
With iTunes removed, you can now install the latest version from Apple’s website. Follow these steps:
- Go to www.apple.com/itunes/download/.
- Click Download for either Windows or Mac.
- Open the downloaded installation file.
- Follow the on-screen prompts to install iTunes.
- Accept any permissions or access requests during installation.
- Restart computer after install is finished.
The latest version will include bug fixes, speed improvements, and support for syncing the newest iOS devices. Installing fresh often resolves many common problems faced by long-time iTunes users.
Step 6: Authorize Computer
Once the new iTunes version is installed, authorize your computer to link it to your iTunes Store account. This will restore your purchase history and re-download any previous media acquisitions.
To authorize your computer:
- Open iTunes and go to Account > Authorizations > Authorize This Computer.
- Enter your Apple ID and password to authorize.
- Do this for each Apple ID you wish to authorize for Store purchases.
Your music and app purchases, movie rentals, and TV show subscriptions will now become available within iTunes after authorizing.
Step 7: Transfer iTunes Library Backup
Now that you have a freshly installed iTunes version, you can transfer your iTunes library backup:
- Connect the external hard drive storing your backup.
- Locate the copied iTunes folder on the drive.
- Copy this iTunes folder back to the Music folder on your computer.
This will restore your iTunes media, playlists, metadata and other library data back to your computer. Make sure to copy back to the same Music/iTunes folder location that you consolidated to before uninstalling iTunes.
Step 8: Point iTunes to Library
The final step is to direct the newly installed iTunes to your restored library folder. This makes the media files and playlists accessible to iTunes again.
To do this:
- Open iTunes.
- Go to File > Library > Choose Library.
- Navigate to the restored iTunes folder.
- Select the iTunes Library file inside.
- Click Open.
iTunes will open and load your original library. All your music and other media should now be back and intact within iTunes. Play some songs and test out playback and playlists to make sure everything still works properly.
Troubleshooting Tips
Follow these tips if you encounter any issues restoring your library after iTunes reinstallation:
- Make sure you authorized your computer with the correct Apple IDs used for Store purchases.
- Double check the folder path to the copied iTunes library when pointing iTunes to the media.
- Re-consolidate your library files back into the iTunes Media folder if tracks are missing.
- Check preference settings like the iTunes Media folder location.
- Restart computer and reset iTunes app if you encounter odd behavior or crashes.
Testing playback with tracks from different playlists, albums, and genres helps validate your library is working properly. You can also inspect your library through the iTunes interface to spot any missing components.
Conclusion
Reinstalling iTunes doesn’t have to result in losing your entire music library, playlists, and metadata. By properly consolidating your library, backing up the iTunes folder, deauthorizing your computer, uninstalling the old iTunes version, installing the newest version, authorizing again, and finally transferring your backup – you can achieve a smooth transition without any data loss.
Be sure to give yourself plenty of time to complete each step carefully. Follow the right folder locations for your operating system, and don’t skip authorization or consolidation. With patience and care, you can have a fresh iTunes installation running your original library again.
