Apple’s iPad is one of the most popular tablets on the market, holding 81.12% of the global tablet market share. iPads come with built-in flash storage, ranging from 32GB to 1TB depending on the model. While this built-in storage is convenient, many users find they quickly run out of space for photos, videos, apps, and other files.
This is where external hard drives come in handy. External hard drives provide additional storage space for iPad users to store their files and free up the iPad’s internal storage. They connect to the iPad usually via the Lightning port or wirelessly over WiFi.
This article will provide a comprehensive overview of using external hard drives with the iPad. It will cover how to connect and access an external drive, eject it properly, compare built-in vs external storage, maintain and back up drives, troubleshoot issues, consider security implications, and recommend top drives for iPads. The key question this content aims to answer is: Can you eject an external hard drive from an iPad?
Connecting an External Hard Drive to an iPad
There are a few different ways to connect an external hard drive to an iPad depending on the model you have. The latest iPad Pro models include a USB-C port, allowing you to directly connect external USB-C hard drives without any adapters. For other iPad models like the iPad Air and standard iPad, you’ll need to use a special adapter to connect a USB hard drive.
The most common way is to use Apple’s Lightning to USB adapter, which has a female USB-A port to connect a standard USB hard drive. You can also find USB-C to USB-A adapters to connect USB hard drives to USB-C iPads like the iPad Pro and latest iPad Air.1
For hard drives that only have USB-C connectors, Apple’s USB-C to USB adapter allows you to plug those into an iPad’s Lightning port. There are also third party adapters like Anker’s USB C to Lightning adapter that work the same way.
Finally, wireless external hard drives that connect over WiFi are an option for using external storage without any adapters. For example, the WD My Passport Wireless SSD works with iPads and lets you access files over WiFi.
The key is finding an external hard drive that matches the ports and connectors on your specific iPad model. With the right adapter or wireless hard drive, you can expand the storage capabilities of any recent iPad.
Accessing Files on the External Hard Drive
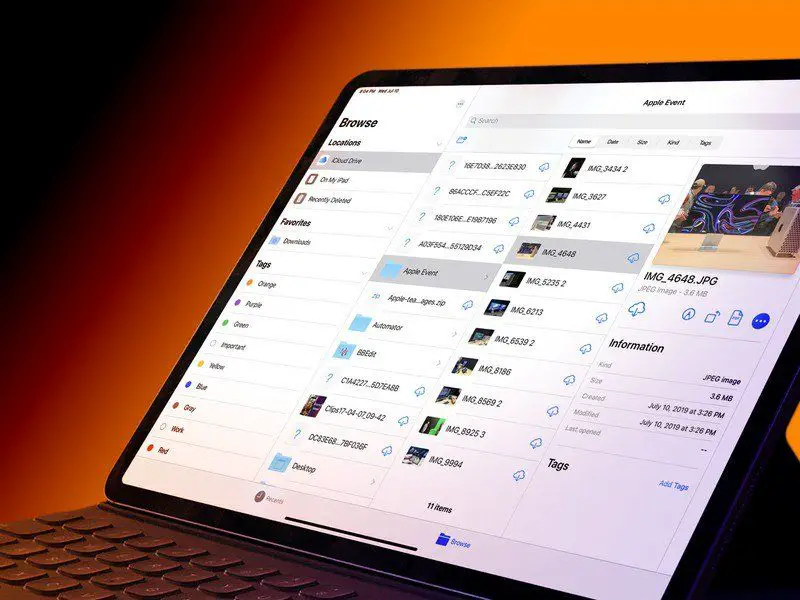
Once an external hard drive is connected to an iPad, you can access and manage the files on the drive through the Files app. The Files app comes pre-installed on iPads running iPadOS 13 or later.
To access the external drive in Files, tap on “Browse” in the sidebar and your connected external drive should appear in the locations list under Locations. Tap on the external drive to open it and view all the files and folders on the drive.
You can browse through folders, open files, move files between locations, copy, duplicate, rename, delete and tag files on the external drive. Most common file formats like photos, videos, documents, spreadsheets etc. can be opened directly within the Files app.
For media files like photos and videos, you can also access them from the Photos app. Just tap on “Albums” and you will see a new album for your external drive media files. This allows you to easily view media stored on the external drive.
Some third-party apps like document editors and media players also have access to external drives and you can open files from the drive within those apps.
Overall, the Files app provides a full-featured file management system for external drives allowing you to efficiently organize, view, edit and backup files stored on the drive.
Safely Ejecting the External Hard Drive
It’s important to properly eject an external hard drive from your iPad before disconnecting it physically. Failure to do so can result in data loss or corruption. Here are the steps to safely eject an external drive:
1. Close any apps that may be accessing files on the external drive. This includes apps like Photos, Files, Pages, etc.
2. Go to Settings > General and tap “Disks”.
3. Locate the disk name of your external drive and tap on the “Eject” icon next to it.
4. Wait for the “Safe to Remove Hardware” message to appear before disconnecting the drive.
5. As an extra precaution, you can power down your iPad completely before removing the external drive. This guarantees that all connections are closed.
Following these steps will ensure no data is lost or corrupted when ejecting an external drive from your iPad. For maximum data protection, powering down completely is recommended, but the eject process alone is generally sufficient (source).
Built-in Storage vs External Storage
Both built-in storage and external storage have their pros and cons when it comes to using them with an iPad. Here’s an overview of key differences:
Built-in storage refers to the flash memory chips built into the iPad itself. The main benefits of built-in storage are:
- Faster access speeds – Data can be read and written faster than external drives since it uses the iPad’s own storage chips.
- More reliable – No need to worry about external drive failure, connectivity issues.
- More secure – Data is encrypted by default and integrated into iOS protections.
- Easier to manage – The Files app provides easy access without extra steps.
The downsides of built-in storage are:
- Limited capacities – iPad storage maxes out at 2TB currently, while external drives go much higher.
- Not upgradeable – You can’t add more built-in storage later if you need it.
- No portability – Built-in storage can’t be removed and accessed elsewhere.
External hard drives and SSDs provide the benefit of expanded capacities from 1TB to tens of terabytes. They can also be unplugged and used across different devices. However, they rely on the iPad’s USB port which can limit transfer speeds. Externals drives will need to be reformatted for iPadOS compatibility, and they require separate power in some cases 1. Overall, built-in storage works best for active use and apps, while externals shine for mass media libraries and backups.
Maintaining and Backing Up External Drives
External hard drives provide great expandable storage for iPads, but it’s important to properly maintain and back them up. Here are some tips for keeping your external drive functioning smoothly with your iPad:
Regularly eject the external drive before disconnecting it from your iPad. To eject, go to Settings > General > Storage & iCloud Usage > Manage Storage, select your drive, and tap on the eject icon next to it. This helps prevent corruption or data loss.
Configure your iPad to automatically back up important files to your external drive. Go to Settings > Your Name > iCloud > iCloud Backup and enable backups to your external drive. This provides an extra layer of protection if anything happens to your iPad’s data or drive.[1]
Occasionally reformat your external drive to clean it up and optimize performance. Reformatting erases all data, so be sure to have backups. Go to Settings > General > Storage & iCloud Usage > Manage Storage, select the drive, tap Format Drive and confirm.
Consider using high-quality drives from reliable brands like Samsung and WD, which are built to withstand consistent use and last for years.
Store your drive safely and avoid exposing it to extreme temperatures, liquid, or physical impacts as these can damage the drive and result in data loss.
Scan your drive periodically with antivirus software and Disk Utility to check for and resolve any developing issues before they become catastrophic.
Maintain backups of your external drive on a secondary drive or cloud storage, so your data remains safe if anything happens to your primary external drive.
Troubleshooting External Hard Drives
Using an external hard drive with an iPad can be a great way to expand your storage capacity. However, sometimes issues may arise that prevent the external drive from being properly recognized or accessed on the iPad. Here are some of the most common problems and potential solutions when using external drives with iPads:
External drive not recognized
If your iPad is not detecting the connected external drive, first check that the drive is properly plugged in and has power. Try unplugging and reconnecting the drive. Also inspect the USB cable for any damage. As a last resort, restart the iPad to reset the system.
Can’t access files on external drive
Double check that you have properly imported and mounted the external drive in Files app. Go to Settings > General > iPad Storage to confirm the external drive shows up under Locations. Try restarting the Files app and your iPad.
Corrupted data on external drive
If files show up as corrupted or unusable, the external drive may have disconnected improperly. Try reformatting the drive on a computer before using with the iPad again. Also scan and repair the disk for errors.
Slow external drive performance
Using older external drives with slower disk speeds can result in laggy response times. Try a newer external SSD for faster speeds. Also be sure to use the charger cable for additional power if needed.
For additional troubleshooting tips, consult the drive manufacturer’s support site or Apple’s guides on using external storage with iPad.
Security Considerations
When using an external hard drive with an iPad, there are some important security risks to consider. While external drives provide more storage capacity, they also introduce potential vulnerabilities if proper precautions are not taken.
One of the main security risks with external iPad storage is the potential for data theft if the drive is lost or stolen. Unlike the built-in iPad storage which is encrypted by default, external drive data is fully accessible if the drive falls into the wrong hands. To mitigate this risk, users should enable encryption on their external drives using Apple’s Disk Utility or a third-party encryption program before connecting to the iPad (Apple Support). Encryption scrambles the data on the drive so it cannot be accessed without the password.
There is also a security risk that malicious software or malware could infect the iPad via the external drive. To reduce this threat, users should only connect drives from trusted sources and avoid opening unfamiliar files or programs. Running antivirus software on the external drive provides another layer of protection.
Additionally, enabling password protection on the iPad itself prevents unauthorized access if the device is lost or stolen. Users should be cautious about what apps and services can access external drive data and limit permissions whenever possible. Following best practices around iPad and external drive security helps ensure sensitive information remains protected.
Top External Hard Drives for iPad
When choosing an external hard drive for your iPad, there are a few key factors to consider based on how you plan to use it. Here are reviews of some top options:
For photographers and videographers who need lots of storage capacity, the SanDisk 2TB Extreme Pro Portable SSD is a great choice. With up to 2TB of storage and read speeds up to 1050MB/s, it provides fast transfer times for working with large image and video files. The rugged, water and dust resistant design also makes it ideal for on-location shoots.
If you need a more affordable option for basic backups and accessing media files, the Seagate Backup Plus Ultra Touch 2TB offers great value. It works with USB-C and USB 3.0 for compatibility with newer iPad Pro models and older iPads. The fabric enclosure gives it a sleek look.
For maximum portability, the SanDisk 1TB Extreme Portable SSD is super compact and lightweight at around 2 ounces. The rugged design is also drop-proof up to 2 meters. While capacity maxes out at 1TB, the blazing fast speeds up to 550MB/s make it perfect for editing video on the go.
Overall, look for SSD drives for best performance, rugged and compact designs for portability, and enough capacity to hold your files. Read customer reviews as well to pick the most reliable option for your iPad setup.
Conclusion
Although iPads do not support directly connecting external hard drives, with the right accessories and apps you can access and manage files on an external drive. Key points covered in this article include:
- Using wireless external drives or Lightning/USB adapters to connect drives
- Apps like FileExplorer and Documents by Readdle for accessing and managing files
- Following best practices for ejecting drives before disconnecting
- Understanding the pros and cons of built-in vs external iPad storage
- Tips for maintaining, backing up, and troubleshooting external drives
- Security considerations around external storage
- Reviews of top drives like the WD My Passport Wireless SSD
To conclude, while the iPad does not have a USB port, with the right accessories and apps you can connect an external hard drive to augment the iPad’s internal storage for accessing more files and media.
