What is a Trail Camera?
A trail camera, also known as a game camera or remote camera, is a specialized outdoor camera designed to be secured in place and left unattended for long periods to capture images or video when motion is detected [1]. Trail cameras are commonly used for hunting, home security, and wildlife research.
Trail cameras are equipped with sensors that detect motion or changes in heat signature. When triggered by motion, the camera will automatically take photos or record video, depending on how it is configured. Most trail cameras take high resolution still photos, though some also offer the option to capture lower resolution video clips.
Common uses for trail cameras include:
– Hunting – Recording wildlife activity to identify game movement patterns.
– Home security – Monitoring property and detecting trespassers.
– Wildlife research – Gathering data on animal populations and behavior.
– Timelapse videos – Creating montages of seasonal changes in landscapes.
Do New SD Cards Need to Be Formatted for Trail Cameras?
Yes, it is recommended to format new SD cards before using them in trail cameras. Formatting prepares the memory card for optimal performance and helps prevent issues.
Formatting a card erases all existing data, allowing it to be filled with new files from the trail camera. It restructures the card’s filesystem, creating a clean slate for the camera to save images and videos. Formatting also checks for and marks bad sectors on the card so they are not used to store data.
Without formatting, issues may arise from data fragmentation or file conflicts. For example, leftover data on the card could prevent the trail camera from properly saving new media. Formatting avoids such problems by ensuring the card is empty and ready for the camera.
In addition, most trail cameras perform a quick format on the card when you insert it. Doing a full format beforehand helps align the card to the camera’s filesystem for optimal speed and performance.
Some key reasons it’s recommended to format an SD card before using it in a trail camera include:
- Erase existing data so the card is empty
- Create an ideal file system for the camera
- Check for and mark bad sectors
- Prevent data fragmentation issues
- Avoid conflicts with leftover data
- Optimize write speeds and performance
In summary, formatting a new SD card removes any residual data and initializes it specifically for your trail camera, helping prevent errors and optimize the card’s function. It’s a quick, necessary step for reliable performance. As experts recommend, always format cards before first using them in your trail camera.
Sources:
https://www.easeus.com/partition-master/format-sd-card-for-trail-camera.html
https://www.kentfaith.com/blog/article_do-you-have-to-format-sd-card-for-trail-camera_3789
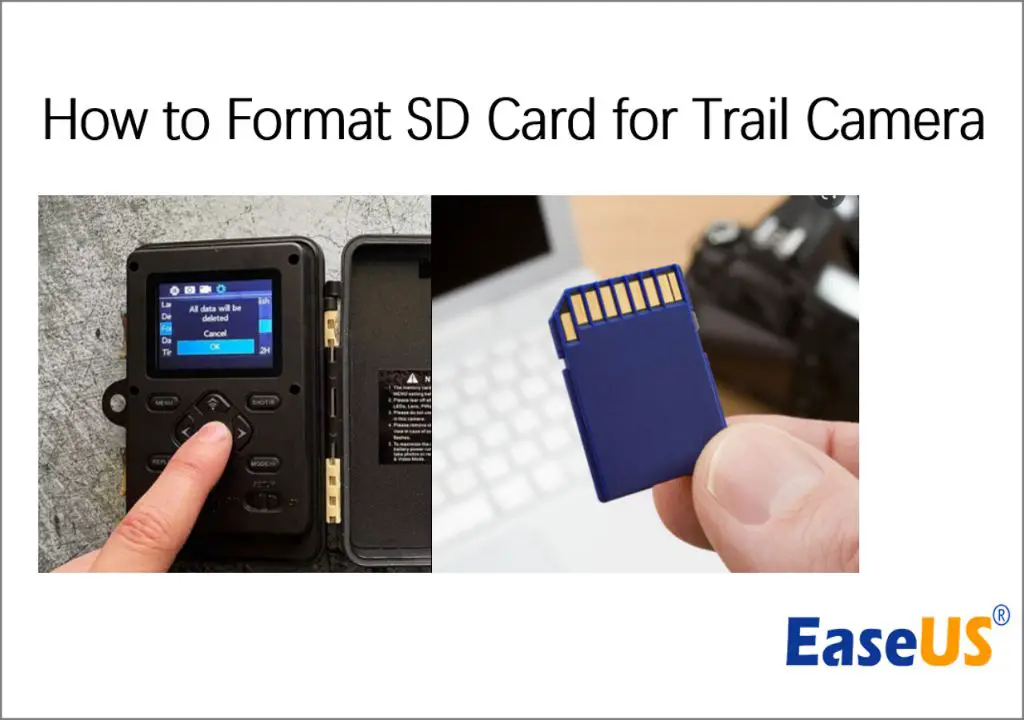
How to Format an SD Card for a Trail Camera
There are two main ways to format an SD card for use in a trail camera – using a computer or using the setup options on the trail camera itself. When formatting an SD card for a trail camera, it’s important to choose the FAT32 file system.
To format the SD card using a computer:
- Insert the SD card into your computer’s card reader.
- Open File Explorer on Windows or Finder on Mac.
- Right click on the SD card and select “Format”.
- Choose FAT32 as the file system.
- Click “Start” to begin formatting.
When using the trail camera menu to format:
- Insert the SD card into the trail camera.
- Access the camera settings menu.
- Find and select the “Format” option.
- Choose FAT32 and confirm formatting.
The FAT32 file system is recommended for trail cameras because it is compatible with both Windows and Mac for viewing photos/videos after downloading from the SD card. FAT32 also allows for many smaller files to be stored, which is ideal for the many photos captured by a trail camera. Some newer cameras may also give the exFAT option, but FAT32 remains the most widely compatible format.
Be sure to back up any photos on the SD card before formatting, as formatting will erase all data. Once formatted with FAT32, the SD card will be ready for use in your trail camera.
Choosing the Right SD Card
When selecting an SD card for your trail camera, there are a few key factors to consider:
Capacity
How much storage capacity you need depends on your trail camera’s resolution, video capabilities, and how often you plan to retrieve the SD card. Most experts recommend at least a 32GB card, but capacities up to 512GB are available. According to Outdoor Empire, a 32GB card can hold between 5,000-10,000 images depending on resolution. For frequent video recording or timelapse photography, a higher capacity SD card is recommended (Source).
Write Speed
Faster write speeds allow your camera to capture images in quick succession without lengthy saving delays in between. Look for read/write speeds of 80-95 MB/s or faster, classified as UHS-1 or V30 speed grades. Top choices like the SanDisk Extreme line offer transfer speeds up to 170 MB/s (Source).
Brand Recommendations
Highly rated brands for trail camera SD cards include SanDisk, Sony, Lexar, and Kingston. The SanDisk Extreme series gets top marks for reliability, while Sony and Lexar offer fast speeds at lower prices. Avoid generic no-name cards, which are more prone to errors (Source).
Inserting and Removing the SD Card
When inserting an SD card into a trail camera, it’s important to do so properly to avoid damaging the card or camera. Here are some tips for inserting and removing SD cards from trail cameras:
To insert the SD card, locate the SD card slot on the camera, usually behind a protective flap or door. Gently push the card into the slot until it clicks into place and is secure. Make sure the card’s label is facing outward and the contacts are facing down and aligned properly in the slot. Do not force the card into the slot if it does not slide in smoothly.
Before removing the SD card, always properly eject it first. There should be an “eject” option in the camera’s menu system. Select eject and wait for any activity lights to stop blinking before removing the card. This ensures any pending writes to the card are completed.
To remove the card, gently press on the edge until it releases from the slot. Be careful not to bend or flex the card. Pull it straight out without rocking it side to side. Avoid touching the metal contacts on the card.
After removing the SD card, carefully close any protective door or flap over the card slot. Make sure the seal is tight and properly aligned to prevent dust, dirt or moisture from entering the camera.
Following these steps will help prevent data corruption or damage to the SD card or camera when inserting and removing the card.
Source: https://www.kentfaith.com/blog/article_where-to-put-sd-card-from-trail-camera_12097
Setting Up the Trail Camera
Properly setting up your trail camera is crucial for capturing high-quality photos and videos of wildlife. Here are some tips for placement and configuring the right settings:
When placing your trail camera, look for game trails, water sources, and feeding areas that animals frequent. Position the camera about 3-4 feet off the ground facing north or south to avoid direct sunlight. Make sure there are no obstructions and attach to a sturdy tree using straps. Clear away any branches or foliage from the camera’s field of vision.
Most trail cameras have various settings you can customize such as image size, video length, time lapse mode, and more. Choose a high resolution image setting like 12MP or higher for crisp, clear photos 1. For videos, 30-60 seconds is ideal. Enable time lapse mode to capture a series of photos over a set time interval.
You’ll also want to set your trail camera to imprint information like the date, time, moon phase, temperature, and camera ID. This provides helpful context about when the photo was taken. For the timestamp, use a 24-hour military format for consistency.
Finally, make sure your batteries are fully charged and SD card has sufficient storage space. Use a high-capacity card between 32-128GB. Format the SD card before initial use to maximize performance.
Downloading and Viewing Trail Camera Photos and Videos
Once you’ve collected the SD card from your trail camera, there are a few options for viewing the photos and videos:
Use a card reader to connect the SD card to your computer. This allows you to access the files directly and is generally the fastest option. You can view the JPEGs and videos natively on your computer or use trail camera software like Wildgame Innovations Viewer or Bushnell Trophy Cam Image/Video Viewer to manage and view your photos (source).
Many trail cameras come with proprietary software included that is specially designed for managing photos and videos. For example, Browning’s Spec Ops software allows you to categorize, tag and edit trail camera media (source).
Some trail cameras have a built-in screen and controls that let you view photos directly on the device. This can be handy in the field for getting a quick preview before swapping out SD cards.
Organizing and Managing Photos and Videos
Once you’ve downloaded all the photos and videos from your SD cards, it’s important to have a system for organizing and managing them. This will make it much easier to find specific images when you need them.
Start by creating a logical folder structure and naming convention on your computer. For example, you could create separate folders for each camera location or date. Give the folders descriptive names like “North Field Camera – June 2022”. Within each folder, you may want to create sub-folders to further categorize images by date, time, or animal.
Tagging and rating your photos is another helpful way to sort through images and identify your best shots. Most photo viewing or editing software gives you the option to add tags and star ratings. Tags like “buck”, “doe”, “sunrise” etc. make it easy to search for certain types of photos later. Rating images helps prioritize your best pictures.
It’s also a good idea to cull any blurry, duplicate, or unneeded images. This removes clutter and saves storage space. But be careful not to delete anything too hastily – a slightly blurry photo could still be useful for reference.
By properly organizing and managing your trail camera photos on your computer, you’ll be able to easily browse, search, and access exactly the images you need. Check out photo organizing apps or software like DeerLab for features that can automatically tag photos to make sorting easier.
Source: https://deerlab.com/blog/organizing-trail-camera-photos
Troubleshooting SD Card Errors
One of the most common issues with using SD cards in trail cameras is getting error messages related to a corrupt or damaged card. Some examples of error messages you may see are “Card Error” or “Card Full Error.” This usually means there is a problem with the card that is preventing the camera from saving new photos or videos.
The first thing to try is reformatting the SD card. This can often resolve error issues by wiping the card and creating a new clean file system. To reformat, remove the card from the camera and use a computer to access the card. On Windows you can right click the drive and choose Format to reformat it. On Mac, open Disk Utility and select the card drive to erase it.
If reformatting doesn’t fix the error messages, then the SD card itself may be permanently damaged. Some signs of a damaged card are the card not being detected by devices, data corruption, or the plastic casing being cracked (source). In this case, the SD card will need to be replaced.
It’s generally a good practice to replace SD cards used in trail cameras every 1-2 years, since the constant writing and rewriting of data can degrade cards over time. The rugged outdoor environment can also damage cards. Purchasing name brand cards from reputable manufacturers can extend the lifespan as well.
Tips for Using SD Cards in Trail Cameras
Using SD cards properly in your trail camera can help avoid issues and capture all the photos and videos you intend. Here are some tips for getting the most out of SD cards with trail cameras:
Test new cards before deploying – When you get a new SD card, test it out in your trail camera at home before relying on it in the field. Take some sample photos and videos and make sure they save properly to avoid finding out too late the card is faulty.
Periodically reformat cards – Over time, fragments of old deleted files can build up on the card and slow down performance. Every month or so, reformat your SD card in the trail camera or on your computer to give it a fresh start.
Use name brand cards – Stick with established brands like SanDisk, Sony, or Kingston when buying SD cards. Avoid cheap off-brand cards that are more likely to have reliability issues or fail prematurely.
Avoid removing cards frequently – Each time you remove the SD card, you risk introducing dust or moisture into the card slot. Format the cards in the device when possible rather than removing them frequently.
