What Does It Mean to Format a USB Drive?
Formatting a USB drive erases all data stored on the drive and allows you to use the drive again from scratch. The format process removes all files and folders on the drive and restructures the drive’s file system, preparing it for new files to be written. Basically, formatting completely wipes and resets the drive.
Formatting is usually done when a USB drive becomes corrupted or unusable, and the normal methods for accessing files on the drive no longer work. It may also be done if you simply want to wipe everything off the drive and start fresh. Formatting erases all contents on the drive, so before formatting, make sure there is nothing you need to keep or recover on the drive.
The format process restructures the logical layout of the drive and overwrites the existing data areas on the drive so the previous contents cannot be accessed. Once formatting is complete, the files are gone for good unless you use special data recovery software before formatting. Overall, formatting erases and prepares the USB drive to be used again from the beginning.
Why You May Want to Avoid Formatting
Formatting a USB drive means erasing all of the data and files stored on the drive and reconfiguring its file system. This is typically done when the drive is having issues or is not being recognized properly by your computer’s operating system. However, formatting permanently deletes all files stored on the drive.
If you have important photos, documents, or other files saved on the USB drive, formatting should be an absolute last resort. Once formatting is complete, it is extremely difficult to recover any previous data from the drive. Specialized data recovery software is often required to restore formatted files.
Before considering formatting, first try to access the USB drive’s files and troubleshoot any access issues. Formatting should only be used if all other options to view the files have failed. Otherwise, you risk permanently losing valuable data.
First Steps: Try the Drive on Another Computer
One of the first troubleshooting steps is to connect the USB drive to a different computer and see if the files show up normally there. This helps determine if the issue is with the original computer rather than the files on the drive itself.
To do this, simply insert the USB drive into another computer. Open up the file explorer on that computer and look to see if all of the expected files and folders show up on the drive. Navigate through the different folders and verify the content is there.
If the files do appear normally on the second computer, then that indicates some setting or software on the original computer is likely causing the USB drive to not show files. It could be a corrupted driver, messed up preferences, or some other system-specific issue. The files are likely fine and intact on the drive itself.
In this case, you’ll want to focus troubleshooting efforts on the original computer rather than trying file recovery methods on the USB drive. Solutions like updating drivers, changing folder view settings, or running USB drive repair software may help resolve the issue on the problem computer so the files show up again.
Citations:
https://www.minitool.com/data-recovery/usb-drive-not-showing-files-and-folders.html
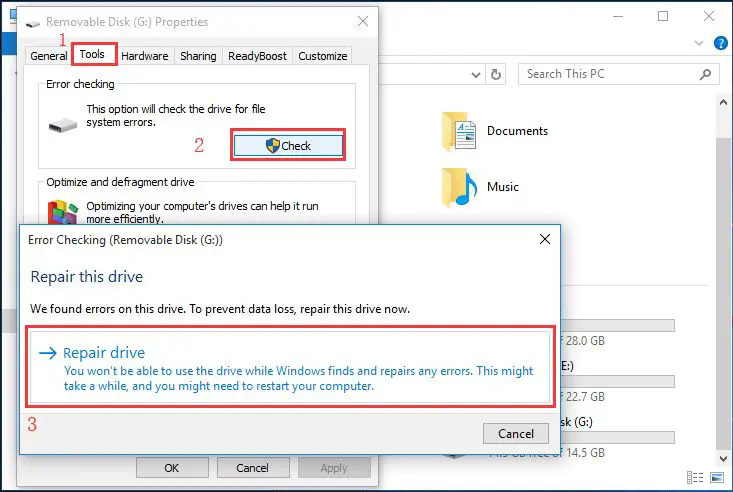
Check for Drive Errors
Running CHKDSK on the external USB drive can help detect and repair some file system errors that may be preventing access to the drive’s contents. CHKDSK scans the drive and looks for issues like bad sectors, lost clusters, cross-linked files, and directory errors. While it cannot recover lost data, fixing file system problems with CHKDSK can make your files accessible again without formatting the drive.
To run CHKDSK on an external drive in Windows, open the Command Prompt as administrator and type “chkdsk X: /f” where X is the letter of your external drive. Adding the “/f” parameter tells CHKDSK to fix any errors found. The scan may take a while depending on the drive size. You can also add “/r” to locate bad sectors and “/x” for an extra thorough scan.
If CHKDSK is able to repair the file system errors, you should then be able to view and access the USB drive’s contents in Windows Explorer without needing to format. This offers a simple way to potentially fix superficial corruption problems before resorting to more involved data recovery methods.
Sources:
https://www.minitool.com/news/run-chkdsk-on-external-drive.html
https://www.anyrecover.com/external-device-recovery-data/usb-repair/
Try USB Drive Repair Software
Specialized software can repair USB drives and may fix corruption issues without formatting. These USB repair tools use advanced algorithms to scan drives and repair errors related to formatting and file systems. Some popular USB repair software options include:
Wondershare Recoverit – This data recovery software can fix USB device errors, restore lost files, and recover data from formatted or corrupted drives. It works on Windows and Mac (source).
EaseUS USB Repair Tool – Fixes USB corruption and write protection issues. It can repair damaged drives without losing data (source).
USB Repair Portable – A portable app designed to diagnose and fix USB drive errors. It supports flash drives, external hard drives and other storage devices (source).
Before formatting, it’s worth trying USB repair software first. These tools may be able to fix the drive and recover data without erasing everything.
How to View Drive Files on Windows
Even if Windows is unable to open the files on your USB drive, you may still be able to view the drive’s partitions and contents in Windows Disk Management.
Disk Management allows you to see the partitions and file structure of drives connected to your computer, even if Windows cannot fully access them. This can help determine if your files still exist on the USB drive.
To open Disk Management on Windows 10 or Windows 11:
- Open the Start menu and search for “Disk Management”.
- Click on the Create and Format Hard Disk Partitions result.
In Disk Management, look for your USB drive in the list of disks. You should see the drive partitions displayed, indicating that the basic file structure is still intact.
If you see your expected drive partitions and a listing of used space on the USB drive, it means your files still exist on the disk even if Windows cannot open them normally. This suggests it may be possible to recover the files without formatting the drive.
However, if the USB drive shows as unallocated space in Disk Management, it likely means the drive’s partition and file system have become corrupted or damaged. Your files may still be recoverable, but it becomes riskier to try repairing the drive without formatting.
Overall, checking Disk Management can provide insight into the internal state of your USB drive on Windows, before resorting to formatting it (source).
How to View Drive Files on Mac
One option for potentially viewing files on your USB drive without formatting on a Mac is to use Disk Utility. Disk Utility allows you to mount drive partitions, which may let you access files even if the drive is corrupted or unrecognized.
To use Disk Utility:
1. Open Disk Utility on your Mac. You can find it by searching in Spotlight or going to Applications > Utilities.
2. In the sidebar, look for your USB drive and expand it to show any partitions. Click on a partition to select it.
3. Click the “Mount” button at the top. This will attempt to mount the partition.
4. If successful, you can now navigate to that partition in Finder and may be able to view files.
This method may allow you to access files without fully formatting the drive. However, if the drive is severely corrupted, a full format may still be required. For more information, see Apple’s guide on using Disk Utility: https://support.apple.com/guide/disk-utility/restore-a-disk-dskutl14062/mac
Advanced File Recovery Methods
If you have tried the methods listed above and still cannot access important files on your USB drive, you may need to turn to data recovery experts as a last resort. There are professional data recovery services that specialize in salvaging data from damaged, corrupted, or formatted drives using advanced tools and techniques that are not available to the average user.
For example, Flash Drive Data Recovery – Secure Data Recovery Services employs certified engineers who can disassemble USB flash drives in a dust-free cleanroom and attempt to recover data using specialized hardware and software.
Similarly, DriveSavers offers sophisticated solutions like advanced chip-off, which directly reads data off the flash memory chips inside a USB drive. This can potentially restore data even if the USB controller chip is damaged.
These kinds of professional data recovery services are often expensive but can be worth the cost if you have critical or irreplaceable files on a corrupted USB drive. While expert recovery cannot be guaranteed, it offers the best chance of salvaging data from a drive that has succumbed to logical or physical damage.
When to Format as a Last Resort
Formatting a USB drive means erasing all of the data on it and resetting it to factory settings. Before taking this drastic step, you’ll want to exhaust all other options for recovering your files first.
According to Disk Drill, you should only format the USB drive as a last resort after trying recovery software, using the drive on another computer, and checking for errors. The Wondershare article agrees, saying you should format “if nothing works” as a last step after trying their USB repair software.
Be prepared to lose all files on the drive when you format it. Back up any important files first if possible, using recovery software or by connecting the drive to another computer. Disk Drill recommends imaging the USB drive before formatting as a way to preserve data.
In summary, formatting your USB drive means erasing it completely. Only do this after trying all other file recovery options, and be resigned to losing any unsaved or unrecovered files in the process.
How to Format a USB Drive
There are a few different ways to format a USB drive on Windows and Mac operating systems:
On Windows, you can use Windows Explorer or Disk Management to format the drive. To use Windows Explorer, right-click on the drive in Explorer and select “Format”. This will launch the format dialog where you can configure options like file system and allocation unit size. In Disk Management, you can right-click the drive partition and select “Format” [1].
On Mac, you can use the built-in Disk Utility application to format drives. Open Disk Utility, select the USB drive, click “Erase”, and configure the format options. This allows you to format with formats like Mac OS Extended or ExFAT [2].
There are also third-party formatting tools available like SD Formatter and HP USB Disk Storage Format Tool. These provide additional formatting options not available in the operating system utilities.