What Does It Mean to Add a Hard Drive to the Boot Sequence?
When you turn on your computer, it goes through a boot process to load the operating system. This involves checking storage devices like the hard drive in a specific order to locate the bootable files needed to start the OS (Techopedia). This order is known as the boot sequence or boot order.
The boot sequence tells the computer which storage device it should check first, second, third, and so on when booting up. Devices earlier in the sequence are checked before devices later in the sequence. The computer loads the OS from whichever device contains the bootable files it finds first in the order.
Adding a hard drive to the boot sequence means configuring that hard drive to be checked during the boot process. This allows you to install an operating system on the new hard drive and boot from it. The hard drive has to be added to the boot order so it will be checked and its OS loaded.
Determine the Boot Mode
Before adding a new hard drive, you first need to determine if your computer uses the legacy BIOS or newer UEFI firmware for booting. BIOS (Basic Input/Output System) is the traditional system firmware used on most older PCs. UEFI (Unified Extensible Firmware Interface) is the newer standard that replaces BIOS on modern systems.
There are some key differences between UEFI and legacy BIOS:
- UEFI offers faster boot times and better security features like Secure Boot. BIOS is slower and less secure.
- UEFI uses GPT partitioning while BIOS uses MBR partitioning.
- UEFI boots from EFI system partitions while BIOS boots from the Master Boot Record.
To check if your system uses UEFI or BIOS, you can look for a “Boot Mode” or similar setting in your firmware setup utility. This may be labeled as “Boot Mode”, “Boot Option”, or something similar (Source). Selecting between UEFI and Legacy/BIOS modes will confirm which firmware your PC uses.
It’s generally recommended to use UEFI boot mode if available, as it includes more advanced features. But BIOS mode may be required for older operating systems or certain boot configurations.
Enter the BIOS or UEFI Interface
To enter the BIOS or UEFI interface on a Windows 10 computer, you need to access it during the boot process before Windows loads. There are a few methods to do this depending on your computer brand and model:
For HP, Dell, Lenovo, and many other computers, tap the F2, F10, F12, or Delete key continuously when the manufacturer logo appears on startup. On some Asus models, press F2 while turning on the computer. Refer to your computer’s documentation to find the exact key.
On a Microsoft Surface device, hold down the Volume down button while pressing and releasing the Power button. For other tablets, try pressing Volume up and Power, or Volume down and Power.
If these methods don’t work, you may need to access the Advanced startup options in Windows 10 itself: Go to Settings > Update & Security > Recovery and click Restart Now under Advanced startup. On the next screen, choose Troubleshoot > Advanced options > UEFI Firmware Settings. This will restart your computer into the firmware settings screen.
Once in the BIOS or UEFI setup utility, look for options related to the boot order, boot sequence, or boot priority to add your new hard drive. The process may vary between computer manufacturers.
Locate the Boot Order Options
The boot order options are typically found in the BIOS setup utility under a menu item labeled “Boot” or “Boot Order.” The specific steps to access the boot order settings may vary depending on your motherboard manufacturer and BIOS version, but the general process is the same.
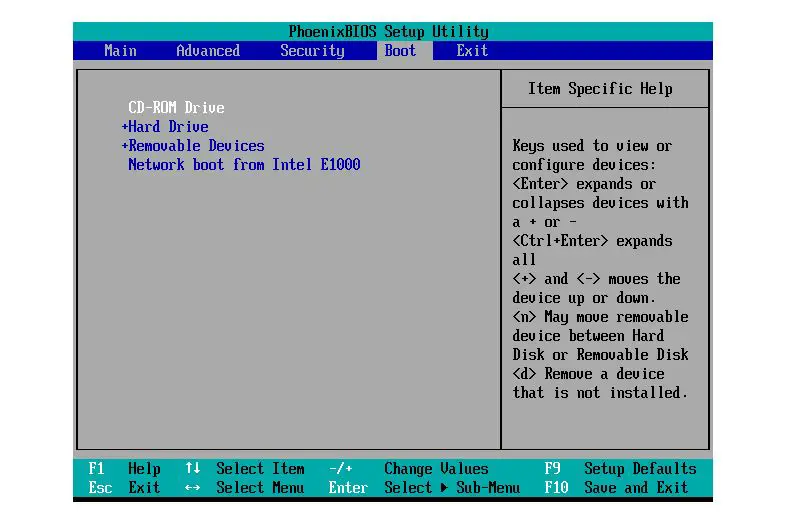
Upon entering the BIOS setup utility, use the arrow keys to navigate to the Boot tab or Boot Order menu. The boot devices detected by the BIOS will be listed here in the current boot order sequence. Hard drives, optical drives, USB devices, and network interfaces may be present in this list.
To change the order, highlight the device you want to move using the arrow keys, and press Enter. This will prompt you to select a new position in the boot order sequence for that device. After reordering to your preferences, ensure the hard drive you want to boot from is at the top of the list.
For example, on an ASUS motherboard, the boot order options are found by going to the Advanced tab in the BIOS and selecting Boot. The specific steps may be different for other manufacturers like MSI, Gigabyte, ASRock, etc. Refer to your motherboard manual for details if you are unsure where to find the boot order settings.
Add the New Hard Drive
To add the new hard drive to the boot sequence, you will need to access the BIOS setup utility on your computer. This is usually done by pressing a key like F2, F10 or Del during the initial boot process.
Once in the BIOS, navigate to the “Boot” section and look for boot device options like “Boot Order” or “Boot Priority”. This is where you will find the list of available boot devices.
The new hard drive should be listed here, but may not be enabled. To enable it, select the drive with your arrow keys and press Enter. This will add the drive to the boot sequence.
You can also reorder the boot sequence here so your new hard drive is prioritized. Make sure to move it higher in the list if you want the system to boot from it first.
According to this source, once you have added and ordered the new hard drive, be sure to save changes and exit the BIOS. The system should now boot from the newly added hard drive.
Reorder the Boot Sequence
Once you have located the new hard drive in the boot options menu, you will need to prioritize it in the boot sequence to ensure the computer boots from the new drive first. This involves reordering the list of bootable devices in the BIOS or UEFI settings.
Typically, the new hard drive should be moved to the top of the boot order list. This will make the computer attempt to boot from that drive before any others. Some BIOS menus allow you to drag and drop devices to rearrange the order, while others require you to select the device and use up/down arrows or a promote/demote function.
Be sure to move any other necessary boot devices like the CD/DVD drive to follow after the new hard drive in the sequence. Devices that are lower in the order will only be attempted if the computer fails to boot from any earlier devices.
Once the new hard drive is prioritized first in the boot order, the computer will look for the operating system and boot files on that drive by default each time it starts up 1.
Save Changes and Exit
Once you have finished making all of your BIOS or UEFI changes to add the new hard drive to the boot sequence, you will need to save the changes and exit the interface to reboot the computer.
In the BIOS or UEFI, navigate to the “Save & Exit” tab or menu. This is typically the last tab or menu within the interface. Here you will find options to save or discard any changes made, as well as options to exit or reboot.
To save the changes, select the “Save Changes and Exit” option. This will save all the configuration changes you have made and then exit the BIOS/UEFI and reboot the computer.
After rebooting, the computer will boot using the new boot sequence with the additional hard drive added. You can verify the new boot order has taken effect by entering the BIOS/UEFI again.
Some systems may have a “Save Changes and Reset” option instead of exit. This will save the changes and restart the BIOS/UEFI interface. You will then need to navigate to the “Exit” tab or menu and select “Exit Saving Changes” to complete the process.
Refer to your system or motherboard manual if you have any trouble locating the proper save and exit options. For example, see this guide for more details on the save and exit menu in BIOS.
Verify the New Boot Order
After saving the changes and exiting the BIOS or UEFI interface, it’s important to verify that the new boot order took effect properly. Restart the computer and observe the boot process. The computer should now boot from the newly added hard drive first instead of the previous first boot device.
If the computer does not boot from the new hard drive, go back into the BIOS/UEFI and double check that the changes were properly saved. Make sure the new hard drive is showing up in the boot options menu and is in the correct priority order.
You can also try temporarily disabling or removing the previous first boot device to force the computer to boot from the newly added hard drive. This will confirm the new boot order is working correctly before re-enabling other boot devices.
Once the computer successfully boots from the new hard drive first, the boot order change has been verified and you can continue with installing the operating system.
For more information, see this guide on changing the boot order in BIOS.
Install the Operating System
After adding the new hard drive to the boot sequence, the next step is to install your operating system onto the new drive. There are a couple options for doing this:
If you have installation media for your OS like a disk or bootable USB drive, you can boot from that media and walk through the installation steps. Be sure to select the new hard drive as the destination for the OS files. Follow the on-screen prompts to complete the installation.1
Alternatively, you can use migration software to clone your OS from the old drive to the new drive. Software like Macrium Reflect makes this process straightforward. You would boot from the old drive, connect the new drive, run the software, select the drives, and clone the OS. The software handles the rest.2
If you don’t have installation media or migration software, you may be able to use recovery partitions or system image backups to restore your OS onto the new drive. Consult your computer or OS documentation for instructions.
Regardless of method, be patient during the OS installation and don’t interrupt it. Once finished, you should be able to boot directly to the OS on the new drive.
Troubleshooting Tips
Some common issues when changing the boot order are:
The system gets stuck in a boot loop. This can happen if the boot order change was not properly saved in the BIOS/UEFI settings before exiting. Try resetting the CMOS to default settings by removing the CMOS battery for a few minutes according to your motherboard manual instructions. Then go back into the BIOS/UEFI settings and reorder the boot sequence again and be sure to save changes before exiting.
The new hard drive is not detected. Double check that the new hard drive is connected properly and powered on. You may need to enter the BIOS/UEFI settings and enable that SATA port if it is disabled. The new hard drive will not show up as a boot option if the BIOS/UEFI does not detect it.
Operating system fails to load from new hard drive. After changing the boot order, if the system tries booting to the new hard drive but fails to load the OS, there could be an issue with the OS installation on that drive. Try reinstalling or repairing the OS boot files on the new hard drive.
Resetting BIOS to default values changes boot order. Some motherboards will revert the boot order when resetting BIOS defaults. After resetting CMOS, double check the boot order in BIOS/UEFI and reorder if necessary.
Boot order randomly changes on reboot. Some motherboards do not properly save boot order settings, causing the order to shuffle on restart. Try updating the BIOS/UEFI firmware or boot into the interface and reorder/save changes again until the settings properly persist.
