With the launch of Apple Music and the slow demise of iTunes, many iPhone users are looking for ways to add music to their devices without using the bloated iTunes software. Thankfully, there are several easy methods to load music onto your iPhone without iTunes.
Use Apple Music
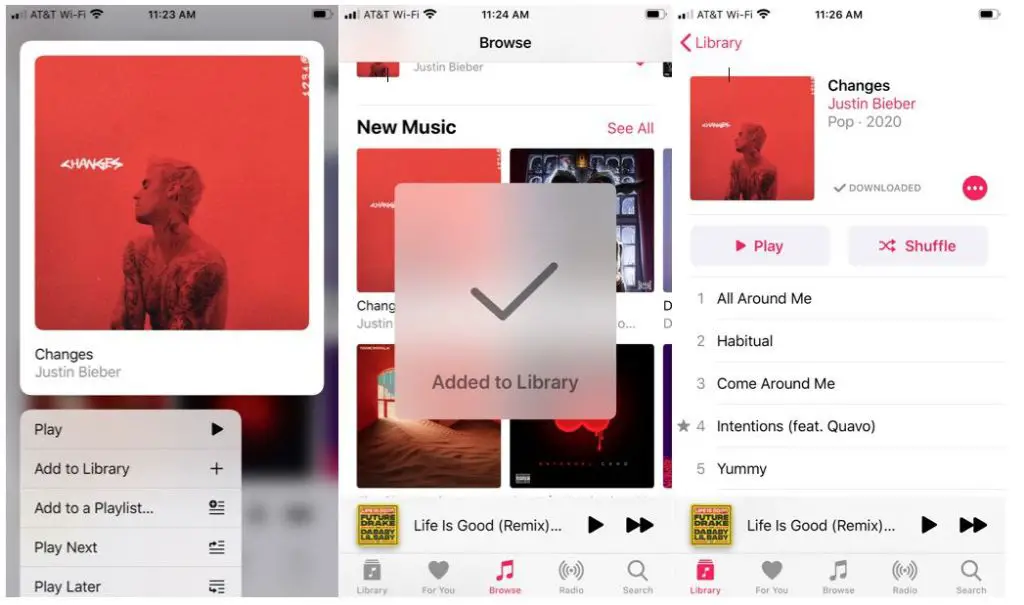
The most obvious iTunes alternative is Apple’s own music streaming service, Apple Music. An Apple Music subscription gives you access to over 75 million songs that you can download for offline listening. Just log in with your Apple ID, search for music, and add songs, albums or playlists to your Library. Everything you add gets automatically downloaded to your iPhone.
Apple Music has no upload limits, so you can add as much music as you want. It works seamlessly with the Music app on iPhone. The main downside is the $10 per month subscription fee.
Sync with Finder (macOS Catalina or later)
For Mac users running macOS Catalina or later, you can sync music using the Finder app instead of iTunes. Connect your iPhone to your Mac via USB and open Finder. In the sidebar, you should see your connected iPhone. Click on it and navigate to the Music tab.
Here you can drag and drop music files or folders onto your iPhone. Make sure Sync Library is checked to sync any music you add to your Mac’s music library. Syncing via Finder copies the music files directly onto your iPhone.
Use a Cloud Service
Cloud storage services like Google Drive, Dropbox or OneDrive make it easy to upload music from your computer and stream or download it on your iPhone. Here’s how it works:
- Upload your music files to your cloud service app or website
- Install the cloud service app on your iPhone
- Tap on a song to stream it, or tap the download icon to save it offline
Most cloud services have free storage quotas between 2GB to 15GB, so you can add at least some of your music collection. Paid plans remove upload limits for a monthly fee.
Use a Third-Party App
For maximum flexibility, consider using a dedicated third-party app to transfer music. Apps like WALTR 2, iMazing, AnyTrans and PhoneTrans give you options like:
- Wirelessly transferring music over Wi-Fi
- Converting and transferring unsupported audio formats like FLAC
- Transferring music from multiple sources like iTunes, downloads folders and streaming services
- Partial and batched transfers for large libraries
- Preserving playlists and metadata when transferring
Most of these apps have free trial periods so you can test which works best for your needs. The pro versions normally cost under $50 as a one-time purchase.
Set Up Home Sharing
If you have a home Wi-Fi network, enable Home Sharing to stream music directly from a Mac or PC on the same network. Here’s how to set it up:
- On your Mac/PC, open iTunes and turn on Home Sharing
- Enter your Apple ID when prompted
- On your iPhone, open Settings > Music and log in to Home Sharing with the same Apple ID
- Any shared libraries on your computer will now be available in the Music app on your iPhone
All the music is streamed over Wi-Fi, so nothing gets stored on your iPhone. But you can listen to everything in your iTunes libraries on demand without needing a cable. Home Sharing works with up to 5 devices.
Sync via the Cloud
If you use iCloud to store your music library, you can stream your full collection or selectively download albums and playlists for offline listening. Here’s how iCloud Music Library works:
- In iTunes on your Mac/PC, enable iCloud Music Library
- All your music uploads to iCloud, including any purchases
- On your iPhone, go to Settings > Music and turn on iCloud Music Library
- Your full library is now available to stream or download
Make sure you have enough iCloud storage for your library size. Up to 100,000 songs are supported. One downside is that iTunes Match can sometimes mislabel or fail to match certain songs.
Sync Music Manually via Wi-Fi
If your music library lives inside various folders on your computer, you can manually transfer songs over Wi-Fi using the Files app and a tool like Documents by Readdle. Here’s how the manual method works:
- On your iPhone, install the Documents app by Readdle
- On your Mac/PC, install the Documents desktop app
- Open Documents on both devices and connect them to the same Wi-Fi network
- From your computer, drag and drop music files and folders to the Documents library
- Open the Documents app on your iPhone and your uploaded music will be there
- You can play music directly within Documents or move the files using the iOS Files app
This method takes more work, but gives you full control over exactly which music gets transferred.
Import CDs
Remember CDs? If you still have a physical music library, you can import tracks into iTunes or another music app on your Mac/PC, and then sync to your iPhone.
On Windows, iTunes can import music CDs automatically when inserted into your computer’s CD drive. On Mac, you can import CDs into iTunes by going to File > New and selecting Import CD.
Alternatively, you can use a free app like MusicBee (Windows) or Audacity (Mac and Windows) to import and digitize music CDs if you don’t want to use iTunes.
Download from the Internet
You can find and download music files on the web and then sync them across. Free, legal sources include:
- Music streaming services – Download for offline listening
- Music blogs and internet radio – Look for download links or record the stream
- Free music archives – Often classical, jazz, live concerts, etc.
- Online music stores like Bandcamp and Jamendo – Save music purchases directly to your computer
For paid downloads, services like iTunes and Amazon MP3 let you directly download music files on your computer. Remember to only use legitimate sources and stay away from illegal piracy sites.
Digitize Your Physical Media
Have shelves of old CDs, cassettes, vinyl or MiniDiscs collecting dust? Digitizing them can revive your musical treasures. You’ll need the right hardware and software:
- CD/DVD Drive – Use a computer’s internal or external optical drive
- USB Turntable or Cassette Deck – Connect to computer via USB cable
- Audio Digitizing Software – Convert audio from physical formats into digital files
Check if your turntable or cassette deck has built-in digital conversion. Alternatively, use a program like Audacity to record and convert the audio into digital formats like MP3.
Find Alternate Versions
If certain songs are missing from your collection, explore alternative versions shared legally by fans. You can often find live recordings, demos, remixes and covers of popular songs on YouTube and music blogs. Use online MP3 converters to download audio from YouTube videos.
Transcode Unsupported Formats
The iPhone doesn’t support FLAC, WMA, ALAC and other less common audio formats. Convert these to a supported format like MP3 before syncing to your iPhone. You can use free audio transcoding software like XLD (Mac), Freemake Audio Converter (Windows), or online tools like Zamzar.
Troubleshooting Tips
Having trouble getting your music to sync properly? Try some of these tips to resolve common issues:
- Check your Wi-Fi connection and try disconnecting/reconnecting devices
- Force quit and reopen any problem apps
- Update to the latest OS versions if syncing problems appeared after an update
- Disable and re-enable iCloud Music Library if tracks are missing
- Authorize computers and check Apple ID if Home Sharing isn’t working
- Increase cloud storage if you run out of space for music
- Change file permissions if transferring music via the Files app
Conclusion
While iTunes was once the sole gateway for getting music onto your iPhone, those days are over. In 2023 there are better, faster methods to transfer music without dealing with bloated software. Whether you prefer streaming, syncing from the cloud, transferring over Wi-Fi or just dragging and dropping, you have choices.
The best iPhone music transfer method for you depends on your needs. Do you want an instant full library from streaming? Maximum file format support? Full manual control over transfers? Lots of storage space? With a little testing, you can find the right way to move your music and finally ditch iTunes.
