Having a USB drive set to read only can be frustrating when you want to add or edit files. Luckily, changing a USB drive from read only to read/write is usually very simple. Here are some quick answers to common questions about making a read only USB drive writable again:
Why is my USB drive read only?
There are a few common reasons a USB drive may be set to read only:
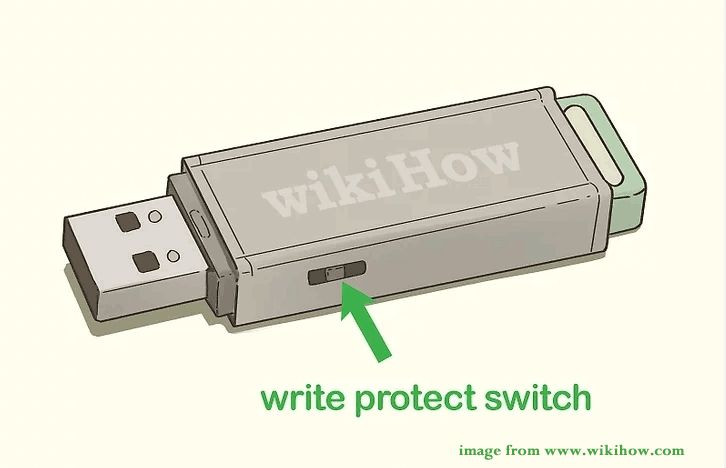
- The drive is physically locked – Many USB drives have a small switch on the side that can toggle between read/write and read only modes. If this switch is slid to the lock position, the drive will be read only.
- The drive is formatted as read only – Drives formatted with write-protection enabled will be read only regardless of the physical lock switch position.
- Drive errors – If the USB drive has experienced certain errors, the operating system may mount it as read only to prevent further damage.
- Insufficient permissions – On Linux or macOS, you may not have permission to write to the drive if it is mounted with read only permissions.
How can I change the drive to read/write?
If your USB drive is physically locked, simply slide the small switch on the housing of the drive to the unlocked position. For other cases, try these steps:
- Safely eject the USB drive from your computer if it is currently plugged in.
- Inspect the drive for a physical lock switch and make sure it is not in the locked position.
- Plug the USB drive directly into your computer’s USB port. Avoid using a USB hub.
- Check the file system of the drive:
- On Windows, open File Explorer, right click on the drive, and select Properties. Look at the File System type.
- On macOS, select the drive and press Command-I to Get Info. Look at the Format field.
- On Linux, open a terminal and run
sudo fdisk -l. Check the System column for the drive.
- If the file system is FAT32 or exFAT, the drive can support read/write when unlocked. Skip to step 7.
- If the file system is NTFS, run chkdsk on the drive:
- On Windows, open an elevated Command Prompt, type
chkdsk X: /f(replace X with the drive letter), and press Enter. - On Linux, use
sudo fsck.ntfs /dev/sdX(replace sdX with the drive path).
- On Windows, open an elevated Command Prompt, type
- Safely eject and reinsert the USB drive. It should now be writable.
How can I format the USB drive to be read/write?
If the drive remains read only, the last resort is to reformat the whole USB drive:
- Backup any important files on the USB drive. Reformatting will erase all data.
- On Windows:
- Open File Explorer and right click on the USB drive.
- Select Format from the menu.
- Choose FAT32 or exFAT as the file system.
- Check the Quick Format box and start the formatting process.
- On Mac:
- Open Disk Utility.
- Select the USB drive.
- Click Erase in the toolbar.
- Choose MS-DOS (FAT) as the format.
- Click Erase to reformat the drive.
- On Linux:
- Open a terminal and run
sudo fdisk /dev/sdX(replace sdX with your drive path) - Type
pto print the partition table and confirm the correct drive. - Type
dto delete any existing partitions on the drive. - Type
nto create a new partition, then press Enter twice to accept the defaults. - Type
tto change the partition type, then typecto set to FAT32. - Type
wto write the partition table and exit fdisk. - Format the drive:
sudo mkfs.vfat /dev/sdX1
- Open a terminal and run
After reformatting, your USB drive should be reset as read/write.
How can I prevent the drive from becoming read only again?
To stop your USB drive switching to read only in the future, follow this advice:
- Check for a physical lock switch and make sure it is never moved to the lock position when using the drive.
- If formatting the drive, choose a file system designed for read/write like FAT32 rather than read only ones like ISO9660.
- On Linux and macOS, unmount and remount the drive with read/write permissions if needed.
- Use the eject option in your operating system before unplugging the USB drive.
- If errors occur, fix them right away using chkdsk or fsck rather than continuing to use a damaged drive.
Why do I need the drive to be read/write?
There are several common reasons you may need to use a USB drive in read/write rather than read only mode:
- Copying files to the drive – To add files to a read only USB drive, it must be switched to read/write mode.
- Editing files – Existing files on the USB drive cannot be edited or changed if it is read only.
- Deleting files – Files cannot be deleted from a read only drive.
- Formatting – Reformatting a USB drive requires read/write access.
- Installing OS – Installing a bootable operating system on a USB requires write permissions.
- Writing logs – Some applications need to write logs or other data to external drives.
So in summary, anytime you need to modify, add, or remove files on a USB drive, it must be switched from read only to read/write mode first.
Can I recover data from a reformatted USB drive?
If you reformatted your USB drive without properly backing up all the data first, you may still be able to recover your files using data recovery software:
- Stop using the drive immediately after reformatting to avoid overwriting data.
- Try recovery software like Recuva or TestDisk to scan the drive and restore deleted files.
- Some premium software like Disk Drill offer more powerful recovery features.
- Recovering data is possible if nothing new was written to the reformatted drive.
- The more you use the drive after reformatting, the lower your chance of file recovery.
So while data recovery from a reformatted USB drive is sometimes possible, it should not be relied upon. Always backup your files elsewhere before reformatting a USB drive.
Can I use a USB drive read only to protect against viruses?
Setting a USB drive to be read only can prevent any files from being written to it. This provides some protection against malware or viruses infecting the drive:
- Viruses cannot copy themselves to a read only USB drive.
- Malware or ransomware cannot encrypt files on a read only drive.
- Without write access, the USB drive should be free from infection.
- This is a simple way to guard against viruses from untrusted PCs.
- The drive must still be scanned after each use to be 100% safe.
However, a read only USB drive has downsides as well:
- You cannot add or edit files on the drive either.
- Not all viruses are stopped – Human action may still cause infection.
- You still risk infecting the computer you plug the USB drive into.
So while using a USB drive read only provides some protection from viruses, it is not a foolproof solution on its own. Practice safe computing habits too.
What are the risks of making my USB drive read/write again?
Changing a USB drive from read only to read/write carries minimal risks in most cases. But be aware of these potential issues:
- Data loss if errors occur – Drives with errors risk more damage if forced to be writable.
- Accidental lock switch – Sliding the physical lock switch back could lead to data loss.
- Loss of access – If permissions or formatting is incorrect, the drive may become unusable.
- Malware infection – Write access enables viruses or malware to infect the USB drive.
- Physical damage – Forcing read/write may damage damaged drives further.
To avoid these risks:
- Backup data before making any changes.
- Carefully follow steps to enable write access.
- Scan for and fix any errors using chkdsk or fsck.
- Watch for the physical lock switch position.
Exercising caution and following procedures helps minimize any risks of enabling write access.
Conclusion
Changing a read only USB drive to allow writing again is usually a simple process, but does come with a small risk of data loss. Check for a physical lock switch, reformat in FAT32/exFAT, correct any errors, and be very careful when working with valuable data. With caution, you can successfully modify your USB drive to enable write access once more.
