Checking for errors in Windows 7 is an important part of troubleshooting issues and keeping your computer running smoothly. There are a few different ways to check for errors, depending on the type of issue you’re having.
Check the Event Viewer
The Event Viewer is a built-in Windows tool that logs various system events, including errors. To open the Event Viewer, click Start > Control Panel > System and Security > Administrative Tools > Event Viewer. This will open the Event Viewer window.
In the left pane, click “Windows Logs” then click “System” to view the System error log. Any critical errors, such as a component failing or crashing, will be listed here. You can double click on an error to view more details about when it occurred and what the issue was. Keep in mind that not all errors are critical – some may just be warnings or minor issues.
Check Reliability Monitor
The Reliability Monitor is another built-in Windows tool that provides an overview of your system’s stability over time. It tracks various failures like application crashes and Windows errors. To open the Reliability Monitor, click Start > Control Panel > System and Security > Action Center. Click “View reliability history” in the left pane.
This will show you a timeline of incidents, like application crashes and Windows errors, that have occurred over the past few weeks. Click on any of the incidents to see details like what program was affected and what the error was. Major spikes in errors shown in the Reliability Monitor can indicate broader system problems.
Check Disk for Errors
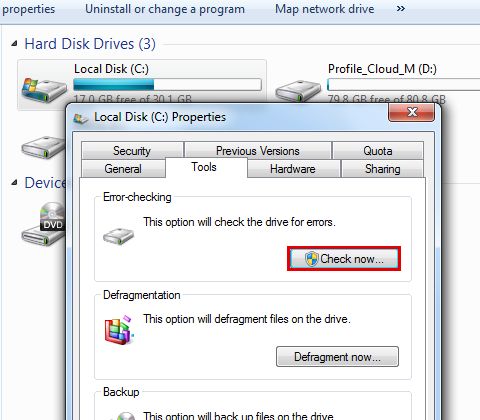
Checking your hard disk for errors is always a good idea if you’re seeing performance issues, crashing, or having trouble booting into Windows. To run Check Disk:
- Open My Computer or Windows Explorer and right-click on the hard drive you want to check (usually Local Disk C:). Select Properties.
- Go to the Tools tab and click “Check Now” under Error-Checking.
- Check both boxes to scan for and fix any errors found.
- Click Start to begin the scan.
Check Disk will scan the drive for bad sectors, physical damage, and file system errors. It may take some time depending on the size of your hard drive. Restart your PC afterwards to ensure any repairs take full effect.
Update or Roll Back Device Drivers
Outdated or corrupt device drivers can sometimes cause crashes, blue screen errors, and other Windows issues. Updating your drivers ensures compatibility and resolves potential conflicts.
To update drivers:
- Open the Device Manager by right-clicking Computer and selecting Manage. Then click Device Manager in the left pane.
- Expand any device categories that are having issues, like Display Adapters.
- Right-click the device and select Update Driver Software.
- Select Search Automatically for Updated Driver Software to find the latest driver.
- Restart your PC after installing any updates.
If a recent driver update seems to have caused issues, you can roll back to the previous version:
- Open Device Manager and find the problematic device.
- Right-click and select Properties.
- Go to the Driver tab and click Roll Back Driver to revert to the previous version.
Scan for Malware
Viruses, spyware, and other malware can sometimes cause Windows crashes, slow performance, and other problems. Running a full system scan helps remove any malicious programs.
Windows comes with Windows Defender built-in, which you can use to scan your system. To run a scan:
- Open Windows Defender Security Center by clicking the shield icon in the taskbar.
- Click Virus & threat protection.
- Click Scan options and then select Full scan.
- Click Scan now. The full scan will scan all files and may take some time.
- Remove any threats found.
For an even more comprehensive scan, you can download and run the free version of Malwarebytes. Malwarebytes can detect and remove malware that may be missed by other antivirus software.
Check System File Integrity
Windows has a built-in tool called System File Checker (SFC) that can scan system files and replace corrupted or missing ones. To run SFC:
- Open an elevated Command Prompt by clicking Start, typing cmd, right-clicking Command Prompt and select Run as Administrator.
- At the prompt, type sfc /scannow and hit Enter.
- SFC will scan all protected system files and replace any that are damaged or missing.
- Restart your computer once it finishes.
This can resolve errors caused by missing or corrupt Windows system files.
Check Hard Drive Health
If your hard drive has physical damage or is starting to fail, that can sometimes manifest as Windows errors and crashes. There are a few utilities you can use to analyze your hard drive health:
- HD Tune: Scans hard drives for errors and benchmarks performance. The free Pro version also monitors drive health.
- SeaTools: Comprehensive hard drive diagnostic and benchmarking tool from Seagate.
- HDTune: Scans hard drives for errors and damage. The paid version performs drive diagnostics.
Replace the hard drive if these tools detect critical damage or impending failure.
Test and Replace RAM
RAM (memory) problems can sometimes cause Windows crashes, blue screens of death, and other system errors. To test your RAM:
- Download and install a RAM tester utility like Windows Memory Diagnostic or MemTest86.
- Restart your computer and open the RAM testing utility.
- Let the tester run through at least one full pass (can take a while for full test).
- If errors are found, you likely have faulty RAM that should be replaced.
Even if the RAM tests okay, you may still want to consider replacing it with newer RAM if you haven’t upgraded in over 2-3 years, or increasing your total RAM if it’s maxed out. RAM is a relatively inexpensive upgrade that can improve performance and stability.
Check CPU Temperature
Excess CPU heat can sometimes cause Windows to crash or act erratically. Download a system monitoring tool like Speccy or HWMonitor to check your CPU and system temperatures.
- Idle CPU temps should be around 30-50°C.
- Load temps (when gaming etc) should be less than 90°C.
- System/motherboard temps should not exceed 50°C.
If your CPU or system runs excessively hot, consider improving your cooling or replacing the CPU cooler. Reapplying high quality thermal paste between the CPU and cooler can also help lower temperatures. Excess heat can cause hardware damage over time.
Check Windows Updates
Keeping Windows fully updated is important to fix bugs, security flaws, and other problems in the operating system. Windows Update can fix system files and drivers that may be causing crashes or instability.
To check for updates:
- Click Start > Control Panel > System and Security > Windows Update.
- Click Check for updates.
- Install any important or optional updates available.
- Fully restart your PC after installing updates.
Make sure you have all the latest service packs installed as well. Service packs contain cumulative updates and fixes for major Windows versions.
Perform a Clean Boot
Performing a clean boot in Windows isolates potential software conflicts by temporarily disabling startup programs and non-essential services. To clean boot:
- Open msconfig by clicking Start, typing msconfig, and clicking msconfig.exe.
- Go to the Services tab and check “Hide all Microsoft services”. Then click “Disable all”.
- Go to the Startup tab and click Open Task Manager.
- In Task Manager, disable all startup programs except for your antivirus.
- Restart your PC. It will now boot with the bare minimum processes and services.
- Test for stability. If the issues are fixed, undo your changes one at a time until you isolate the problematic program.
This can identify programs and services causing conflicts, crashes, or other problems in Windows.
Run System File Checker
The System File Checker tool scans Windows system files for corruption and restores them to the proper version. To run the System File Checker:
- Open an elevated Command Prompt by searching for cmd, right-clicking it, and selecting Run as Administrator.
- At the command prompt, type sfc /scannow and hit Enter.
- System File Checker will scan Windows system files and replace any corrupted or missing files.
- Restart your computer when it completes.
This can resolve Windows errors caused by corrupted system files. The scan may take some time to complete.
Perform a Repair Install
A repair install reinstalls Windows while preserving your files, settings, and programs (non-Windows Store apps). This can fix system file and configuration errors.
To do a repair install:
- Insert your Windows 7 installation media and boot from it.
- Select your language and click Next.
- Click “Repair your computer” in bottom left.
- Select “System Image Recovery”.
- Choose your Windows installation drive to repair.
- Click Next and let the repair process complete. Your files and apps will remain.
This reverts your Windows installation back to factory settings while preserving your personal data. Good if Windows is corrupted.
Reset Your PC
Resetting your PC reinstalls Windows and deletes all of your personal files and settings. This is a last resort if nothing else works to fix problems:
- Open the Recovery Drive by clicking Start > Control Panel > System and Security > Recovery.
- Under Reset This PC, click Get started.
- Choose to Keep personal files or Remove everything.
- Follow the on-screen prompts to reset Windows. Reinstall apps afterwards.
This completely reverts your PC to factory settings. Use only if Windows is severely damaged or corrupted. Back up your files first.
Conclusion
Those are the most common ways to check for and fix errors in Windows 7. Start with simpler steps like updating drivers, running SFC and Check Disk, and checking system stability tools like Event Viewer and Reliability Monitor. For more serious issues, you may need to repair Windows or reset your PC entirely.
Regularly backing up your data and performing periodic maintenance like scans and updates can help avoid major Windows problems down the road. But if you do encounter crashes or error codes, utilizing the various built-in Windows troubleshooting tools can usually get your system stable again.