Why Destroy Your Hard Drive?
When recycling or disposing of a computer, it is crucial to properly destroy the hard drive first. This is to protect personal data and prevent identity theft or misuse of your information. Hard drives contain sensitive data like financial records, emails, photos, passwords, and browsing history. Simply deleting files or reformatting the hard drive does not fully erase the data – it can often still be recovered. The only way to guarantee the data is unrecoverable is to physically destroy the hard drive platters.
According to security experts, the best practice before recycling a computer is to remove and destroy the hard drive (Source: https://www.shredit.com/en-us/blog/best-practices-for-secure-and-compliant-hard-drive-destruction). This prevents the next user from accessing your private information. Identity theft is a major risk if personal data falls into the wrong hands. Physically destroying the hard drive gives you peace of mind that your data cannot be misused.
Back Up Important Data
Before destroying your hard drive, it’s crucial to back up any important personal files, photos, documents, or other data stored on the computer. This ensures you don’t lose anything valuable when wiping the hard drive.
The easiest way to back up data is to copy it to an external drive like a USB flash drive, external hard drive, or SSD. Make sure the external drive has enough storage capacity for all the files you need to save. Plug the external drive into your computer and use File Explorer or Finder to copy over any important folders or files.
You can also back up data to cloud storage services like Google Drive, Dropbox, Microsoft OneDrive, or Apple iCloud. Install the app for your preferred cloud service and sync the folders containing important files. This will create cloud copies of your data that can be accessed again later.
Double check that any irreplaceable photos, documents, or other personal files have been successfully copied to the external or cloud storage. It’s easy to miss something, so take time to verify no important data will be lost once you wipe the computer’s hard drive.
Completely backing up your data is a crucial first step before attempting to destroy the hard drive. With your files protected in external or cloud storage, you can securely erase the hard drive knowing your data is safe.
Delete Files and Wipe Hard Drive
Before physically destroying your hard drive, it’s important to first delete all files and folders stored on the drive. This includes emptying the recycle bin completely so that no deleted files can be recovered. You should also use disk wiping software to overwrite the data on the hard drive multiple times. This helps ensure the data cannot be recovered by forensic tools.
Some recommended disk wiping programs include DBAN, Eraser, and KillDisk. These tools allow you to perform multiple overwrites of the hard drive with random data, meeting Department of Defense standards for data destruction. Be sure to use the tool’s most secure “DoD 5220.22-M” wiping method. This overwrites all sectors 7 times for total data removal.
After using a disk wiper, all files and folders will be permanently deleted. The data will be virtually unrecoverable without very expensive forensic tools. This is an important step before physical destruction, as simply formatting the hard drive does not fully remove data.
Remove Hard Drive
To physically remove the hard drive from your computer, you will need to open up the computer case and locate where the hard drive is mounted. Most desktop computer hard drives are mounted internally, often in drive bays with removable trays or screws. Laptops generally have the hard drive mounted under an access panel on the bottom of the device.
Once you locate the hard drive, the next step is to disconnect it from the motherboard and power supply. This usually involves gently removing cabling such as the SATA data cable and the power connector cable. Be sure not to yank or tug too hard on the cables to avoid damaging the connectors. Some hard drives may have mounting screws that need to be unscrewed before the drive can slide out of its bay or tray.
Use care when handling the physical hard drive, as they are sensitive devices. Once fully disconnected, you should be able to remove the hard drive completely from the computer case and set it aside for the next steps of physical destruction. Consult your computer or hard drive manual for detailed instructions on accessing and removing your specific model of hard drive if needed.
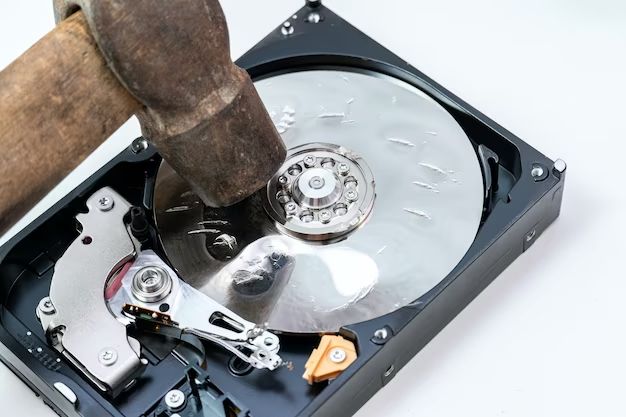
Physically Destroy the Hard Drive
One of the most secure ways to destroy a hard drive is to physically damage the disks and internal components beyond repair. This ensures no data can be recovered from the drive.
To physically destroy a hard drive:
- Use a hammer to bend, break, and deform the casing and internal disks. The goal is to damage the platters and circuitry to prevent the drive from powering on.
- Drill holes through the hard drive using a power drill. This will damage the internal disks where data is stored and make them unreadable.
- According to Tech Reset, drilling holes through the disk platters or scratching them extensively with sandpaper can render data unrecoverable.
Physically destroying the hard drive completely eliminates the possibility that any data can be recovered. While time consuming, it is one of the most secure data destruction methods available.
Alternatives to Physical Destruction
While physically destroying a hard drive is often considered the most secure method of data destruction, there are some alternatives that don’t require physically damaging the drive.
One alternative is degaussing, which uses strong magnetic fields to scramble and erase data stored on the hard drive’s platters. This makes the existing data unrecoverable without physically destroying the drive. Degaussers are available as both handheld wands and large walk-through units for degaussing entire hard drives. Proper degaussing renders a hard drive permanently unusable but the drive remains physically intact.
Another alternative is to encrypt the hard drive before recycling it. By enabling full-disk encryption on the drive and then doing a secure erase of the encryption key, the data becomes inaccessible without the right decryption key. This allows the intact drive to be safely recycled without worrying about data recovery. Popular disk encryption software options include BitLocker for Windows, FileVault for MacOS, and VeraCrypt as a cross-platform open-source solution.
The downside of these alternatives is that while they can make data recovery unfeasible, physical destruction is the only way to ensure absolutely no possible data retrieval. But for less sensitive data, degaussing and encryption are reasonable alternatives to destroying the drive.
Dispose of the Damaged Drive
Once you have physically destroyed the hard drive and rendered it unusable, you will need to properly dispose of it. The best option is to take it to an electronics recycling center or municipal waste facility. They will dispose of the damaged drive responsibly and in accordance with local regulations.
Most cities and towns have designated facilities that accept old electronics for recycling. Contact your local waste management department to find the closest authorized recycling center. Make sure to call ahead to confirm they will take a physically damaged hard drive.
When dropping off the destroyed drive, let the recycling center know that you have wiped the data and manually damaged it. They may ask you to demonstrate the drive is inoperable. Recycling centers will typically dismantle drives, shred them, and separate the raw materials like steel, aluminum and copper. This helps recover precious metals and keeps e-waste out of landfills.
It is important not to simply throw a hard drive in the garbage even after destroying it, as data could potentially still be recovered. Always recycle old drives responsibly to ensure data security and environmental safety. With proper destruction and disposal, you can retire an old hard drive with peace of mind.
Buy a New Hard Drive
Once you have physically destroyed the old hard drive, you will need to replace it with a new one. You have two main options for replacing the hard drive:
Internal Hard Drive
You can purchase a new internal hard drive that is compatible with your computer. Make sure to get one with equal or greater capacity than your previous drive. Installing an internal hard drive will require opening up your computer to connect the drive to the motherboard.
External Hard Drive
Alternatively, you can purchase an external USB hard drive and use that to store your files and operating system. External drives connect via USB cable and do not require internal installation. This gives you more flexibility to move the drive between devices if needed.
Once you have a new hard drive installed or connected, you will need to reinstall your operating system, device drivers, software applications, and then restore your data from backup. Make sure to reformat the new hard drive before restoring your data to remove any existing partitions and start fresh. With your data restored, you will have a functionally equivalent or better hard drive without leaving sensitive information on the old destroyed drive.
Reinstall Computer Operating System
After installing the new hard drive, you will need to reinstall your computer’s operating system. Here are the steps to reinstall the OS:
First, boot from the OS restore disc or USB drive that you previously created. Insert the disc into the disc drive bay or connect the USB drive. Restart your computer and boot from the disc or USB drive instead of the hard drive. This will launch the OS installation wizard.
Next, walk through the on-screen prompts to install the OS. You will be asked to select language preferences, accept licensing terms, choose file locations, etc. One of the most important steps is when you are prompted to select a drive to install the OS on. Be sure to select the new hard drive you just installed. The wizard will automatically format the hard drive as part of the installation.
Follow all the remaining prompts to finish installing your operating system software on the new hard drive. Once completed, you will be able to boot your computer from the new hard drive and use it as normal.
Restore Your Data
After installing the new hard drive and operating system, it’s time to transfer your data back. If you backed up your data to an external drive or cloud storage, you can now restore it to your computer’s new hard drive.
Connect any external backup drives to your computer and locate your data backups. Transfer the files and folders back to your computer, organizing them how you had them before. Be sure to transfer any photos, videos, documents, music, and other personal files.
For cloud backups like OneDrive or Google Drive, sign into those accounts and sync the data back down to your computer. This will download your files from the cloud and recreate the folder structure on your new hard drive.
You’ll also want to reinstall any software programs, apps, and games you had before. Download installers for your essential programs and set them up freshly on your computer. For some apps like web browsers, you may be able to import your old settings and data to save you time customizing them again.
Finally, customize the settings for your operating system, apps, and utilities to restore your previous preferences. With your data restored and programs reinstalled, your computer will start feeling like home again.
