The BIOS (Basic Input/Output System) is firmware software stored on a small memory chip on the motherboard of a computer. It is the first software to load when a computer boots up, and it initializes all the hardware components like the CPU, memory, drives, etc. to get the computer started.
Sometimes, a hard drive may be disabled or not detected properly in the BIOS. This would prevent the drive from being accessed by the operating system. In such cases, you need to enter the BIOS setup utility during boot and enable the drive. Enabling a drive in BIOS allows the operating system to recognize it and access data stored on it.
When You Should Enable a Drive in BIOS
The most common reason to enable a drive in BIOS is if your hard drive is not being detected in Windows. This can happen if your SATA drive is disabled or set to RAID mode in BIOS. When this occurs, your hard drive will not show up in Windows File Explorer even though it is connected properly.
According to EaseUS, “If hard drive is not showing up in BIOS or setup, it’s highly possible that the HDD is not enabled or recognized by the motherboard BIOS. You need to enter BIOS settings to check and make sure the hard drive is being detected or recognized by system BIOS.”1
So if your HDD is connected but not being detected in Windows, entering BIOS and enabling the drive is one of the first troubleshooting steps you should take.
Enter the BIOS
The most common way to enter the BIOS on a Windows 10 computer is on startup. As soon as you turn on your PC, you’ll need to press a specific function key, which varies between manufacturers. For example, Dell computers typically use the F2 key, HP uses F10, and Lenovo uses F1 or F2.
Pay close attention to the screen when your computer first starts. You should see a brief prompt telling you which key to press to “Enter Setup,” access system settings, or open the BIOS. Press this key continuously once per second as soon as you power on the PC.
If you miss the prompt, you may need to restart your computer and try again. Timing is important, so be ready at the first sign of life on the screen. If the key isn’t working, try pressing it more rapidly. Some systems require tapping the key repeatedly instead of holding it down.
For more details, you can refer to the computer or motherboard manufacturer’s documentation. The key will vary between brands.
Here are some common BIOS access keys:
- Dell: F2
- HP: F10
- Lenovo: F1, F2, or Fn + F2
- Asus: Delete or F2
- Acer: F2 or Delete
- MSI: Delete
If you still can’t enter the BIOS, you may need to change settings in Windows first.
Navigate to Drives/Boot Menu
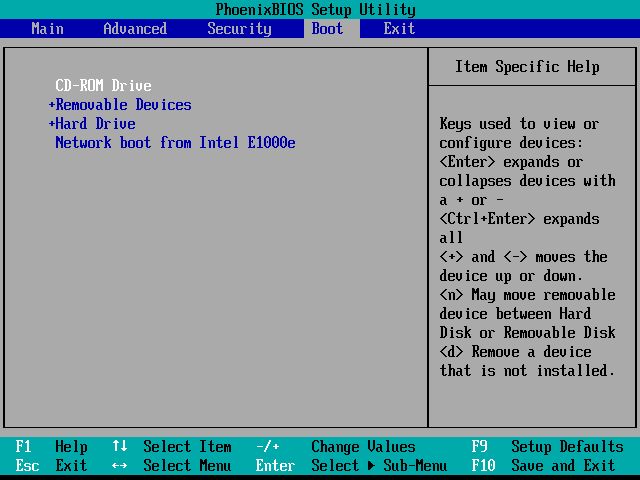
The first step in enabling a drive in BIOS is to navigate to the boot or drive menu. Here’s how to find this menu:
On most systems, after entering the BIOS setup utility, use the arrow keys to navigate to the “Boot” tab or menu. This is typically located along the top or side of the BIOS screens. The boot menu may also be labeled as “Boot Options,” “Boot Sequence,” or something similar. HP suggests using F9 or F10 to quickly access the boot menu.
On some systems, especially older models, the drive menu may be under an “Advanced” or “Advanced BIOS” menu item. Navigate to Advanced, then look for options like “Drive Configuration,” “SATA Settings,” or “Hard Drive BBS Priorities.”
If you’re unsure where the drive or boot menu is located, try searching for keywords like “HDD,” “Hard Drive,” “Boot,” or “Drive.” The drive options are often listed alongside boot device options. With some trial and error, you should be able to locate the correct screen to enable your drive.
Enable the Drive
Once in the Boot or Drives menu of the BIOS, you need to locate the hard drive you want to enable and select it. The hard drive will likely be listed alongside other drives like the CD/DVD drive and any solid state or flash drives.
Use the arrow keys on your keyboard to highlight the hard drive you want to enable. The name of the drive will indicate its size, manufacturer, and interface type, such as SATA or NVMe. If you’re unsure which is the correct hard drive, look for identifying information like the size (500GB, 1TB etc).
With the hard drive highlighted, press Enter on your keyboard to open the configuration options. Look for an option like “Disabled” or “Enable” and switch it to enabled. This will allow the motherboard to detect the drive at boot.
Some BIOS menus may have a separate “Hard Disk Drives” section. Navigate there and make sure the drive shows as “Enabled”. If it’s disabled, select it and change it to enabled.
Once enabled in the BIOS, the motherboard will be able to detect the hard drive and give you the option to boot from it. Be sure to save changes and exit the BIOS before rebooting.
Save and Exit
After making any changes in the BIOS, you need to save the changes and exit properly for them to take effect. Here are the steps:
- Once you have made all necessary changes, navigate to the “Save & Exit” tab in the BIOS.
- Select the “Save Changes and Exit” option. This will save any changes made and reboot the system.
- You may be prompted to confirm exiting BIOS. Select “Yes” to confirm and exit.
- The system will reboot and the changes will take effect after restarting.
- If you don’t save changes before exiting, the system will reboot discarding any changes made.
Some key things to note about saving and exiting BIOS:
- Always save changes before exiting to avoid losing any changes made. The BIOS will usually prompt you to save if attempting to exit without saving.
- Changes only take effect after a reboot once BIOS is exited. The system does not apply changes in real-time.
- You may also have options to “Save and Reset” or “Discard Changes and Exit.” Use the appropriate option for your needs.
Following proper save and exit procedures in BIOS ensures your changes are saved and applied correctly after restarting the system.
Verify Drive Enabled
After enabling the drive in the BIOS, you will want to verify that Windows now detects the drive. Here are the steps to check if the drive is now detected in Windows 10:
1. Open File Explorer by pressing Win + E on your keyboard or selecting the folder icon in the taskbar.
2. In the left pane, look under This PC or My Computer for the drive. If the drive is now detected, it should be listed here.
3. You can also click on This PC or My Computer and look at all the drives shown. The newly enabled drive should now appear.
4. If you still do not see the drive listed in File Explorer, right-click on This PC or My Computer and select “Manage”.
5. In the Computer Management console, select Disk Management on the left.
6. In the Disk Management window, see if your newly enabled drive appears.
If the drive now shows up in either File Explorer or Disk Management, then the drive has been successfully enabled in the BIOS and detected by Windows.
If you still do not see the drive, you may need to go back and double check the drive is enabled in the BIOS. There could also be other hardware or driver issues preventing Windows from detecting the drive.
Enable AHCI Mode (if needed)
For best performance, you’ll want to switch the SATA mode in BIOS to AHCI. AHCI (Advanced Host Controller Interface) allows the operating system to take full advantage of the speed of SSDs and mechanical hard drives. Without AHCI enabled, drives will operate in IDE mode which limits performance.
To enable AHCI mode:
- Restart your computer and enter the BIOS.
- Navigate to the “SATA Operation” or similar menu.
- Change the setting from “IDE”, “RAID”, or “Compatibility” to “AHCI”.
- Save changes and exit BIOS.
Windows will need to install AHCI drivers during the reboot process. Be patient during the transition. Once logged back in, you can verify AHCI is active by going to Device Manager and confirming the SATA controller is running in AHCI mode.
Enabling AHCI unlocks the full potential of solid state and mechanical drives. With AHCI active, your drives will operate at peak read/write speeds.
Troubleshooting
If the hard drive is still not detected in the BIOS after enabling it, here are some solutions to try:
Make sure the power and SATA cables are properly connected to the hard drive and motherboard. Disconnect and reseat the connections to ensure a solid connection. If the cables are loose or damaged, replace them.
Try connecting the hard drive to a different SATA port on the motherboard. Use a port you know works with another drive if possible.
Remove any other drives and connectors from the motherboard and connect this drive directly to the primary SATA port. See if it is detected alone.
Check to make sure the hard drive is listed on the motherboard/system vendor’s hardware compatibility list. If not, a BIOS update may be required for compatibility.
Attempt to reset the BIOS to default settings by clearing the CMOS. This may revert any incorrect settings preventing drive detection.
If using an M.2 SATA drive, make sure the BIOS doesn’t have the M.2 slot set to RAID mode instead of AHCI mode.
As a last resort, replace the data cable and try another SATA hard drive with the same cable and port to isolate any potential drive defects.
Conclusion
In summary, enabling a hard drive in BIOS allows your operating system to detect and access the drive properly. The process involves entering BIOS setup, navigating to the drives or boot menu, enabling the drive, saving changes and exiting BIOS. Once in Windows, you can verify the drive is now enabled and detected. Enabling AHCI mode may also help if the drive is still not detected. With the drive now enabled, you can access and use it as needed. The steps covered should resolve most situations where a connected hard drive is not being detected due to being disabled in BIOS. If issues persist, further troubleshooting may be required.
