What is a Disk0s2 IO Error?
A Disk0s2 IO error is a type of input/output error that occurs when macOS is unable to read or write data to your startup drive, commonly referred to as disk0s2. This error typically appears when booting up or restarting your Mac, and is accompanied by text such as “Disk0s2 I/O error” or “Disk0s2: I/O error. Cannot mount.”
The most common causes of Disk0s2 errors include:
- File system corruption – Damage to the format or structure of your drive.
- Faulty cables – Damaged or loose SATA/IDE cables connecting your hard drive.
- Failing hard drive – Age, hardware issues, or bad sectors leading to drive errors.
Common symptoms of a Disk0s2 IO error include:
- Your Mac getting stuck at the gray screen when booting.
- Folder with question mark appearing at startup.
- Boot process taking much longer than usual.
- “Disk0s2 I/O error” or “Disk0s2: I/O error. Cannot mount” message.
Verify the Disk is Mounted
The first step is to open Disk Utility and check if the disk with the IO error appears. Disk Utility provides a view of all connected drives and volumes on your Mac.
To open Disk Utility:
- Go to Applications > Utilities > Disk Utility
Or open Spotlight and search for “Disk Utility”.
In Disk Utility, go to View > Show All Devices to see a list of all disks connected to your Mac (1). This view will display the full disk drives along with any partitions or volumes on them.
Check if the disk with the IO error is showing up in Disk Utility. If it is visible, that means it is still mounted and recognized by your Mac. An IO error can sometimes occur even on a mounted drive due to corrupted sectors or catalog errors.
If the disk does not show up in Disk Utility, it likely needs to be remounted before further troubleshooting. Trying booting into Safe Mode or resetting NVRAM may allow MacOS to detect the drive again (2).
You can also use the diskutil list command in Terminal to view all mounted drives (3).
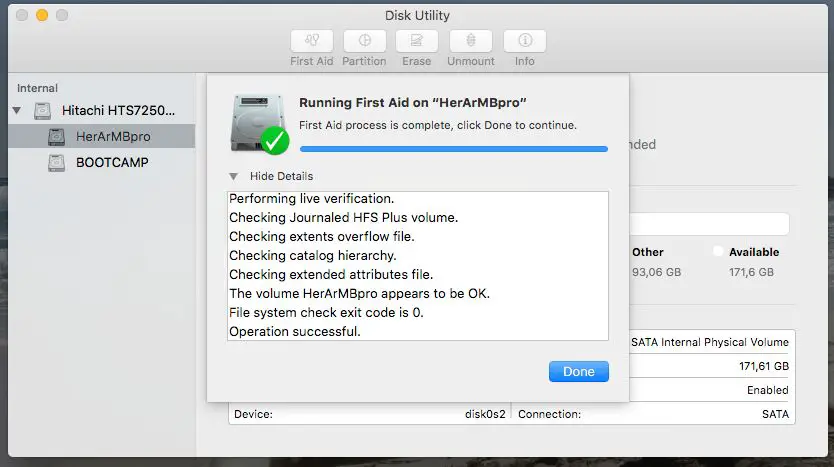
Run First Aid
One of the first steps to try when troubleshooting a Disk0s2 IO error is to run First Aid using Disk Utility. First Aid scans the drive for errors and then attempts to repair any issues it finds [1].
To run First Aid:
- Open Disk Utility (located in Applications > Utilities)
- Select the problematic disk on the left side panel
- Click First Aid in the top center and then click Run
- Allow First Aid to complete the scanning and repair process
First Aid can resolve common errors related to formatting, directory issues, permissions, or other simple problems. It may require multiple runs to fully repair the disk. However, First Aid cannot fix all errors, especially with physical damage or hardware failure [2].
Reset NVRAM
Resetting the NVRAM (Non-Volatile Random Access Memory) can help clear settings that may be causing the disk0s2 IO error. The NVRAM stores certain settings like volume settings, screen resolution, and startup disk selection. Resetting it clears these settings and allows macOS to rewrite them.
To reset the NVRAM on an Intel-based Mac:
- Shut down your Mac.
- Turn it back on and immediately press and hold Command + Option + P + R.
- Keep holding the keys until you hear the startup chime again.
To reset the NVRAM on an M1 or M2 Mac:
- Shut down your Mac.
- Turn it back on and immediately press and hold Command + Option + P + R.
- Keep holding the keys until you see the Apple logo appear and disappear for the second time.
Resetting NVRAM clears certain settings and allows them to be rewritten, which may resolve the disk0s2 IO error. It’s a simple step worth trying before moving on to more complex solutions.
Sources:
https://discussions.apple.com/thread/8642800
https://www.avg.com/en/signal/reset-mac-pram-nvram-smc
Boot into Safe Mode
One way to troubleshoot an IO error on disk0s2 is to boot into Safe Mode on your Mac. Safe Mode loads only the minimum essential drivers and software to get your Mac up and running. This can help identify if third-party software or login items are causing the disk0s2 IO error.
To boot into Safe Mode on your Mac:
- Fully shut down your Mac
- Restart your Mac and immediately press and hold the Shift key after you hear the startup sound
- Release the Shift key when you see the login window
- “Safe Boot” should appear in red text in the login window to indicate you’re in Safe Mode
- Log in normally and use your Mac in Safe Mode
If the disk0s2 IO error does not occur in Safe Mode, it’s likely being caused by third-party kernel extensions, startup items, or login items. You can troubleshoot by selectively disabling or removing these items until you isolate the problem. If the IO error still occurs in Safe Mode, it likely indicates an issue with macOS or hardware.
Reinstall macOS
One option to fix the disk0s2 IO error is to erase the disk fully and do a clean install of the macOS operating system. This will completely wipe the hard drive and install a fresh copy of macOS.
To reinstall macOS, you will need to boot into Recovery mode by restarting your Mac and holding down the Command + R keys at startup. This will boot you into the Recovery partition.
Once in Recovery mode, open Disk Utility and select the disk that is having issues (likely named “Macintosh HD”). Click “Erase” at the top of the Disk Utility window. This will completely erase and reformat the drive, resolving any file system corruption issues.
After erasing the disk, exit Disk Utility, then reinstall a fresh copy of macOS by clicking “Reinstall macOS” in the Recovery window. Follow the on-screen prompts to complete the installation process.
Reinstalling the OS will overwrite your existing files and settings, so make sure anything important is backed up externally. This is an effective way to troubleshoot disk issues, though is time consuming. For step-by-step guidance, see Apple’s support article on erasing and reinstalling macOS.
Replace SATA Cable
A bad SATA cable can sometimes be the cause of IO errors on a MacBook Pro. The SATA cable connects the hard drive to the logic board and allows data transfer between the two components. Over time, normal wear and tear as well as damage from drops or bumps can degrade the cable and result in intermittent connection problems.
If you are experiencing IO errors specifically mentioning disk0s2, replacing the SATA cable could potentially fix the issue. The 2012 MacBook Pro 13″ Unibody contains a known defect with the original SATA cable that Apple issued a replacement program for. Even later models can develop cable problems over time.
Replacing the SATA cable involves opening up the MacBook to access the cable and carefully detaching it from the logic board and hard drive. A proper repair guide such as this one from iFixit provides step-by-step instructions for the replacement process.
Be sure to purchase a high quality SATA cable designed specifically for your model of MacBook Pro. Installing a new, properly functioning cable often resolves IO errors caused by a bad SATA connection.
Replace Hard Drive
One of the most common causes of a Disk0s2 IO error is a failing or failed hard drive. An IO error indicates that the system is having trouble communicating with the hard drive, which usually means the drive itself is failing.
If your MacBook Pro is consistently showing Disk0s2 IO errors, especially on startup or when accessing certain files, the hard drive is likely failing. In this case, you will need to replace the hard drive in order to resolve the issue.
Replacing the hard drive on a MacBook Pro is a more involved process than on some other computers, but still doable for most users. You will need to purchase a compatible replacement hard drive, open up the MacBook to access the drive bay, swap out the old drive for the new one, and then reinstall macOS on the new drive. There are excellent step-by-step guides for replacing MacBook Pro hard drives available online such as this one: Upgrade the Hard Drive on a MacBook Pro
Going with an SSD rather than a traditional hard drive is recommended for performance benefits. Make sure to purchase a drive that is compatible with your specific MacBook Pro model.
Once the new drive is installed, you will hopefully no longer experience Disk0s2 IO errors on your MacBook Pro.
Contact Apple Support
If you have tried the troubleshooting steps and the disk0s2 I/O error persists, it’s a good idea to contact Apple Support for further assistance. An Apple technician can help diagnose whether the issue stems from a software problem or an underlying hardware issue that requires repair or replacement.
Apple Support can run diagnostics on your Mac’s storage drive to pinpoint the cause of the I/O error. If it’s determined to be a hardware problem like a faulty SATA cable or failed hard drive, Apple can arrange for a repair or replacement of the hardware under warranty if applicable.
You can contact Apple Support by phone, online chat, or booking an appointment at an Apple Store’s Genius Bar. Be prepared to provide your Mac’s serial number and describe the disk0s2 error you are experiencing. The Apple technician can then provide customized troubleshooting steps or get you set up for a repair.
As noted on Apple’s discussion forums, disk I/O errors often indicate a problem with the physical hard drive hardware. So if you’ve exhausted your own troubleshooting, having an Apple technician evaluate your Mac can help resolve persistent disk0s2 errors.
Data Recovery Options
If the data on your disk is extremely important to you, it is recommended to attempt data recovery before trying any repairs. There are a few options for recovering data from a disk with IO errors:
You can try using data recovery software like Wondershare Recoverit to scan the disk and recover files. This works best if the disk is still partially readable.
For more severe IO error cases, you may need to turn to a professional data recovery service. They have specialized tools and clean room facilities to attempt extracting data from drives with electrical or physical issues. This can be expensive but is sometimes the only option. Two well-reviewed professional data recovery firms are DriveSavers and Ontrack.
The key is recovering critical data before attempting any repairs on the disk that could potentially make data recovery impossible. Once the data is secure, you can then move forward with troubleshooting the IO errors.
