There are a few reasons why you may need to erase your Mac’s hard drive. Before selling or gifting your Mac, you’ll want to securely wipe the drive to protect your personal data. Erasing the drive also allows you to do a clean install of the operating system if you’re experiencing performance issues or want to start fresh. Lastly, erasing a drive can resolve certain disk errors or malware infections.
However, erasing a drive deletes all data stored on it. So it’s critical to back up your important files first. Once erased, there is no way to recover data from the drive. Proceed with caution before erasing an entire drive.
Back Up Important Data First
Before erasing your Mac’s hard drive, it is crucial to back up any files or data you need to keep. An erased drive means all data will be permanently deleted, so you want to preserve anything important by making backups.
Use Apple’s built-in Time Machine feature to back up your entire Mac to an external hard drive or NAS storage device. Time Machine will create hourly backups of changed files, and save daily and weekly snapshots as well (Use Time Machine to back up). When first connecting a drive for backups, Time Machine will likely prompt to erase the drive, allowing it to be entirely used for versions and snapshots.
You can also manually backup important folders or files by copying them to external storage drives, cloud storage services like iCloud or Dropbox, or a networked server. Applications like Carbon Copy Cloner allow creating bootable clones of your entire drive for redundancy.
Review what is saved before wiping your Mac. If you need access to any data later, ensure it exists in a backup created external to your Mac’s drive so you can retrieve it after erasure.
Disconnect External Drives
Before starting the erasure process, it’s important to disconnect any external hard drives or SSDs that you don’t want erased. This prevents accidentally selecting the wrong drive in Disk Utility.
To disconnect an external drive, simply unplug the drive from your Mac. For desktop Macs, this means unplugging the USB, Thunderbolt, or other cable connecting the drive. For MacBooks, eject the external drive properly before unplugging it.
To eject an external drive on a Mac, click the eject button next to the drive name on your desktop or in the Finder sidebar. Alternatively, right-click or ctrl-click the drive icon and select “Eject”. You can also eject drives via Finder > File > Eject.
Once all external drives are safely disconnected, you can proceed with forcing the Mac to erase the correct internal drive without worrying about erasing valuable data.
Restart in Recovery Mode
To erase the hard drive, you first need to restart your Mac in Recovery mode. Recovery mode is a special troubleshooting environment that exists outside of the normal macOS. It allows you to reinstall macOS, erase drives, and more. Here’s how to restart into Recovery mode:
On an Intel-based Mac, hold down the Command (⌘) + R keys immediately after pressing the power button to turn on your Mac. Keep holding the keys until you see the Apple logo or a spinning globe appear on the screen. This will boot you into macOS Recovery over the internet.
On an M1 or M2 Mac, hold down the power button until “Loading startup options” appears. Then, while still holding the power button, press and hold the Command (⌘) + R keys. Keep holding all three keys until you see the Recovery mode screen.
For more details, refer to Apple’s guide on using Recovery mode on Intel-based Macs or their Mac startup key combinations page.
Launch Disk Utility
After your Mac restarts in Recovery mode, you’ll see the macOS Utilities window. Select “Disk Utility” from this window to launch Disk Utility.
To launch Disk Utility:
- Click on the Disk Utility option in the macOS Utilities window. Disk Utility will open.
- You can also find Disk Utility using the macOS Utilities window menu bar. Click on Utilities and select Disk Utility from the dropdown menu.
Once launched, Disk Utility will scan connected drives and display them on the left side of the window. You can now select the drive you want to erase (Source: https://support.apple.com/en-us/HT201314).
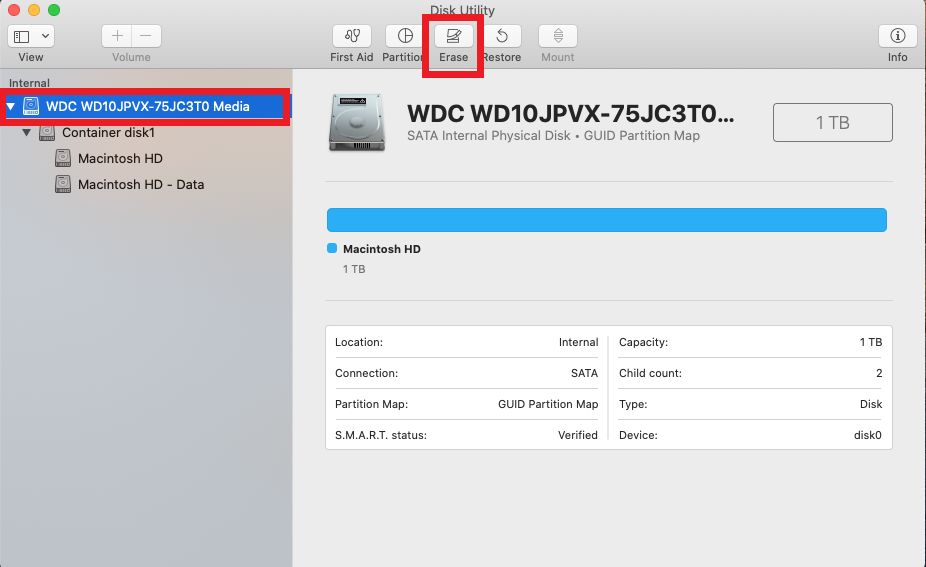
Select the Drive to Erase
In Disk Utility, you’ll need to select the specific internal drive that you want to erase. Here are the steps:
- In the sidebar on the left, click on the internal drive you want to erase. This will likely be named “Macintosh HD” or something similar for the main startup drive.
- Make sure the correct volume is highlighted in blue in the main section of Disk Utility before proceeding.
- If you do not see the internal drive you want to erase, go to the View menu and choose “Show All Devices.” This will display external drives and disk partitions.
- You can identify the correct internal drive by its size and format listed, such as “APPLE HDD HTS541010A9E662 Media” for a Mac startup drive.
- Do not select any external drives, disks, or partitions at this stage – only select the main internal drive you intend to erase.
Once you have the correct internal drive highlighted, you can choose an erase option and continue.
Choose an Erase Option
Disk Utility provides several options for erasing a hard drive on a Mac. The erase options allow you to choose the format and level of security for wiping the drive.
The most common erase options are:
- Mac OS Extended (Journaled) – The standard format for Mac hard drives. Provides basic erase of directory info.
- APFS – The newer Apple File System introduced in macOS High Sierra. Optimized for SSDs.
- ExFAT – Compatible with both Mac and Windows. No permissions or encryption.
- FAT32 – Compatible with both Mac and Windows. Limited to 32GB file sizes.
For more secure options, Disk Utility offers:
- One-pass zero-out – Overwrites data with zeros once.
- Three-pass erase – Overwrites data with zeros, then ones, then random data three times.
- Seven-pass erase – Overwrites data seven times meeting DoD 5220.22-M standards.
The most secure option is the seven-pass erase, which conforms to U.S. Department of Defense standards for preventing data recovery. However, it takes much longer than a standard erase. A one-pass zero-out is sufficient for most uses before reselling or recycling a Mac.
Confirm the Erasure
Before proceeding, it’s critical to confirm you have selected the correct drive to erase. Erasing the wrong drive can result in catastrophic data loss, so double and triple check you have the proper drive selected. The last thing you want is to accidentally erase your backup drive or external storage device containing important files.
Carefully review which drive is selected in the sidebar of Disk Utility. The name, capacity, format, and partition map should match what you expect for the drive intended to be erased. If anything seems off, do not continue and carefully re-check which drive is targeted.
As an extra precaution, you can disconnect external drives prior to launching Disk Utility to avoid any chance of selecting the wrong volume. Once certain the proper internal drive is selected, proceed with the erasure.
Wait for Erasure to Finish
Erasing a hard drive can take a significant amount of time, especially for larger drives. For a 1TB hard drive, expect the erasure process to take several hours. Some users report it taking 4 hours or longer to securely erase a 1TB hard drive [1]. The exact time will vary depending on the drive itself and the erase method chosen.
Be patient and avoid interrupting the process. Note that using the secure erase options like multi-pass erasure will dramatically increase the amount of time required. With the standard erase option, erasing 1TB should take under an hour. But with a 7-pass secure erase, it could take over 20 hours on some drives [2].
Go do something else until the erasure finishes. The Disk Utility app will prevent the Mac from sleeping during this process. Don’t force shut down or restart the Mac before it completes.
Reinstall macOS
After erasing your Mac’s hard drive, you will need to reinstall the Mac operating system before you can use your computer again. The easiest way to do this is to restart your Mac into Recovery Mode and reinstall macOS from there.
To reinstall the latest version of macOS that your Mac shipped with, restart your Mac and hold down the Command + R keys immediately after you hear the startup chime. This will boot your Mac into Recovery Mode.
Once in Recovery Mode, click on the option to Reinstall macOS and follow the on-screen instructions. The reinstallation process will take some time to fully complete.
If you want to install an older version of macOS, restart your Mac and hold down Command + Option + R after the startup chime. This will let you reinstall the macOS that came with your Mac originally. For more reinstallation options, see Apple’s support article.
After macOS has been reinstalled, you’ll be able to set up your Mac with a new user account and restore data from a backup.
