Formatting an SD card in Windows 10 is a straightforward process that can be done in just a few steps. Properly formatting your SD card before first use is important to ensure maximum performance and stability. Formatting will erase all data on the card, so be sure to backup anything you want to keep before beginning.
When Should I Format My SD Card?
There are a few instances when you should format your SD card:
- When using a brand new SD card for the first time.
- If you want to permanently delete all data on the SD card.
- If the SD card is having performance issues or isn’t being properly recognized by your computer or device.
Formatting the SD card resets it to factory settings, erasing any stored data and clearing out any software or file system issues that may be causing problems.
How to Format an SD Card in Windows 10
Here are the steps to properly format your SD card in Windows 10:
- Insert your SD card into your computer’s SD card reader or slot.
- Open File Explorer by clicking the folder icon in your taskbar or pressing Windows + E on your keyboard.
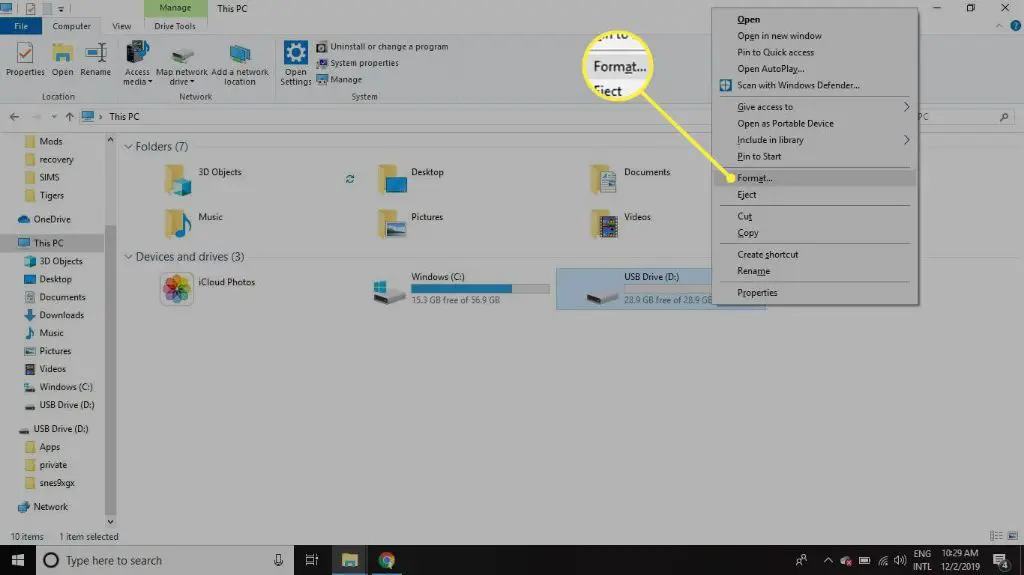
- Under This PC or This Device on the left sidebar, locate your inserted SD card and right-click on it.
- Select “Format…” from the pop-up menu.
- In the Format window:
- Under File System, select FAT32 or exFAT depending on your needs.
- Give your SD card a name under Volume Label (optional).
- Check the Quick Format box.
- Click Start.
- Wait for the formatting process to complete. This may take several minutes depending on the SD card size and computer speed.
- Once finished, click OK. Your SD card will now be reset to factory settings and ready to use.
Choosing Between FAT32 vs exFAT
When formatting your SD card, you’ll need to choose between the FAT32 or exFAT file systems. Here’s an overview of each to help decide:
FAT32
- Compatible with all operating systems and devices.
- Supports SD cards up to 32GB in size.
- Limits individual file sizes to 4GB.
- Slower write speeds compared to exFAT.
exFAT
- Compatible with most modern operating systems and devices.
- Supports SD cards larger than 32GB.
- No limitations on individual file sizes.
- Faster write speeds than FAT32.
For SD cards 32GB or less, FAT32 is generally the best choice for maximum compatibility. For larger SD cards, exFAT is preferable to overcome the 4GB per file limit of FAT32.
Using Disk Management to Format SD Card
Formatting your SD card can also be done using the Disk Management utility in Windows 10. Here are the steps:
- Insert your SD card into your computer.
- Search for Create and format hard disk partitions in the Windows search bar and open the Disk Management app.
- Right-click your SD card partition and select Format.
- Adjust settings – file system, volume label, quick format, etc.
- Click OK to begin formatting.
Using Disk Management gives you a few more options during formatting like the allocation unit size. But for basic formatting, using File Explorer is quicker and simpler.
Using the Command Prompt to Format SD Card
The command prompt can also be used to format SD cards in Windows 10 for more advanced users. Here are the steps:
- Insert your SD card into your computer.
- Search for Command Prompt, right click it and select Run as administrator.
- Determine the drive letter of your SD card by entering list disk and looking for your card’s info.
- Enter the command: format X: /fs:FAT32 replacing X with your SD card drive letter.
- Enter Y to confirm formatting and wait for the process to finish.
- Close the command prompt when done.
Using the command line allows you to format your SD card without a GUI. But File Explorer or Disk Management are simpler options for most users.
Other Important Tips
Here are some other important things to keep in mind when formatting an SD card in Windows 10:
- Always safely eject your SD card before removal to avoid corruption.
- Regularly formatting your SD card can help improve performance and lifespan.
- Quick formatting is faster but less secure – do a full format monthly for better results.
- Don’t format an SD card with important photos or files on it without backing up first.
- You can use third-party tools like SD Card Formatter for more options.
Troubleshooting Problems Formatting an SD Card
If you’re having issues formatting your SD card in Windows 10, try the following troubleshooting tips:
- Use a different USB port or SD card reader if one isn’t working properly.
- Update your Windows operating system and hardware drivers to latest versions.
- Scan for errors and attempt to repair any file system corruption.
- If your SD card is locked, slide the lock switch on the side to unlock it.
- Damaged or very old SD cards may need replacement if they fail formatting.
- Use DiskPart utility in command prompt to clean and reformat SD card.
Formatting your SD card using the Windows interface is usually quick and easy. But if you run into any issues, these troubleshooting steps should help get your SD card working again.
Frequently Asked Questions
1. Is formatting my SD card the same as deleting everything?
Yes, formatting your SD card will permanently delete all data stored on it. Be sure to backup any files you want to keep before formatting the card.
2. Will formatting improve my SD card performance?
Formatting your SD card can help improve performance by clearing out any corrupted files or file system issues. Doing a full format periodically is recommended.
3. How long does formatting an SD card take?
The time to format an SD card can range from a few seconds for a quick format to a few minutes for a full format, depending on card size and computer speed.
4. Can I recover files after formatting an SD card?
If you accidentally formatted your SD card, recovery software may be able to restore some files, though success depends on overwrite level. Avoid saving new data.
5. Is exFAT better than FAT32 for SD cards?
exFAT is preferable for SD cards larger than 32GB due to lack of file size limits. But FAT32 offers wider compatibility if needed.
Conclusion
Formatting your SD card in Windows 10 is a quick and straightforward process using File Explorer, Disk Management, or the command prompt. Just be sure to backup your files first and properly eject the SD card after formatting to avoid any data loss or corruption issues.
Regularly formatting your SD card can help maintain optimal performance and fix any file system problems. FAT32 and exFAT are the two primary file system choices, with exFAT preferred for cards larger than 32GB. Take your time, follow the proper steps outlined above, and you should have a freshly formatted SD card ready to use in no time.
