Why Move Photos from iCloud to External Hard Drive?
There are several reasons why you may want to download your photos from iCloud and move them to an external hard drive:
- Free up storage space on iCloud – iCloud only provides 5GB of free storage. Once you exceed that limit, you have to pay for additional storage. Moving photos to an external drive frees up iCloud space.
- Back up photos – Having a physical backup of your photos on an external drive provides redundancy in case something happens to the photos in iCloud.
- View photos when offline – The photos stored in iCloud require an internet connection to access. Storing them on an external drive allows you to view them anytime without an internet connection.
- Edit photos – Editing or modifying photos is easier when they are stored locally rather than in the cloud.
- Print photos – It’s easier to print photos from a local hard drive than from iCloud.
How to Download Photos from iCloud
To move photos from iCloud to an external hard drive, you first need to download the photos to your local device – Mac, iPhone, etc. Here are the steps to download photos from iCloud:
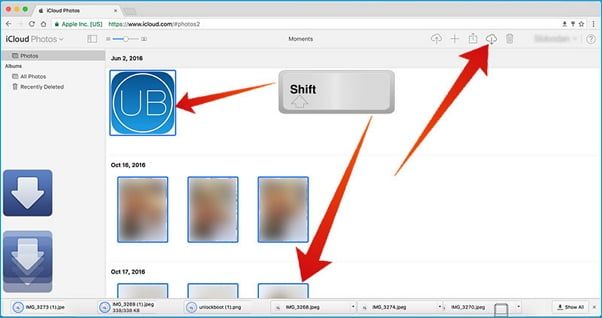
- Go to iCloud.com on your web browser and log in using your Apple ID.
- Go to the Photos app and click on the Photos tab.
- Select the photos you want to download by holding the Command key and clicking on each photo.
- Click the Download button at the bottom.
- Choose either Original or Optimized format for the photos. Original will download the full resolution photos which will take up more storage space. Optimized will download smaller versions of the photos.
- Select a folder on your local device to save the downloaded photos.
- Click Download.
- The photos will start downloading to the selected folder. You’ll see the download progress.
- Once the downloads are complete, the photos are now available on your local device storage and can be transferred to the external drive.
Depending on the amount of photos you are downloading, this process can take a while. So be patient and let the downloads complete.
Connect the External Hard Drive
Before you can transfer photos to the external drive, you need to connect it to your computer first. Here’s how:
- Connect the external hard drive to your computer using the USB cable that came with the drive. Plug one end into the drive, and the other end into a USB port on the computer.
- Most external drives don’t need an additional power source and will power on once connected via USB.
- If your external drive has an AC adapter, plug that in to a power outlet to provide consistent power to the drive during transfers.
- Wait for a few moments for the computer to detect the newly connected drive.
- You should see the external hard drive appear on your desktop (on a Mac) or in File Explorer (on Windows PC).
Now your external hard drive is connected and ready to transfer photos.
Transfer Photos to External Hard Drive
With the external hard drive connected and photos downloaded from iCloud, you can now transfer copies of the photos to the drive. Here is how to do it:
On a Mac
- Open the Finder window and navigate to the folder where your photos are located. This is the location you chose to save the downloads from iCloud.
- Select the photos you want to transfer. You can select multiple photos by holding down the Command key while clicking.
- With the photos selected, drag and drop them into your external hard drive shown in the Finder window or desktop.
- A copy of the photos will now be transferred to the external drive.
- You can verify this by opening the external hard drive and seeing the photos copied over.
On Windows
- Open File Explorer and navigate to the folder where your photos are located. This is the location you chose to save the downloads from iCloud.
- Select the photos you want to transfer. You can select multiple photos by holding down the Ctrl key while clicking.
- With the photos selected, drag and drop them into your external hard drive shown in File Explorer.
- A copy of the photos will now be transferred to the external drive.
- You can verify this by opening the external hard drive in File Explorer and seeing the photos copied over.
The time taken to transfer photos depends on the amount of photos being copied and the transfer speed of the external drive. Be patient and let the transfer complete before disconnecting the drive.
Safely Disconnect the Drive
Once the photo transfer is complete, you need to safely disconnect the external drive before physically detaching it from your computer. This prevents any data loss or corruption.
On a Mac
- Right-click on the external hard drive icon on your desktop or in the Finder window.
- Click on Eject.
- Wait for a message confirming the drive can be safely disconnected.
- Disconnect the USB cable from your computer.
On Windows
- Click on the Safely Remove Hardware icon in the system tray (bottom-right of screen).
- Select your external hard drive.
- Wait for a message confirming the drive can be removed.
- Disconnect the USB cable from your computer.
Your photos are now safely stored on the external hard drive. You can use the drive for offline backup and to free up space on iCloud.
Tips for Backing Up Photos to External Drives
Here are some additional tips for effectively backing up your photos using an external hard drive:
- Copy photos to the drive regularly – Don’t just do it once. Periodically copy any new photos from iCloud to your drive to keep it up to date.
- Consider backup software – Use backup software like Time Machine or Backup Plus to automate regular backup of photos to the external drive.
- Encrypt the drive – Encrypt your external drive if it contains sensitive photos you want to keep extra secure.
- Store drive safely – Keep the external drive in a safe, secure place when not in use to prevent any physical damage.
- Replace old drives – Drives can fail after several years. Replace external hard drives every 3-5 years.
Frequently Asked Questions
Why are my photos still in iCloud after transferring them?
Transferring photos from iCloud to an external hard drive only copies them over, but does not delete the originals from iCloud. So you will see the photos existing in both locations after the transfer. You need to manually delete the photos from iCloud to free up cloud storage space.
How do I verify the photos transferred correctly?
Open the external hard drive folder where the photos were copied to and browse through the photos to verify they were copied properly from iCloud. Check that photo count matches and images open without error.
Is there a size limit for photos I can transfer?
No, there is no size restriction when transferring photos from iCloud to an external drive. You are only limited by the storage capacity of the external drive itself. Even if you have very large high-resolution photos, they can be transferred as they are without size limitations.
What is the fastest way to transfer photos from iCloud?
The quickest way is to use a wired USB 3.0 or USB-C connection from the external drive to your computer. USB 3.0 and USB-C provide much faster transfer speeds compared to older USB 2.0 drives. Transferring over wireless can be very slow.
How do I transfer photos from iCloud on my iPhone?
On your iPhone, first transfer the photos to your computer using the iPhone USB cable. Then follow the steps outlined above to transfer from computer to external hard drive. Trying to transfer directly from the iOS Photos app to an external drive is not possible.
Summary
To recap, the key steps to transfer photos from iCloud to an external hard drive are:
- Download the photos from iCloud to your local device storage
- Connect the external hard drive to your computer
- Transfer photos by dragging and dropping them to the external drive
- Safely eject the external drive before disconnecting
Following these steps allows you to free up iCloud storage space, create backups of photos, and make your photos portable. Just remember to eject the drive safely each time you disconnect it. Enjoy having your photos available offline!