External hard drives are a great way to back up important files and data. However, the information stored on them is susceptible to unauthorized access if the drive is lost, stolen, or accessed without permission. Password protecting an external hard drive on a Mac is an easy and secure way to encrypt sensitive files and restrict access.
This guide will provide step-by-step instructions for encrypting an external hard drive using Mac’s built-in Disk Utility software, as well as FileVault encryption. We will also cover how to access and decrypt the protected drive, change or remove the password, and troubleshoot common issues. By the end, you will know how to properly secure your external hard drive’s contents on a Mac.
Benefits of Password Protecting External Hard Drives
There are several key benefits to password protecting your external hard drive on a Mac:
Prevent unauthorized access to data – By enabling encryption and setting a password, you ensure that no one can view or access files on the drive without the correct credentials. This protects sensitive data if the hard drive is lost, stolen, or accessed by an unauthorized user.
Keep sensitive files secure – Password protection is ideal for external drives used to store confidential business files, personal financial records, private photos/videos, or other sensitive data. The encryption scrambles data so it cannot be read without the password.
Provide encryption – Mac’s built-in encryption through FileVault offers AES-XTS 128-bit encryption to scramble data as it is written to the drive. This meets the security standards for cryptographic modules published by the National Institute of Standards and Technology (NIST).
Requirements
To password protect an external hard drive on a Mac, you’ll need the following:
- Mac computer running OS X 10.8 or later
- External hard drive you want to password protect
The password protection and encryption features work on all modern versions of macOS. However, OS X 10.8 Mountain Lion from 2012 is the oldest Mac operating system that supports encrypting external drives.
You can use the built-in Disk Utility app or FileVault feature to password protect any external drive formatted to work with Mac. This includes USB flash drives, SD cards, Thunderbolt drives, FireWire drives, and traditional external hard drives. The drive needs to be plugged in or connected to the Mac in order to encrypt it.
Encrypting External Hard Drive with Disk Utility
Disk Utility is an application included with macOS that allows you to encrypt external hard drives. Here are the steps to encrypt an external drive using Disk Utility:
1. Connect the external hard drive to your Mac via USB or Thunderbolt.
2. Open Disk Utility (located in Applications > Utilities).
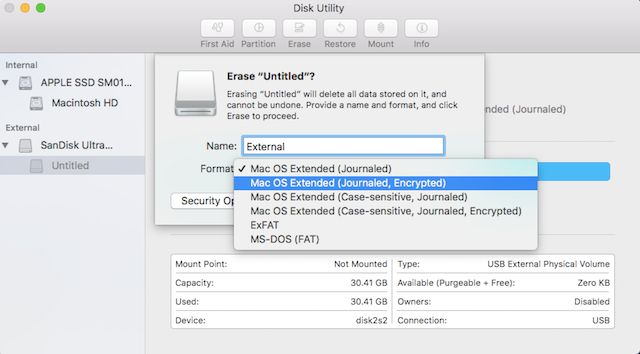
3. Select the external hard drive from the left side panel in Disk Utility.
4. Click the “Erase” button near the top of the Disk Utility window. This will not actually erase your drive, it simply prepares it for encryption.
5. Choose a name and format for the drive, then click “Erase”.
6. Once the drive has been erased, click “Encrypt” to enable encryption.
7. You will be prompted to create a password that will be required to access the encrypted drive. Choose a strong password and enter it twice to confirm.
8. Click “Encrypt” and your drive will begin encrypting. This may take some time depending on the size of the drive and the speed of your Mac.
Once completed, your external hard drive will be encrypted and inaccessible without entering the password. You can now safely store sensitive data on the protected drive.
Encrypting External Hard Drive with FileVault
FileVault is Apple’s built-in encryption tool that allows you to encrypt external hard drives. Here are the steps to encrypt an external drive with FileVault:
1. Open System Preferences and select FileVault.
2. In the FileVault preferences, click the lock icon in the bottom left corner and enter your admin password to make changes.
3. Select the external drive you want to encrypt from the list of available drives.
4. Click Turn On FileVault. This will initiate the encryption process.
5. You will be prompted to create a password that will be required to unlock the encrypted external drive. Choose a strong password and be sure to remember it.
Once enabled, FileVault will automatically encrypt the entire drive. You can track the encryption progress in the FileVault preferences. The contents of the drive will be inaccessible until fully encrypted.
To access the encrypted drive, plug it into your Mac and enter the password when prompted. FileVault decrypts the drive in the background as needed when files are accessed.
Using Third-Party Encryption Tools
In addition to the built-in encryption options offered by macOS and Windows, there are various third-party encryption tools you can use to encrypt an external hard drive.
Some popular options include:
- VeraCrypt – Open source disk encryption software that allows you to create an encrypted container or encrypt a partition or storage device. Available for Windows, macOS, and Linux.
- Cryptomator – Open source client-side encryption tool that encrypts your files before they leave your device. Supports Windows, macOS, Linux, Android, and iOS.
- AxCrypt – File encryption software for Windows that integrates with File Explorer. The free version allows you to encrypt individual files.
- Boxcryptor – Encryption tool for cloud storage services like Dropbox, Google Drive, OneDrive and iCloud. Available for Windows, macOS, iOS and Android.
The main advantage of third-party encryption tools is that they offer more customizable options for encrypting specific files or partitions. They also allow you to access the encrypted data across platforms. The downside is that you need to separately install and manage the encryption software.
Accessing the Encrypted External Drive
When you want to access files and data stored on an encrypted external drive on your Mac, follow these steps:
First, physically connect the encrypted external drive to your Mac using the appropriate cable, either USB, Thunderbolt, or FireWire. The external drive should mount on your desktop like normal.
Once mounted, you will be prompted to enter the password you created when initially encrypting the drive. Type your password and hit Enter or click Unlock to continue.
If the password is accepted, the drive will finish mounting and you will gain full access to all the files and folders stored on the encrypted external drive. You can now access, view, edit, delete, copy, or add files and folders on the drive as needed.
If you enter the wrong password, you will receive an error and be prompted again for the correct password. Make sure to enter the exact password you set during the encryption process.
When you are done using the encrypted drive, eject it before physically disconnecting it from your Mac. To eject, either right-click the drive icon and select Eject, click the Eject button next to the drive name, or drag the icon to the Trash.
Changing or Removing Password
If you want to change or remove the password from an encrypted external hard drive on your Mac, it’s a straightforward process.
To change the password, you can use Disk Utility or FileVault:
- In Disk Utility, select the encrypted volume in the sidebar and click File > Change Password. Then enter the current password and new password.
- For volumes encrypted with FileVault, click the padlock icon for the volume in Finder. Enter the current password, then click Change Password and enter the new one.
To remove the password completely:
- In Disk Utility, select the encrypted volume, click File > Change Password, enter the current password, then leave the new password fields blank and click Change.
- For FileVault volumes, click the padlock icon in Finder, enter the password, then click Turn Off FileVault. This will decrypt the drive and remove password protection.
That’s all there is to it. The password will be changed or removed while preserving all the data on the external drive.
Troubleshooting Tips
If you are having issues accessing your encrypted external hard drive on your Mac, here are some things you can try:
First, check the Keychain Access application and make sure the password is still stored there. You may need to search for it (1).
Try disconnecting and reconnecting the external hard drive. Sometimes the drive just needs to be remounted for the password prompt to appear.
Restart your Mac, as this can reset things and make the password prompt show up again (2).
If you encrypted the drive with Disk Utility, make sure FileVault is not also encrypting the drive, as this can cause conflicts.
As a last resort, you may need to reformat the drive and start over with the encryption process. Be sure to backup your data first.
If nothing seems to work, it may indicate a technical issue or corruption. You can try advanced troubleshooting like running First Aid in Disk Utility or terminal commands to repair the drive.
Conclusion
In summary, there are several easy ways to password protect an external hard drive on a Mac. The built-in Disk Utility tool allows you to encrypt the drive using AES-XTS encryption. FileVault is another option that provides full-disk encryption. Third-party tools like LogMeOnce also offer encryption features and other security measures. The main steps involve selecting the drive, choosing a strong password, and enabling encryption.
It’s important to protect sensitive data stored on external drives, especially if the drive is portable and could be lost or stolen. Encryption transforms the data so it is unreadable without the password. This safeguards personal information, financial records, business data, and any other private content. Password protection gives you peace of mind knowing your data is secure.
