Quick Summary
There are a few different ways to transfer photos from your iCloud Photo Library to your iPhone:
- Enable iCloud Photo Library on your iPhone so photos are automatically downloaded from iCloud.
- Use the iCloud website to download photos to your computer, then transfer them to your iPhone.
- Use AirDrop to wirelessly transfer photos from your Mac to your iPhone.
The easiest way is generally to enable iCloud Photo Library on your iPhone so all your photos are automatically available. However, you may want to manually download photos in some cases, like if you need to save storage space on your iPhone.
What is iCloud Photo Library?
iCloud Photo Library is Apple’s cloud storage service for photos and videos. When enabled, it automatically uploads all photos and videos you take on your iPhone to iCloud, and downloads them to your other devices like iPads and Macs.
This allows you to access your entire photo library seamlessly on all your Apple devices. Any photos you take or edits you make are updated across all devices.
iCloud Photo Library uses your iCloud storage allowance to store your photos. You get 5GB of iCloud storage free, but may need to purchase additional storage if your photo library exceeds this limit.
How to use iCloud Photo Library
If you want all your iCloud photos to automatically appear on your iPhone, enable iCloud Photo Library:
- Go to Settings > [your name] > iCloud > Photos on your iPhone.
- Turn on the switch for iCloud Photos.
This will turn on iCloud Photo Library and begin downloading all your iCloud photos to your device. New photos you take will be automatically uploaded to iCloud as well.
Keep in mind the following:
- If you don’t have enough iCloud storage room, you may need to purchase more.
- It can take hours or days to fully upload your existing photo library.
- Your iPhone storage may fill up quickly if you have a large photo library.
If you don’t want all your iCloud photos taking up space on your iPhone, you can optimize your iPhone storage instead:
- Enable iCloud Photo Library
- Tap Download and Keep Originals to switch it off.
This stores full-resolution photos in iCloud but smaller versions on your iPhone, saving space. You can download the originals on demand.
Download Photos from iCloud.com
You can use the iCloud website to manually download photos and videos to your computer:
- Go to iCloud.com and sign in.
- Go to Photos.
- Select the photos/videos you want to download.
- Click the Download button at the bottom.
This will download the selected photos and videos to your computer as a zip file. You can then transfer the photos to your iPhone.
Some things to note:
- You can only download 100 items at a time.
- HEIF/HEVC formats may not be supported by your Windows PC.
- Live Photos and editing features won’t be preserved.
Use Image Capture on Mac
If you have a Mac, you can use Image Capture to transfer photos directly from iCloud:
- Connect your iPhone to your Mac via USB cable.
- Open Image Capture on your Mac (located in Applications > Image Capture).
- Select your iPhone under Devices.
- Choose which photos to import from the iCloud Photo Library section.
- Click Import to transfer the photos to your Mac.
- Now you can sync the photos from your Mac to your iPhone.
This provides an easy graphical interface to transfer iCloud photos on a Mac.
Use AirDrop from Mac to iPhone
Another way to transfer photos on Apple devices is via AirDrop:
- Open the photos you want to transfer on your Mac.
- Click the Share button and select AirDrop.
- Select your iPhone from the list of nearby devices.
- Accept the transfer request on your iPhone.
The photos will now be wirelessly transferred from your Mac to your iPhone using AirDrop.
Some tips for using AirDrop:
- Your Mac and iPhone need to be within 30 feet of each other.
- Both devices must have WiFi and Bluetooth enabled.
- AirDrop only works between Apple devices.
Use a USB Cable to Transfer
You can always transfer photos directly from your computer to your iPhone using a USB cable:
- Connect your iPhone to your computer using the cable.
- Open your iPhone’s folder on your computer.
- Drag and drop photos from your computer onto your iPhone’s folder.
This will copy the photos directly into your iPhone camera roll. Just make sure to eject/safely remove your iPhone before unplugging the cable.
Which Method Should I Use?
Here is a quick summary of when to use each transfer method:
| Method | When to Use |
|---|---|
| iCloud Photo Library | You want your entire iCloud photo library available on your iPhone automatically |
| iCloud.com Download | You need to selectively download photos to your computer |
| Image Capture | Transferring iCloud photos from Mac directly to iPhone |
| AirDrop | Quick wireless transfer from Mac to iPhone |
| USB Cable | Direct wired transfer from computer photos to iPhone |
So in summary:
- Enable iCloud Photo Library for automatic syncing of your entire library.
- Use iCloud.com downloads for selective transfers to your computer.
- Leverage tools like Image Capture or AirDrop if transferring directly from a Mac.
- Use a wired USB connection for quick transfers from your computer.
Choose the option that best suits your needs and how many/which photos you want to transfer!
Troubleshooting iCloud Photo Library
Here are some troubleshooting tips if you’re having issues getting iCloud Photo Library to work properly:
Photos not downloading to iPhone
- Check that you have iCloud Photo Library enabled in iPhone Settings.
- Make sure you’re connected to WiFi so photos can download.
- Confirm you have enough iCloud storage space for your photo library.
- Try toggling iCloud Photo Library off and back on to retrigger download.
Uploads to iCloud taking forever
- Only upload over WiFi to avoid cellular data charges.
- Try connecting your iPhone to a power source so uploads continue in standby.
- Pause/resume uploads and check again in a few hours.
- Double check you have adequate iCloud storage space.
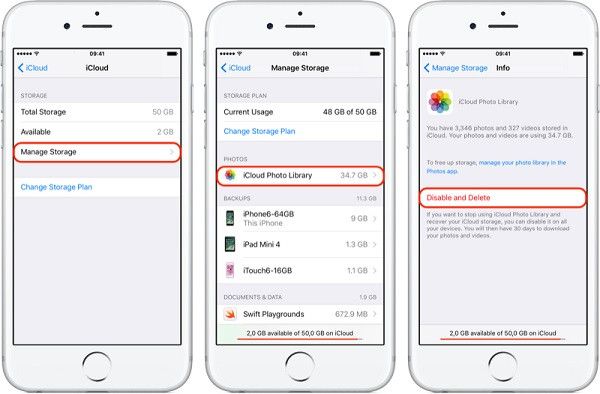
Photos deleted from iPhone but not iCloud
- Deleted photos stay in iCloud for 30 days before being removed.
- Go to iCloud.com to permanently delete photos.
- Disable iCloud Photo Library and delete from iPhone camera roll instead.
Not enough device storage for photos
- Set Optimize iPhone Storage setting to only keep smaller versions locally.
- Manually offload unused apps and clear cached files to free up space.
- Upgrade your iPhone model for more storage capacity.
Other issues
- Make sure your iPhone and iCloud account are using the latest software versions.
- Check Apple System Status page for any iCloud service disruptions.
- Contact Apple Support for further troubleshooting assistance.
Following troubleshooting steps and tips should help resolve most issues you encounter with iCloud Photo Library.
Conclusion
In summary, there are a few different options to transfer photos from your iCloud Photo Library to your iPhone:
- Enable iCloud Photo Library on your iPhone for automatic syncing.
- Manually download photos from iCloud.com to your computer then transfer to iPhone.
- Use Image Capture on Mac to import iCloud photos directly to iPhone.
- AirDrop photos wirelessly from Mac to iPhone.
- Connect iPhone to computer via USB and transfer photos.
The easiest options are generally using iCloud Photo Library for automatic syncing or AirDrop for quick wireless transfers. But other methods like iCloud website downloads or wired transfers may be needed depending on your use case.
Following the guide steps outlined here will help ensure you can successfully get your iCloud photos and videos onto your iPhone. Just pick the transfer method that best matches how many and which photos you need to move.
