SD cards can become damaged or corrupted over time, resulting in data loss or the card not being readable by devices. While software fixes may help recover data, SD cards that are physically damaged require a physical repair to get them functioning again. This involves opening up the SD card, diagnosing problems with the internal components, and attempting fixes like replacing parts or resoldering connections. Attempting a physical SD card repair yourself is difficult and there’s no guarantee of success, so it’s often better left to data recovery pros. But if you want to learn how to do it, here’s an overview of the SD card physical repair process.
Assessing if Your SD Card Needs Physical Repair
Before attempting a physical repair on an SD card, first determine if that is definitely necessary. An SD card may seem “broken” when the issue is really logical corruption that can be fixed with data recovery software. Things to try first include:
- Trying the card in a different device – A card may not work in one device but still function in another.
- Running data recovery software – Programs can repair logical errors and retrieve data from seemingly dead cards.
- Reformatting the card – This wipes all data but can fix software issues.
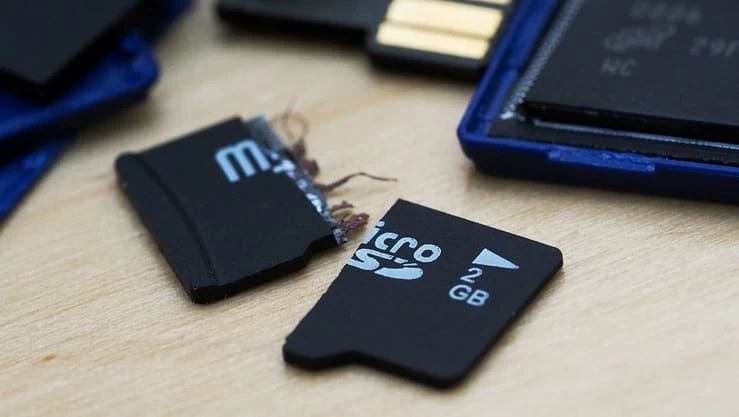
If you’ve exhausted software troubleshooting options and confirmed there is a physical problem, the next steps would involve physically examining the card to identify issues. Warning signs suggesting physical damage include:
- Visible cracks or broken pieces.
- Bent or warped shape.
- Burn or melt marks.
- Corrosion from water or other liquids.
- Scratched metal contacts.
At this point the card likely requires disassembly and physical repair work to function again. The feasibility of DIY repair depends on the exact damage and your skills.
Obtain Tools and Components for SD Card Repair
Repairing an SD card yourself requires specialty tools to safely open the card and make fixes. Essential items include:
- Tweezers – Precision tweezers help grip and manipulate small components.
- Spudgers – These are thin, plastic pry tools used to separate the SD card casing.
- Magnifying glass – Used to inspect components for damage under magnification.
- Soldering iron and solder – For resoldering connections and replacing components.
- SD card controller – A replacement controller chip may be needed.
- SD card socket – The metal host interface pins may need replacement.
- Conductive epoxy – Can repair damaged traces and connections.
- IPA and brush – Isopropyl alcohol and a brush for cleaning contacts.
These are specialized tools found at electronics and computer repair supply vendors. Additionally, replacement SD card components may be salvaged from donor cards that are irreparable but contain working parts.
Safely Disassemble the SD Card
With the right tools on hand, you can start the SD card disassembly process. This requires very careful work to avoid damaging small components:
- Use spudgers to pry apart the two halves of the SD card casing. Move slowly and apply gentle force in the seam gap.
- Once the casing is open, gently lift the internal board out. Avoid bending it.
- Examine both sides of the board under magnification to identify problems.
- Note location of key components like the controller chip, memory modules, and metal contacts.
- Use tweezers and gentle prying to separate layers and remove any damaged parts.
Patience and precision is crucial so you don’t tear traces or lift solder pads. Components can only withstand so much physical handling before becoming irreparable. Document the disassembly carefully to aid reassembly.
Clean Contacts and Repair Traces
With the components exposed, you can start cleaning and repairing damage. Focus first on simpler fixes:
- Clean metal contacts – Use IPA and a brush to clean corrosion from the metal pins and gold fingers. This can instantly improve connections.
- Reflow solder joints – Resolder any loose chips and modules. Add flux and heat with the iron to re-bond weak joints.
- Scrape trace corrosion – Gently scrape away trace corrosion with a fiberglass pen to uncover intact copper.
- Repair traces – Use conductive epoxy to bridge broken or corroded PCB traces.
Take care not to overheat and de-laminate the board when soldering. Work slowly and methodically to improve connections before replacing any components.
Replace Faulty Controller or Memory Chips
If cleaning and trace repair doesn’t resurrect the SD card, the issue may be an internal component. The controller chip and flash memory modules are most likely to fail due to their complexity and wear over time. Replacing them involves:
- Identify faulty component via visual inspection and multimeter/oscilloscope tests.
- Carefully desolder the damaged chip from the board.
- Clean pads thoroughly and apply flux to pre-tin them.
- Obtain a replacement component, either new or salvaged.
- Align and temporarily tack component in place with minimal solder.
- Fully solder all pins while verifying alignment under magnification.
This requires proficiency in surface-mount soldering techniques. Matching the exact specs of the original component is also critical. Once complete, retest connections thoroughly before reassembly.
Replace Entire SD Card Socket if Needed
If the physical damage is focused on the metal SD socket where the card interfaces with devices, the entire socket may need replacement. This involves:
- Desoldering the damaged socket from the host PCB.
- Cleaning pads and opening up the socket mounting holes.
- Aligning and soldering the replacement socket in place.
- Carefully re-forming any bent socket contact pins as needed.
Any mismatch between the new socket and PCB can cause connection issues. Only attempt this repair if absolutely needed and take steps to ensure proper physical and electrical mating to the host board.
Reassemble SD Card
Once any fixes are complete, you can reassemble the SD card. This process is just as delicate as disassembly:
- Align internal board layers properly and press gently back into place.
- Mate card casing halves, pressing firmly but evenly around the seam.
- Check that no components or wires are pinched or displaced.
- Press halves tightly until the plastic snaps back together.
- Visually inspect for any gaps, misalignment issues or debris inside.
Reassembly is best done soon after disassembly while you recall the original structuring. Go slow and continually check progress to avoid issues powering up the card after it’s closed.
Conclusion
Successfully repairing a physically damaged SD card takes patience, specialty tools and advanced soldering skills. While possible for a motivated DIYer to accomplish, there are many pitfalls that can render the card permanently inoperable. Weigh the effort and risk versus the value of the lost data, as professional data recovery may be a safer option over self-repair. But for those able to carefully disassemble, diagnose, fix and reassemble the card, a physical repair can often give it renewed life.