One of the most frustrating things that can happen with a computer is a hard drive failure. This issue leaves your system unable to boot properly into Windows and access your files. The solution in this case is to replace the failed hard drive and reinstall Windows 10 from scratch. This guide will walk through the full process to get your system back up and running after a hard drive failure. We’ll cover how to back up important personal files, create Windows 10 installation media, install Windows on the new drive, install drivers, reinstall programs, restore your files, and customize the OS. By the end, you’ll have a fully functional Windows 10 system on the new hard drive.
Back Up Personal Files
Before reinstalling Windows 10 after a hard drive failure, it is crucial to back up all important personal files and data first. As Microsoft notes, “Backing up your files is the single most important thing you can do to prevent data loss” (source). This ensures you have copies of critical information like photos, documents, music, videos, settings, installed programs, drivers, and any other data you want to preserve.
According to EaseUS, some key files and data to backup before reinstalling Windows 10 include personal photos, videos, music, documents, accounting data, saved game progress, browser bookmarks, emails, chat histories, and other irreplaceable information (source). It’s also wise to back up any custom settings, installed software licenses, and device drivers to make reinstallation smoother.
Backing up this data provides insurance against permanent data loss during the Windows reinstallation process. Without backups, all personal files and customizations on the original hard drive will be erased. Having backups ensures you can safely restore your files, settings, and configurations after Windows 10 is reinstalled.
Create Windows 10 Installation Media
The first step in reinstalling Windows 10 after a hard drive failure is to create new installation media. There are a few different methods to create bootable Windows 10 installation media on a USB flash drive or DVD:
Using the Media Creation Tool
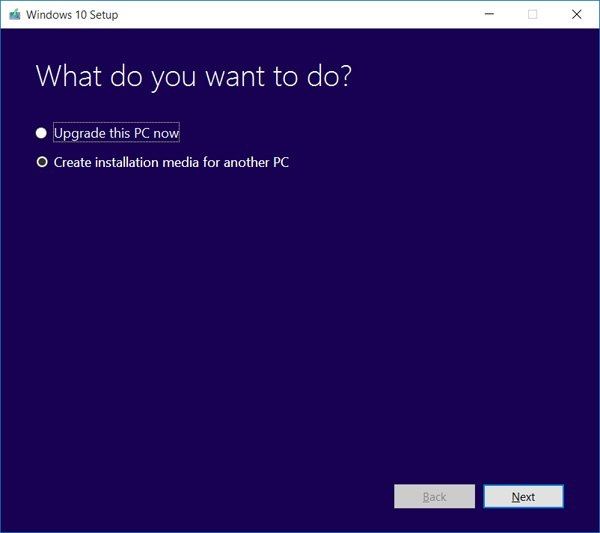
The easiest way is to use the Windows 10 Media Creation Tool. This is an official tool from Microsoft that allows you to download the latest version of Windows 10 and create bootable installation media. To use it:
- Download the Media Creation Tool from the Microsoft website.
- Run the tool and select “Create installation media.”
- Choose the language, edition, and architecture (64-bit or 32-bit) of Windows 10 to download.
- Select either USB flash drive or ISO file as the destination.
- Wait for the Windows 10 installation files to download and get copied to the media.
Using Rufus
Rufus is a third-party utility that provides an easy way to format USB drives and create bootable media. To use Rufus:
- Download and install Rufus.
- Insert a blank USB flash drive with at least 5GB of space.
- In Rufus, select the USB drive and choose “Boot selection” as ISO image.
- Select the Windows 10 ISO file you want to use.
- Click Start to format and create the bootable USB drive.
Burning to a DVD
You can also burn the Windows 10 ISO file to a blank DVD to create installation media. This requires a DVD burner and blank DVD discs.
Change BIOS Settings
In order to boot from the Windows 10 installation media, you’ll need to change the boot order in your computer’s BIOS. Here are the steps to change the boot order:
1. Restart your computer and press the key to enter the BIOS, which is usually F2, Delete, or F12. Consult your computer or motherboard manual for the exact key.
2. Navigate to the “Boot” tab in the BIOS.
3. Change the boot order so that the USB drive or DVD drive with the installation media is first in the boot order.
For more details, refer to these guides on changing the BIOS boot order:
How to Change the Boot Order (Boot Sequence) in BIOS
How To Change Boot Order In Computer BIOS [For Beginners]
Install Windows 10
To start the installation process, insert the Windows 10 installation media you created into your PC and restart it. As it boots up, press the key to enter the BIOS menu (F2, F10, Del, etc. depending on your system). Under the boot options, choose to boot from the USB or DVD drive where your installation media is. Save changes and exit BIOS.
Your PC will now boot from the installation media instead of the hard drive. You will be greeted by the Windows 10 setup screen. Click ‘Install Now’ to begin. Accept the license terms, and on the next screen choose ‘Custom: Install Windows only’ to start a clean install.
On the next screen you will see a list of your PC’s drives and partitions. Select the drive where you want to install Windows, likely your main hard drive. Click ‘Drive options’, then select ‘Format’ to delete all existing partitions on it.Formatting removes any old Windows installations and files for a completely clean install. After it completes, click ‘Next’ to start the installation process.
Windows will copy the required files and go through multiple steps to configure your customized installation. This may take awhile depending on your system’s hardware. Once it completes, you will be able to set up a user account and configure basic settings. Afterward, Windows will finalize a few more things and you’ll be left at the desktop. Your fresh Windows 10 installation is now complete.
Install Drivers
After Windows 10 is installed, it’s important to install the latest drivers for your hardware devices. This ensures everything functions properly and you get the full capabilities of your hardware.
First, determine what hardware drivers you need. Common drivers to install include:
- Graphics card driver
- Motherboard chipset driver
- Audio driver
- Network adapter driver
- Printer driver
- Touchpad driver
To find the latest drivers, visit the manufacturer’s website for each hardware component and search for the drivers. For example, visit Nvidia’s website for latest Nvidia graphics drivers. The manufacturer websites will have drivers available to download.
Before installing a driver, read the release notes to confirm compatibility with your hardware. Then, run the downloaded setup/executable file and follow the prompts to install each driver. Restart your computer when prompted.
You may want to install drivers in this order:
- Chipset
- Graphics
- Other main drivers (audio, network, etc)
- Accessories (printer, touchpad, etc)
After installing each driver, test that the device is working properly in Windows 10. Once all drivers are updated, your system will be fully optimized and stable.
Reinstall Programs
After you have Windows 10 installed and updated, you will likely want to reinstall your favorite software and apps. Here are some tips for smoothly reinstalling programs:
Make a list of all the software, apps, and programs you frequently use. This will help you remember everything you may want to reinstall.
For software you purchased, look up your license keys or account info. This is crucial for reactivating paid software.
Prioritize must-have programs first. Focus on utilities, security software, productivity apps, and other essentials before reinstalling games and niche software.
Reinstall software directly from the developer or publisher when possible. Download installers from their official website instead of third-party sites.
Refer to your old software list if you are unsure whether you are missing something important. Check both desktop and mobile apps.
Consider alternatives if you can no longer access a previous software purchase. Competitors may offer free options to switch to.
Automate and streamline reinstalls with a software management tool like Ninite. This can quickly reinstall multiple apps at once.
Take the opportunity to clear out unused, outdated, or redundant programs you may no longer need.
Be patient as reinstalling and reactivating software can be time consuming. But having your favorite programs back will make Windows feel like home.
Restore Personal Files
After reinstalling Windows 10 and getting your system back up and running, the next important step is to restore your personal files and data. This includes documents, photos, music, videos, downloads, desktop files, and any other important user-generated content.
If you were able to back up your personal files before the system failure and Windows reinstallation, you can simply restore them from that backup. For example, if you used Windows Backup to create system image backups on an external hard drive, you can restore those image backups to retrieve your files and settings.
There are a couple ways to restore files from a Windows Backup image:
– Use the Windows Backup wizard to guide you through locating the backup image on your external drive and restoring it.
– Boot to the Windows Recovery Environment, go to Advanced Recovery Methods > System Image Recovery, and follow the prompts to choose the backup image to restore.
Similarly, if you backed up your files to cloud storage, you can download them from services like OneDrive or Google Drive to your newly installed Windows 10 system. Log in to each cloud account and sync the files to your local storage.
If you did not have backups of your personal files, unfortunately those files may be lost after reinstalling Windows. However, there are some tools that may be able to recover deleted files, like Recuva and EaseUS Data Recovery Wizard. These will scan your hard drive and attempt to find traces of deleted files to recover what’s possible, though there are no guarantees.
Customize Settings
After a fresh installation of Windows 10, you will likely want to customize various settings to personalize the experience. Some key settings to reconfigure include:
Personalization – Change the desktop background, themes, start menu layout, taskbar location and more under Settings > Personalization. See this guide for tips on personalizing Windows after a clean install.
Privacy – Review privacy settings under Settings > Privacy and choose what apps can access your location, camera, microphone and more. Adjust telemetry settings to your comfort level.
Accounts – Add, delete or modify user accounts under Settings > Accounts. Re-enter credentials for email, OneDrive, online accounts etc.
Apps – Reinstall apps from the Microsoft Store. Review startup apps under Settings > Apps > Startup and disable any unnecessary ones. Uninstall bloatware.
OneDrive – Set up OneDrive backup under Settings > Accounts > Sync your settings. Choose what files to sync to the cloud.
Display – Adjust display settings like resolution, scaling, orientation and multiple monitors under Settings > System > Display.
Network & Internet – Set up Wi-Fi networks, connect devices, check network status and more under Settings > Network & Internet.
Conclusion
Reinstalling Windows 10 after a hard drive failure can seem daunting, but by following the steps outlined in this guide, you can get your PC up and running again with your files and settings restored. Here’s a quick recap of the major steps:
- Back up personal files from the old hard drive if possible
- Create Windows 10 installation media on a USB flash drive
- Change BIOS settings to boot from the USB drive
- Perform a clean install of Windows 10 on the new hard drive
- Install necessary device drivers
- Reinstall programs and customize settings
- Restore personal files from backup
With some time and patience, you can recover from a hard drive failure. For additional help, consult your computer manufacturer’s support website or user forums related to your specific model. The Microsoft Support website also provides useful tips for installing and troubleshooting Windows 10. With the right preparation and tools, you can get back to a fully functioning Windows 10 system.
