A factory reset clears all of the data on an external hard drive and resets it to its original out-of-the-box state. This process erases all files, folders, apps, settings, and partitions from the drive. There are a few reasons why you may want to reset your external hard drive to factory settings:
- You’re selling or giving away the drive and want to wipe it clean of personal data
- You’re experiencing performance issues or errors and want a fresh start
- You suspect malware or viruses and want to do a complete wipe
- You forgot the password and cannot access the drive
Resetting the drive deletes everything, so be sure to back up any important files before proceeding. With the drive erased, you can then reformat it and reinstall any necessary software.
Back Up Important Data
Before resetting your external hard drive, it is critical to back up any important files or data stored on the drive. A factory reset will completely erase all data, so you want to make sure you have copies of anything you want to keep.
Use file transfer software or cloud storage to copy important documents, photos, videos, music, or other files from the external drive to a secure location like your computer’s internal drive or cloud storage.
Some popular options for backing up data include:
- Copying files directly to your computer through your operating system’s file manager.
- Using backup software like Backup Computer Before Factory Reset Windows 11/10.
- Syncing files to cloud storage services like Google Drive, Dropbox, or iCloud.
Make sure you have full backups of any folders or files you may want to access again in the future. It is better to be over-cautious and backup more than you need, rather than miss something important.
Once you’ve verified the backup was successful and you have copies of all crucial data, you can proceed with resetting your external hard drive.
Disconnect External Hard Drive
Before initializing the external hard drive, it’s important to safely disconnect it from your computer to avoid potential data loss or corruption. Here are the steps:
Close any windows or programs that might be accessing files on the external drive. This includes any open document windows, multimedia players, etc. Failure to close these programs could result in lost data.
Right-click on the Start menu and select “Disk Management”. Locate your external hard drive in the list of disks and volumes. Right-click on the drive volume and select “Eject”. This will safely disconnect the drive so it can be removed.
Alternatively, locate the external drive icon on your desktop or in File Explorer. Right-click on the icon and select “Eject”. This will pop-up a message saying it’s safe to remove the hardware.
If you don’t see an eject option, navigate to the “Safely Remove Hardware” icon in the system tray. Click on this and select your external drive. This will disconnect it from the system.1
Once disconnected, unplug the USB cable connecting the drive to your computer. Store the drive in a safe place until you are ready to reconnect it.
Check Drive Format
Before resetting your external hard drive, it’s important to check what file system it is currently formatted with. This will determine if the drive is set up for use with Mac, Windows, or can work across both operating systems.
Most external hard drives sold today come pre-formatted with the exFAT file system. As explained on CNET, exFAT “allows you to read and write files on both Mac and Windows systems.”
You can check the format of your external drive by connecting it to your computer, then viewing its properties or details. On Windows, right-click the drive and select Properties, then look at the File System. On Mac, click the drive icon and go to Get Info, then inspect the Format line.
If your external drive does not indicate it’s formatted as exFAT, then it may be set up for only Mac or Windows. Drives formatted with HFS+ are for Mac only, while NTFS formatting is for Windows. To use your external drive seamlessly between both operating systems, it needs to be formatted as exFAT.
Initialize Drive
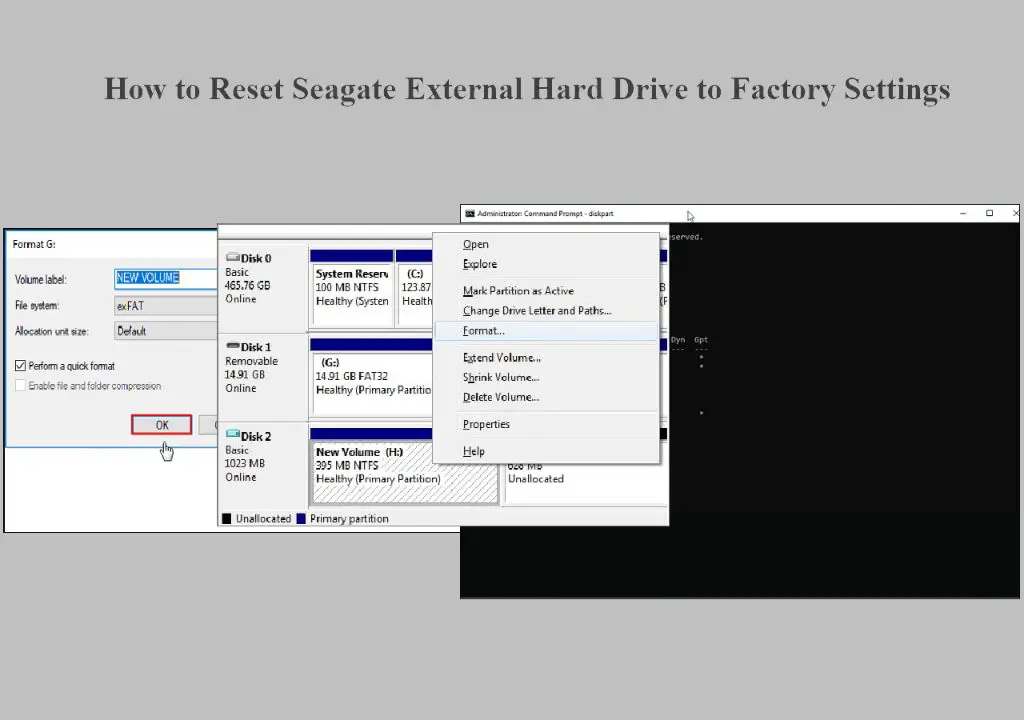
The next step is to initialize the external hard drive, which will wipe all data and restore it to a clean, unformatted state. This can be done using the Disk Utility app on Mac or the Diskpart tool on Windows.
On a Mac, open Disk Utility, select the external hard drive from the sidebar, and click “Erase” at the top. Choose a name, format (ex. APFS or Mac OS Extended (Journaled)), and scheme (GUID Partition Map or Master Boot Record). Then click “Erase” to wipe the drive.[1]
On Windows, open the Diskpart command line tool. Type “list disk” to identify the disk number of the external drive. Then type “select disk X” (replace X with the disk number). Next, type “clean” to wipe and erase the drive. Finally, type “create partition primary” to create a new partition on the blank drive.[2]
Initializing the external hard drive erases all existing data and prepares it to be formatted with a new file system.
Restart Your Computer
After initializing the external hard drive, you will need to restart your computer for the changes to take effect. Rebooting allows your system to reload the drivers and recognize that the external hard drive has been reset. Some key steps for restarting after initializing an external hard drive:
- Safely eject the external hard drive and disconnect it from your computer.
- Go to the Start menu and click the Power button.
- Select Restart to reboot your system.
- Wait for your computer to go through the restart process.
- Once your system has fully restarted, reconnect your external hard drive.
Rebooting clears out any previous drive connections and resets the communication between your computer and external storage devices. This will ensure your system recognizes the external hard drive as a newly initialized drive. Following these steps is crucial after initializing a drive before attempting to access or reformat it.
Reconnect External Hard Drive
After restarting your computer, the next step is to reconnect your external hard drive. This is a simple process:
- Plug the USB cable back into the external hard drive and connect it to your computer.
- Windows should automatically detect the drive again and install any necessary drivers.
- You may get a notification that new hardware has been detected. If prompted, allow Windows to install default drivers for the external drive.
Once reconnected, Windows will assign a new drive letter to your external hard drive since you reset it. You can check File Explorer to confirm the drive appears and is accessible.
If the external drive is not detected, try connecting it to another USB port on your computer. Also try replacing the USB cable if issues persist, as a faulty cable can prevent detection.
Overall the reconnection process is straightforward. With the drive reset and drivers installed, it will be ready for use once again.
Install Drivers
After resetting your external hard drive, you may need to install new drivers for Windows to recognize the drive. Most external hard drives come with drivers pre-installed, but formatting or resetting the drive erases these drivers. To reinstall drivers for your external hard drive:
- Open Device Manager in Windows. You can access this by typing “device manager” into the Windows search bar and clicking on the result.
- Under the Disk Drives category, locate your external hard drive.
- Right click on the drive and select “Update driver.”
- Windows will now automatically search and install the latest driver for your drive.
If Windows is unable to find a driver, visit the manufacturer’s website and search for the latest driver available for your specific model of external hard drive. Download and install the driver.
With the proper drivers installed, Windows should now recognize your reformatted external hard drive.
Test the Drive
After resetting your external hard drive to factory settings, it’s important to test that the drive is functioning properly before storing new data on it.
To test the external hard drive:
- Reconnect the external hard drive to your computer if you haven’t already.
- Open File Explorer on Windows or Finder on Mac and look for the external hard drive.
- Double click to open the drive.
- Create a test folder or file on the external hard drive such as “Test File”.
- Open the test file or folder you created to confirm you can access it.
- Try creating additional folders/files and opening them.
- Copy a small amount of data (e.g. a few photos or documents) to the external hard drive as an additional test.
- Eject and reconnect the external hard drive, then confirm you can still access the test files/folders copied over.
If you are able to create files/folders on the external hard drive and access them after disconnecting and reconnecting, the reset was successful. The external hard drive should now be empty and ready for new data to be stored.
If you run into errors creating or accessing files on the freshly reset external hard drive, there may still be underlying issues that require troubleshooting. Consulting the manufacturer’s instructions or support resources may help resolve any lingering problems.
Conclusion
In summary, resetting an external hard drive to factory settings is a straightforward process. First, back up any important data on the drive since the resetting process will erase everything. Next, disconnect the external hard drive from the computer. Open Disk Management, right-click on the drive, and choose to initialize it. Select a partition style such as MBR or GPT depending on your needs. Right-click on the unallocated space and create a new simple volume. Format the volume using NTFS or exFAT file system. Restart the computer and reconnect the external drive. Install any required drivers and run tests to ensure the drive is functioning properly.
Resetting the external hard drive to factory settings erases all data and restores the drive to its original out-of-the-box state. This can be useful for wiping sensitive data, resolving drive errors, or preparing the drive for resale or donation. Just be absolutely sure to back up your data first, as the resetting process cannot be undone.