Transferring your iTunes library and playlists to a new computer can seem daunting. Many users have spent years curating their music libraries and don’t want to lose their playlists in the migration process. The good news is that with the proper steps, you can successfully move your entire iTunes library, including playlists, to a new Mac or Windows PC.
Common challenges in this process include ensuring all music files and playlist data are transferred properly. iTunes stores critical information in its library database, which must be moved over as well. Software and OS version differences between old and new computers can also cause snags. Overall, users want to move their playlists seamlessly so they can pick up right where they left off listening to their favorite mixes.
Back Up iTunes Library
Before transferring your iTunes library to a new computer, it’s crucial to first back up your current iTunes library. This protects you in case anything goes wrong during the transfer process. To back up your iTunes library:
Go to Finder and navigate to the iTunes folder. On a Mac, this is typically located in your Music folder under User>Music>iTunes. On Windows, it’s usually under C:\Users\Username\Music\iTunes.
Once you locate the iTunes folder, copy it to an external hard drive or a cloud storage service like iCloud or Dropbox. For optimal performance, use a high-capacity external hard drive like a USB flash drive or solid state drive.
Store the backup in a safe location in case you need to restore your iTunes library later. Backing up to an external drive allows quick restores while cloud storage protects against local storage failures.
Authorize New Computer
Before you can authorize your new computer, you’ll first need to deauthorize the old computer that you transferred the iTunes library from. This frees up one of your authorization slots. Deauthorizing does not delete any content.
To authorize the new computer with your Apple ID, open iTunes and go to Account > Authorizations > Authorize This Computer. Sign in with your Apple ID and password. This associates your iTunes account with the new device.
If you run into any issues authorizing your new computer, it could be due to corrupt authorization records. Try resetting your User Account Controls in Windows or deleting certain iTunes folders on a Mac to clear out old authorizations.
Transfer iTunes Media
There are a few options for transferring your iTunes media files like songs, movies, TV shows, and more to your new computer:
You can copy the iTunes Media folder from your old computer to an external hard drive and then transfer it to the new computer. The iTunes Media folder is usually located in Music/iTunes on Windows or Music/iTunes/iTunes Media on Mac. Be sure to consolidate your library first so all your media files are contained in the iTunes Media folder before copying. Connect the external drive to the new computer and copy the iTunes Media folder over.
If your computers are on the same home network, you can transfer the iTunes Media folder over the local network. On the old computer, share the iTunes Media folder. Then on the new computer, connect to the shared folder and copy over the files.
You can also use iTunes Match to sync your iTunes media to the cloud. This will allow you to stream your music on any device and download your purchased music on the new computer. Make sure iTunes Match is enabled, then on the new computer sign in with the same Apple ID and iTunes will sync and download your media.
Import iTunes Library
Once you have transferred your iTunes media and backup to the new computer, you can import your iTunes library. This will restore your playlists, preferences, and other iTunes settings.
To import your iTunes library on Windows, hold down Shift while opening iTunes. This will bring up an option to choose your library. Navigate to and select the iTunes backup folder you transferred to the new computer (it will likely be named something like iTunes Library.itl). iTunes will then import this backup and restore your full library.
On Mac, you can hold Option while opening iTunes to choose your library backup to import. The process is otherwise the same.
When importing your library, all of your previous iTunes settings, playlists, play counts, ratings, and other preferences will be restored. However, any media files like songs, movies, or TV shows will need to be located or redownloaded if they weren’t transferred over.
iTunes will automatically search for the transferred media files. If any are missing, you can go to Preferences > Advanced and select “Consolidate files” to redownload any media purchased from Apple that is missing. For non-Apple media you’ll need to locate the files manually or readd them to your library.
Restore Playlists
When you import your iTunes library to your new computer, most of your playlists should transfer over automatically. However, sometimes playlists can get lost or not sync properly during the migration process.
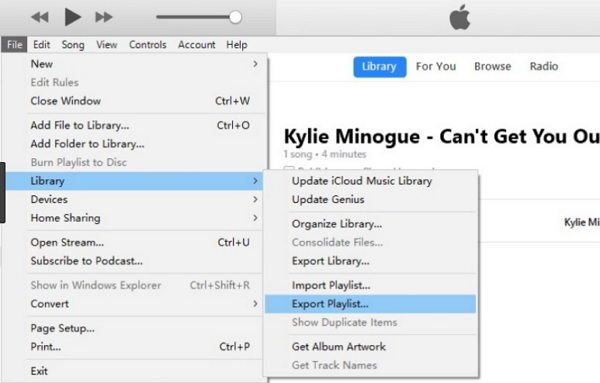
If you find some of your playlists are missing after importing your iTunes library, you will need to manually recreate them on your new computer. The easiest way is to open your old iTunes library on the original computer and export any missing playlists. Then import those playlist files into the new iTunes library. According to Apple Support, you can select a playlist and go to File > Library > Export Playlist to save a copy of that playlist [1].
Smart playlists may not transfer correctly when importing your iTunes library. These are playlists that update automatically based on rules you set up. To fix any smart playlists, go to File > New Smart Playlist in your new iTunes library. You can then rebuild the playlist using the same rules and settings you originally set up.
It may take some time to recreate any playlists that did not transfer correctly. But this will ensure you get back all your carefully curated playlists on the new computer.
Sync iOS Devices
When setting up a new computer, you’ll need to sync your iPhone, iPad, or iPod to transfer over your media and data. Begin by connecting your iOS device to your new computer with a USB cable and opening iTunes. Click on the device icon in the top left corner of the iTunes window.
Before syncing, it is highly recommended to back up your iOS device. Backing up ensures you have a save point if anything goes wrong during syncing. To back up, right click on your device in iTunes and select “Back Up”.
When you sync your iOS device to a new computer, iTunes will automatically wipe all existing media and data on your device and replace it with the iTunes library on the new computer. Make sure your new iTunes library contains all the data you want before syncing. You can choose to manually transfer only certain types of content like music or photos instead of everything.
For more detailed instructions on syncing iOS devices to a new computer using iTunes, refer to this Apple support article.
Troubleshooting Tips
Here are some solutions for common issues that may arise after transferring your iTunes library and playlists to a new computer:
If some or all of your playlists are missing after the transfer, this is likely because the playlist files (.xml files) did not get transferred over. To fix this, you will need to export your playlist files from your old computer and import them into iTunes on your new computer. Instructions can be found here: https://support.apple.com/en-us/HT202190
If you are missing media files like songs, videos or photos, check that you transferred the entire iTunes media folder from your old computer. If files are still missing, you may need to re-add the missing items to your iTunes library on the new computer.
Sync issues can also occur after transferring your library, where playlists or media do not sync correctly to your iOS devices. Some tips to fix syncing issues can be found here: https://discussions.apple.com/thread/254411117
If you have followed all troubleshooting steps and are still having issues, you can contact Apple Support directly for help. An Apple Support agent can assist you with diagnosing and fixing any remaining problems importing your iTunes library or playlists.
Alternative Options
If you don’t want to use iTunes to transfer your media and playlists to a new computer, there are other options available:
Use Apple Music
If you subscribe to Apple Music, you can access your music library and playlists from the cloud on any device. Simply sign into your Apple Music account on the new computer to regain access to your content. This eliminates the need to manually transfer files or playlists between devices.
Third-Party Apps
Apps like MobileTrans and MusicBee provide an iTunes alternative to easily transfer music, playlists, and other content between devices. These tools can copy your iTunes library to the new computer and match/recreate playlists. They can also transfer data from iOS devices.
Streaming Services
If you use streaming services like Spotify or Pandora, you can simply sign in on the new computer and access your playlists and stations again. Streaming eliminates the hassle of local media management and transfers. Services like Soundiiz even allow you to transfer playlists between different platforms.
The advantage of these options is avoiding manual iTunes file transfers. Depending on your needs, they provide simpler ways to move iTunes content to a new device.
Summary
This guide covered the main steps for restoring your iTunes playlists to a new computer, including:
- Backing up your iTunes library to an external drive (source)
- Authorizing the new computer to access your purchased content (source)
- Transferring the iTunes media files to the new computer
- Importing the iTunes library backup
- Restoring playlists from the backup
Backing up your iTunes library before transferring to a new computer is critical to avoid losing data. You’ll also need to authorize the new computer to access items purchased from the iTunes Store on your old computer.
If you need further help troubleshooting or want to explore alternative options like using Apple Music, check out the resources below:
