Installing a new hard drive in your MacBook Pro can be a great way to upgrade your storage capacity or replace a failed drive. However, once the new drive is installed, you’ll need to restore your Mac to factory settings in order to use the new drive.
What you’ll need
Before restoring your MacBook Pro, make sure you have the following:
- The Mac OS X install disc that came with your MacBook Pro, or a bootable USB flash drive containing the OS X installer
- Access to an Ethernet connection or Wi-Fi network
- Your Apple ID and password
- Time Machine backup (optional but recommended)
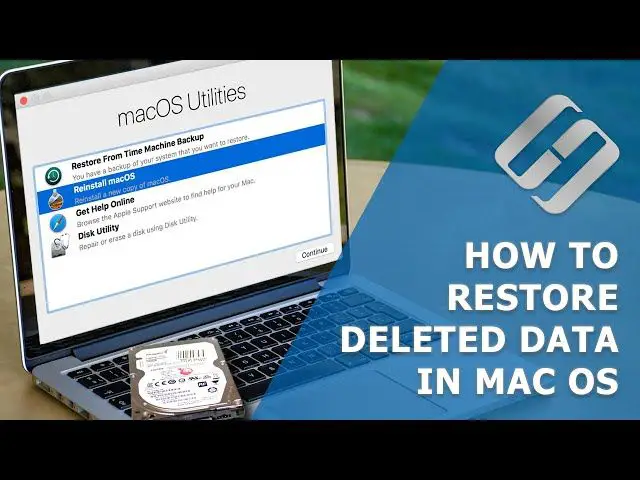
Step 1: Boot from the OS X installer
To restore your MacBook Pro, you’ll need to boot it from the OS X install disc or USB flash drive:
- Insert the install disc or connect the bootable USB drive.
- Restart your MacBook Pro and hold down the Option key after you hear the startup chime.
- Select the disc or drive containing the OS X installer.
- Click the arrow button below the icon.
This will launch the OS X installer so you can erase and restore the new drive.
Step 2: Open Disk Utility
Once the installer loads:
- Choose your language.
- Click Utilities > Disk Utility.
This will open the Disk Utility app so you can erase the new drive.
Step 3: Erase the new drive
In Disk Utility:
- Click the new hard drive on the left.
- Click Erase at the top.
- Choose a name and format for the drive (Mac OS Extended Journaled is recommended).
- Click Erase.
This will completely wipe the new drive, preparing it for installation of OS X.
Step 4: Install OS X
With the new drive erased:
- Quit Disk Utility.
- Click Install OS X on the installer screen.
- Follow the onscreen prompts to install OS X.
The installer will walk you through the basic OS X setup process. Be sure to select the new drive when prompted to choose a destination.
Step 5: Migrate data and settings (optional)
Once OS X is installed, you can migrate your data and settings from a Time Machine backup or another Mac:
- Time Machine: When prompted during setup, select Migrate Data from a Time Machine backup. Then select your backup drive and the data you want to migrate.
- Another Mac: Use an Ethernet cable to connect the two Macs. On the new Mac, open Migration Assistant (located in /Applications/Utilities/). Then follow the onscreen prompts.
Migrating your data will copy over all your old files, settings, and accounts to the new drive.
Step 6: Reinstall apps and troubleshoot
With your data migrated, you’ll need to reinstall any third-party apps that didn’t transfer over. Some tips:
- Check the App Store for updates to any built-in Apple apps (Safari, Maps, etc).
- Download and install updates for programs like Adobe Creative Cloud, Microsoft Office, etc.
- Transfer any licenses, activation keys, or serial numbers needed for your third-party apps.
- If you have issues opening migrated files/data, check app compatibility or troubleshoot with the software developer.
Reinstalling and updating your apps will ensure everything works properly with the new version of OS X.
Conclusion
Restoring your MacBook Pro with a new hard drive takes time but is straightforward with the OS X installer. The basic process is:
- Boot from the installer.
- Erase the new drive in Disk Utility.
- Install OS X on the erased drive.
- Migrate data from backup (optional).
- Reinstall third-party apps.
Following these steps carefully will get your MacBook Pro restored and running again in no time. Just be sure to backup important data beforehand. And don’t hesitate to contact Apple support if you run into issues.
| Step | Description |
|---|---|
| 1 | Boot from the OS X installer |
| 2 | Open Disk Utility |
| 3 | Erase the new drive |
| 4 | Install OS X |
| 5 | Migrate data and settings (optional) |
| 6 | Reinstall apps and troubleshoot |
Booting from the OS X Installer
To start the restoration process, you’ll need to boot your MacBook Pro from the OS X install disc or USB drive:
- Insert the disc or connect the bootable USB drive.
- Restart your MacBook Pro and hold down the Option key after you hear the startup chime.
- Select the disc or drive containing the OS X installer.
- Click the arrow button below the icon.
This will launch the OS X installer so you can access Disk Utility and begin restoring your Mac. Be sure to have your Wi-Fi settings handy in case you need to get online during the process.
Using Disk Utility to Erase
Disk Utility, included with the OS X installer, will erase and format the new drive:
- Open Disk Utility from the Utilities menu.
- Select the new drive on the left.
- Click Erase at the top.
- Choose a name and format.
- Click Erase.
Make sure you select the correct new drive to avoid erasing your old drive by mistake. “Mac OS Extended (Journaled)” is the recommended format for best performance.
Migrating Your Data
Once OS X is installed, migrating your old data and settings is optional but recommended:
- Time Machine – Migrate data during setup using a Time Machine backup.
- Another Mac – Use Migration Assistant to transfer data from another Mac.
This will copy over all your old files, accounts, settings, etc. Be sure to reinstall any apps that don’t transfer over.
Reinstalling Apps
Some tips for reinstalling third-party apps:
- Download updates for Adobe, Office, etc.
- Find licenses, keys, serials needed for reinstallation.
- Check app compatibility if migrated files have issues.
- Contact the developer for troubleshooting help.
Updating and reinstalling apps will ensure minimal disruption after migrating your data. The whole restoration process may take a while but is worth it for a smooth OS X experience.
Frequently Asked Questions
Do I need to backup my data before restoring?
Yes, it’s always a good idea to have a backup before restoring your MacBook Pro. You can either use Time Machine or manually backup your important files. A backup gives you a safety net in case anything goes wrong.
How do I create a bootable OS X USB drive?
You can create a bootable USB installer drive for OS X using the createinstallmedia command in Terminal. You’ll need a USB stick with 12GB or more storage. The drive will contain the full OS X installer.
Can I restore to an older OS X version?
Usually it’s best to restore to the same OS X version that came with your MacBook originally. Trying to install an older OS can cause complications. Check Apple’s support site for details on compatible versions.
How long will the restore process take?
It depends on factors like your Mac’s specs, the installation method, and optional migration steps. But expect the full restore to take 1-3 hours typically. Creating a bootable USB and backing up data also adds time.
Do I need to reinstall third-party apps?
Most third-party apps won’t transfer over when restoring your MacBook Pro. You’ll have to download and reinstall them afterwards. Some apps may require license keys or account logins again as well.
What if I can’t migrate my old data?
If migration doesn’t work during setup, don’t worry. You can transfer files and data later using an external hard drive, cloud storage, network connection, or data recovery software. Just focus on getting OS X installed first.
Tips for a Successful Restore
Follow these best practices for a smooth restore process:
– Use a wired Internet connection if possible for faster speeds
– Close all open apps before starting the restore
– Disable encryption on your old drive first if enabled
– Have your Wi-Fi password ready to connect during setup
– Read all onscreen prompts carefully before clicking
– Pay close attention to drive selection to avoid data loss
– Use Time Machine for automated backups and migrations
– Check Apple’s support site for common issues and fixes
– Allow 1-3 hours minimum for the full restore process
– Don’t hesitate to contact Apple support if you need assistance
Warnings and Precautions
– Back up important data before restoring
– Only restore using trusted installer discs or drives
– Disconnect external devices besides the installer drive
– Ensure your battery is charged or plugged in before starting
– Select correct drive partitions/volumes during the process
– Never restart or shut down improperly during installation
– Use a stable Internet connection for software downloads
– Keep your software licenses and serial numbers handy
– Do not force quit apps or background processes
– Contact Apple Support immediately for any critical errors
– If data loss occurs, stop and consult data recovery experts
Summary
In summary, restoring a MacBook Pro with a new hard drive involves:
- Booting from the OS X installer disc or USB drive
- Using Disk Utility to erase the new drive
- Performing a clean install of OS X
- Migrating old data and settings (optional)
- Reinstalling third-party apps
Following this process will get your MacBook Pro running like new again with the fresh hard drive. Just be sure to backup your old data, get your Wi-Fi info ready, and set aside ample time to complete each step. With some care and patience, you’ll have your Mac restored and ready to use once more.