What is CHKDSK?
CHKDSK is a utility included in Windows for checking disk drives for errors and fixing logical file system errors. According to Microsoft, “Chkdsk examines disk space and disk use and provides a status report specific to each file system.” Microsoft Docs.
Specifically, CHKDSK inspects the file system structure on a drive and looks for logical file system errors or corruption. It can fix common errors related to bad sectors, lost clusters, cross-linked files, directory errors, invalid filenames, and more. By running CHKDSK periodically, you can detect and repair issues before they lead to serious problems or data loss.
CHKDSK has been included in DOS and Windows operating systems for decades as an important disk maintenance tool. It continues to provide an easy way for users to verify drive health and fix logical file system problems on their Windows computers.
When to use CHKDSK on a USB drive
Running CHKDSK on a USB drive is recommended if the drive is exhibiting issues like slow transfer speeds, difficulty accessing files, or file corruption. Some common signs that CHKDSK could help identify and fix problems on a USB drive include:
- The USB drive is taking a long time to open folders and access files
- You receive frequent error messages when trying to access files on the USB drive
- Files on the USB drive appear corrupted or won’t open properly
- You experience frequent disconnects or the drive freezing when plugged in
- The available free space on the USB drive is lower than expected
When a USB flash drive experiences these types of issues, it often means there are disk errors that need to be identified and repaired. Running CHKDSK scans the drive to find and fix bad sectors, cross-linked files, directory errors, lost clusters, and other file system issues (AVG). This maintenance helps improve performance and stability of the USB drive.
In addition, it’s a good idea to run CHKDSK on a new USB drive to verify it is functioning properly before storing important files on it. You can also run CHKDSK periodically as preventive maintenance to help catch issues early.
Preparing to run CHKDSK
Before running CHKDSK on a USB drive, it’s important to properly prepare the drive to avoid data loss or corruption. Here are some tips for preparing a USB drive for CHKDSK:
First, be sure to close any open files or programs that are using the USB drive. Running CHKDSK while files are in use can lead to data corruption. Close all windows and applications that may be accessing the drive.
Next, back up any important data on the USB drive. Although CHKDSK is designed to repair issues, having a backup allows you to restore data if anything goes wrong during the process.
You’ll also want to ensure no new writes occur to the drive during CHKDSK. Eject the USB drive properly before running the scan to prevent any read/write processes from interfering.
Finally, having ample time is recommended, as CHKDSK can take a while to fully scan and repair a drive. Don’t start it if you are rushed or have somewhere to be. With the drive backed up and ejected, you’re ready to run CHKDSK.
Running CHKDSK from Command Prompt
One of the most common ways to run CHKDSK on a USB drive is through the Command Prompt window. Here are the steps:
1. Open the Start menu and type “cmd”. Right-click on the Command Prompt result and select “Run as administrator”. This opens the command prompt with admin privileges.
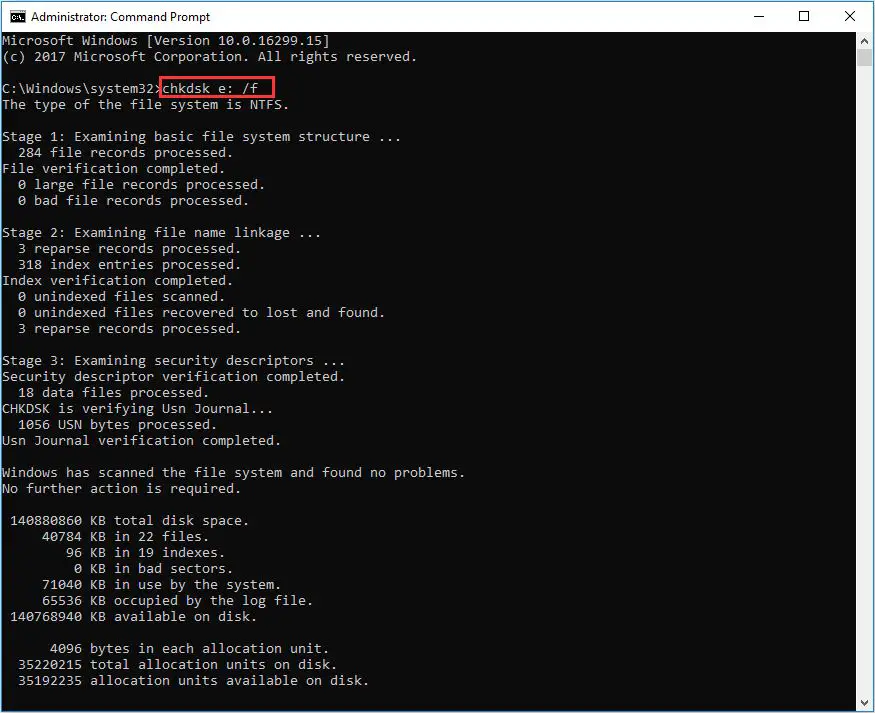
2. Type the following command to run CHKDSK on your USB drive, replacing “X” with the actual drive letter of your USB:
chkdsk X: /f
For example:
chkdsk F: /f
3. Press Enter to execute the command. CHKDSK will start scanning the USB drive for errors.
The /f parameter tells CHKDSK to fix any errors it finds on the USB drive. Running CHKDSK as an admin ensures you have the permissions to repair the drive.
After CHKDSK completes, it will provide a report of any errors found and status of repairs. You can then safely eject and continue using the USB drive.
For more details, refer to Microsoft’s guide on using the chkdsk command.
Running CHKDSK from File Explorer
CHKDSK can also be run directly through File Explorer without using the Command Prompt. This provides a more user-friendly graphical interface for running a check on your USB drive. Here are the steps:
1. Open File Explorer and navigate to This PC or My Computer.
2. Right click on the USB drive you want to run CHKDSK on and select Properties.
3. In the Properties window, click on the Tools tab.
4. Under Error checking, click on the Check button. This will launch CHKDSK with default settings.
5. A dialog box will appear asking you if you want to schedule a disk check. Click Scan drive to start the disk check immediately.
6. CHKDSK will now run through the stages on your USB drive. Once it completes, you can close the Properties window and view the report in Event Viewer if needed.
The advantage of using File Explorer is that it provides a graphical way to access CHKDSK without dealing with command line parameters. The disadvantage is you have less control and customization over how CHKDSK runs versus using the Command Prompt method.
For more details, refer to the step-by-step guide on the AVast website: How to Use CHKDSK to Repair & Fix Windows Hard Drives
Understanding the stages of CHKDSK
CHKDSK runs through several stages when checking a drive for errors. The number of stages depends on whether the drive is the system partition or a non-system partition, and whether the /f or /r switches are used.
For non-system partitions, CHKDSK goes through 3 main stages:
- Checking files – Scans the drive and checks the file system structure, looking for issues like bad sectors, lost clusters, cross-linked files, directory errors, invalid security identifiers, etc.
- Checking indexes – Verifies the file name indexes, which allow quick location of files. Checks for invalid or redundant indexes.
- Checking security descriptors – Validates the security descriptors which define access rights to files. Checks for invalid security IDs.
For the system partition, CHKDSK executes 5 stages. The additional stages are:
- Checking for disk space integrity – Checks the space allocation on disk, looking for issues like missing or crossed linked clusters, invalid sizes, etc.
- Checking clusters, directories and files – Does a second pass looking for disk space integrity issues that may have been uncovered in the previous phases. Attempts to repair disk space allocation errors.
Using the /f or /r switches invokes further testing and repair operations in each stage. The /r switch is more comprehensive than /f in what it checks and attempts to repair.
Reading the CHKDSK Report
After running CHKDSK, it’s important to read through the report to see if any errors were found. The report provides details on the different stages CHKDSK goes through and notes any issues discovered.
In the report, you’ll want to look for lines starting with “Errors found”. This indicates CHKDSK came across corrupted files, bad sectors, cross-linked files, directory errors, or invalid security descriptors. The report will specify the error type and location on the drive.
If no errors are reported for a stage, it means that part of the drive passed the CHKDSK scan. So “Errors found. CHKDSK cannot continue in read-only mode” is bad, while “No Errors found.” is good.
Aside from errors, also check the stats at the end of the report. This will show total files scanned, how long CHKDSK took, and the amount of disk space. If the number of files is unexpectedly low, it could mean corrupted data. A long runtime can hint at bad sectors.
Reading through the full CHKDSK report carefully allows you to spot any problems on the drive. You can then take steps to fix them, like running CHKDSK again with the /F or /R parameters. Or in severe cases, you may need to reformat and repartition the USB drive.
For more details on interpreting CHKDSK output, see this guide: https://learn.microsoft.com/en-us/windows-server/administration/windows-commands/chkdsk
Fixing errors identified by CHKDSK
One of the main purposes of running CHKDSK is to identify and fix errors on your USB drive. CHKDSK can detect a variety of issues like bad sectors, lost clusters, cross-linked files, directory errors, and more. When it finds errors, CHKDSK will attempt to repair them automatically.
For example, if CHKDSK detects bad sectors on your USB drive, it will mark those sectors as defective so they are no longer used to store data. This prevents future corruption. CHKDSK can also recover readable information from bad sectors and copy it to a good sector. However, any data stored only in bad sectors may be lost for good.
If CHKDSK reports “Data Error (cyclic redundancy check)” for a file, that indicates corruption. Running CHKDSK with the /F flag will attempt to fix the file by replacing corrupted parts with a saved copy. If no copy is available, the file may be unrecoverable.
Directory errors like invalid filenames, orphaned clusters, and incorrect folder structures can also cause corruption. CHKDSK will fix directory errors to restore the proper file system structure. This solves many mysterious crashes and data access issues.
Essentially, CHKDSK automates the process of diagnosing problems and implementing solutions. Reviewing the CHKDSK report allows you to identify areas that were repaired so you can check if important files were recovered. Overall, fixing errors preserves USB drive health, prevents further corruption, and salvages data whenever possible.
Improving USB Drive Health
There are a few tips to help prevent errors and maintain your USB drive’s health:
- Safely eject the USB drive – Always use the “Safely Remove Hardware” option to eject the USB drive before unplugging it. This ensures any writes are completed and helps prevent corruption.
- Maintain good ventilation – Avoid enclosing USB drives in tight spaces and ensure air circulation to prevent overheating.
- Handle with care – Avoid dropping, bending, or rough handling that can damage the USB drive.
- Limit unnecessary writes – Refrain from constantly writing and erasing data as this can wear out the memory cells over time.
- Keep it dry – Liquids can short circuit and corrode electronics, so keep the USB drive away from moisture.
- Scan for errors – Periodically run CHKDSK to identify and fix any developing issues.
Following these best practices will help maintain your USB drive’s health and extend its usable lifetime. Periodic checks with CHKDSK can also help identify and resolve minor errors before they become catastrophic failures.
When to reformat vs troubleshoot
Reformatting the USB drive should only be done as a last resort if running CHKDSK does not resolve the issues. CHKDSK is designed to scan drives to identify and repair logical file system errors, such as bad sectors, lost clusters, cross-linked files, and directory errors. It should be able to fix most issues with a USB drive.
However, if CHKDSK consistently reports errors that it is unable to fix, the USB drive may be physically damaged or deteriorating. In this case, reformatting the drive may be necessary to wipe the drive and restructure the file system. This should only be done after first attempting repairs with CHKDSK and when the drive errors are persistent and unrepairable.
Before reformatting, be sure to back up any data on the drive you want to keep. Reformatting will erase all data on the USB drive. On Windows, you can reformat the drive using the Format option when right-clicking the drive in File Explorer. Select a file system like FAT32 or exFAT when prompted.
In some cases, you may get an error saying the drive cannot be formatted. This typically indicates hardware damage. You may need to try a format tool like EaseUS Partition Master to forcibly reformat the stubborn drive. If that does not work, the USB may need to be replaced.
So in summary, try CHKDSK first to repair errors. But if problems persist, reformat as a last resort before replacing the USB drive. Back up data first and be prepared for reformatting to potentially fail on a damaged drive.
