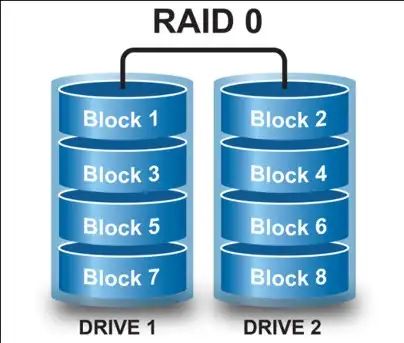
RAID 0, also known as disk striping, is a way of configuring multiple hard drives to work together as one large volume to increase disk performance. Setting up RAID 0 involves connecting two or more hard drives to your computer and using disk management software to stripe data across the drives.
What is RAID 0?
RAID stands for Redundant Array of Independent Disks. It is a data storage technology that combines multiple physical disk drives into one unit. The different RAID levels provide various combinations of performance, redundancy, and cost-efficiency.
RAID 0 is focused solely on performance. It stripes data across multiple drives, which allows for simultaneous disk reads and writes. The stripe size, which is the amount of data written to each drive before moving to the next, can be configured based on your specific needs.
Because RAID 0 spreads data across all disks, the total disk space is equal to the size of all the disks added together. For example, two 500 GB drives configured as a RAID 0 array would have a total capacity of 1000 GB.
The major advantage of RAID 0 is increased disk performance. By splitting and distributing the data across multiple drives, it can achieve faster read and write speeds compared to a single disk. However, RAID 0 provides no data redundancy. If one drive fails, all data will be lost. Due to this lack of fault tolerance, RAID 0 is primarily used in non-critical storage environments where performance is the main goal.
Why Use RAID 0?
Here are some of the most common reasons to set up a RAID 0 array:
- Improve disk performance – By striping data across multiple disks, RAID 0 can provide significant speed improvements for reading and writing data. This makes it well-suited for tasks like video editing, data analysis, gaming, etc.
- Increase disk capacity – Combining multiple physical drives adds up their storage capacities. A two-disk RAID 0 array effectively doubles your available storage space.
- Low cost – RAID 0 is one of the most affordable RAID configurations since it does not require any parity or mirroring overhead.
- Simple setup – Configuring RAID 0 is straightforward compared to other RAID levels. The minimum is two identical drives.
In summary, the key strengths of RAID 0 are enhanced performance and increased storage capacity. Just be aware that it does not provide any fault tolerance. Backing up your data is highly recommended when using RAID 0.
RAID 0 Requirements
Here are some important requirements to keep in mind for setting up RAID 0:
- 2 or more disk drives – A minimum of two identical drives are needed for RAID 0. More drives can be added to increase capacity and performance.
- Compatible drives – The drives should be of the same interface (SATA, SAS, NVMe), capacity, and rotational speed. Mixing drive types is not recommended.
- Available RAID controller – The system requires dedicated hardware or software to manage the RAID array. Motherboard-based or add-in RAID cards are common options.
- Disk format – The disks must be formatted before creating the RAID 0 array. This erases any existing data.
- Backup – No fault tolerance means a backup plan is essential. Schedule regular backups to protect your data.
As long as these requirements are met, setting up RAID 0 is very straightforward. The steps will vary slightly depending on whether you are using hardware or software RAID.
Hardware vs. Software RAID
RAID 0 can be implemented using dedicated hardware RAID controllers or via software using your operating system’s disk management utilities.
Hardware RAID
Hardware RAID uses a specialized RAID controller card that is installed in a PCIe slot on your motherboard. The drives connect directly to the RAID controller, which handles all of the RAID calculations and distribution of data across the array.
The advantages of hardware RAID include:
- Better performance – Hardware RAID processes RAID tasks faster than software solutions.
- Operating system independence – The RAID array is managed at the hardware level, separate from the OS.
- Additional cache – RAID cards often include large caches to optimize reads and writes to the drive array.
Hardware RAID is a good choice for performance-critical applications. The downside is the added cost of the RAID controller card.
Software RAID
Software RAID utilizes the OS’s built-in disk and volume management interface. The RAID calculations are handled by the CPU and operating system instead of a dedicated card. The drives connect to the standard SATA, SAS, or NVMe ports on the motherboard.
Benefits of software RAID include:
- Lower cost – No need to purchase a RAID card.
- Easier management – Configured through the OS disk utility.
- Flexibility – Some software allows resizing and migration of arrays.
Software RAID is a good option for home builds or small business servers. The performance may not be as fast as hardware RAID, but for many applications, the difference is negligible.
RAID 0 Setup Steps
The exact steps to set up RAID 0 will vary depending on your chosen method – hardware or software. However, the general procedure is similar:
- Install RAID controller – If using hardware RAID, insert the RAID card into a PCIe slot and install drivers.
- Connect disks – Attach the compatible drives to the RAID controller ports or motherboard SATA/SAS ports.
- Configure BIOS – If needed, adjust BIOS settings to enable RAID mode for SATA or NVMe ports.
- Create array – Open the RAID configuration utility and create a striped volume using your disks.
- Initialize and format – Initialize the new array and format it with your desired file system (ex: NTFS, EXT4)
- Mount array – The RAID 0 volume can now be mounted and accessed through your operating system.
That covers the general workflow. Now let’s go over the step-by-step instructions for both hardware and software RAID setup.
Hardware RAID Configuration
Follow these steps to configure RAID 0 using a dedicated hardware RAID controller:
- Install RAID card – Power off your computer and insert the RAID controller into an open PCIe expansion slot. Secure the card with a screw.
- Connect SATA/SAS drives – Attach your compatible disk drives to the ports on the RAID card. Ensure the card is properly seated.
- Boot computer – Turn on your computer and allow the RAID card drivers to install automatically. Or install them manually from the included disc.
- Enter RAID configuration utility – Access the configuration interface for your RAID card. This is often done during boot by pressing a hotkey like Ctrl+R or Ctrl+I.
- Create array – Select the option to create a new array. Choose RAID 0 and pick your connected disk drives. Specify your preferred stripe size.
- Initialize disks – The new array will need to be initialized. This will erase all data so back up drives first if needed.
- Format volume – Now format the full RAID 0 array with your desired file system. For Windows, NTFS is recommended.
- Reboot – Reboot your computer for changes to take effect. The RAID 0 volume will be available to the operating system.
Your high performance RAID 0 array is now ready to use! Be sure to install essential utilities from your RAID manufacturer to monitor the health of the array.
Software RAID Configuration
Here are the steps to configure RAID 0 using Windows built-in disk management:
- Connect SATA/NVMe drives – Install your compatible disks in the SATA or NVMe ports on your motherboard. Ensure ports are enabled in BIOS.
- Open Disk Management – In Windows, access Disk Management. This can be found in Computer Management or by searching Disk Management.
- Initialize disks – Initialize each drive that will be part of the array. Select each disk and initialize it as GPT.
- Create volume – Right-click the initialized disk and select New Mirrored Volume. Choose RAID-0 striped volume and select your disks.
- Format volume – Format the new RAID 0 array with NTFS file system.
- Assign drive letter – Give the array a drive letter like E: to access it in Windows File Explorer.
After following these steps, your RAID 0 array will be ready to use! Be sure to back up your data regularly since software RAID lacks redundancy.
Performance Optimization
To get the most performance out of your new RAID 0 array, here are some additional optimizations you can make:
- Use higher capacity disks – Larger drives typically have faster sequential read/write speeds to take advantage of.
- Increase stripe size – Try testing different stripe sizes from 64KB up to 1MB to find the optimal setting.
- Align partitions – Align partitions properly to minimize performance hits from misaligned stripes.
- Use caching disk controller – A disk controller with read/write caching will boost performance.
- Enable write-back caching – Enabling write-back caching instead of write-through can significantly improve write speeds.
Benchmarking tools like CrystalDiskMark can help test the impact of various RAID 0 settings and optimizations. Just be careful when enabling caching, as data loss can result from power failure. Use a UPS as a precaution.
Maintenance and Monitoring
Like any storage system, your RAID 0 array will require some ongoing maintenance and monitoring:
- Check event logs – Monitor controller and system event logs for any warnings or errors related to the RAID array.
- Update drivers/firmware – Keep your RAID controller drivers and firmware up to date for optimal compatibility and performance.
- Clean drives – Periodically wipe and clean disks to prevent performance degradation.
- Backup data – Always maintain recent backups. RAID 0 offers no redundancy if a drive fails.
- Monitor SMART stats – Use SMART monitoring tools to check disk health statistics and receive early warnings.
- Test redundancy plan – Verify your backup process allows you to successfully restore data in the event of a full array failure.
By actively monitoring and maintaining your RAID 0 array, you can maximize its performance, lifespan and avoid unexpected data loss.
Troubleshooting RAID 0 Issues
If you encounter any problems with your RAID 0 array, try these troubleshooting tips:
- Reseat connections – Ensure SATA/SAS cables are firmly connected to drives and controller.
- Check controller logs – Logs may indicate faulty or degraded drives.
- Recreate array – Deleting and recreating the array can resolve some logical issues.
- Update firmware – An outdated RAID controller firmware can cause compatibility issues.
- Test drives individually – Use disk utilities to verify health of individual drives.
- Replace failed drives – If a disk has definitely failed, replace it and restore from backup.
In many cases, performance issues or strange behaviors can be fixed by rebuilding the array. However, with frequent or reoccurring problems, it may be faulty hardware needing replacement.
Conclusion
Setting up a RAID 0 array allows you to substantially improve disk performance by striping data across multiple drives. Configuring hardware or software RAID 0 is relatively straightforward, but does require meeting specific requirements like having matching drives. While the performance gains are significant, RAID 0 provides no data protection or redundancy. Be sure to have a solid backup solution in place in case of disk failures. With proper setup and maintenance, RAID 0 can deliver lightning fast speeds for non-critical storage needs.
