Using iCloud Music Library is a great way to sync your music from iTunes on your computer to your iPhone. With iCloud Music Library, you can access all your music on all your devices that are connected to your iCloud account. Here is a step-by-step guide on how to set up and use iCloud Music Library to sync music between iTunes and your iPhone.
What is iCloud Music Library?
iCloud Music Library is an Apple service that allows you to store your music library in the cloud. This means all the music you purchase or import into iTunes on your Mac or PC can be accessed from any device connected to your iCloud account, including your iPhone, iPad, iPod touch, Apple TV, and HomePod.
Some key features of iCloud Music Library:
- Syncs your iTunes music across devices connected to your iCloud account
- Lets you stream your music library without taking up storage space on your devices
- Provides access to your music even if your devices are offline
- Uploads new music added to your library so it’s available everywhere
- Downloads music from iCloud when you play something that’s not already on your device
With iCloud Music Library, any music you have purchased or imported into your iTunes library on one device can be streamed or downloaded to another device. This makes it easy to sync your music from a computer to your iPhone.
Requirements for Using iCloud Music Library
To use iCloud Music Library to sync your iTunes music to your iPhone, you need:
- An iCloud account
- iOS devices running iOS 11.4 or later, or iPadOS or macOS 10.15 or later
- iTunes 12.2 or later on a Mac or PC
- Sufficient iCloud storage for your music library (200GB or more is recommended)
- All your music in the iTunes app on a Mac or PC
Make sure all your music is imported into the iTunes app before you set up iCloud Music Library. Any music purchased or imported into iTunes will be available in your iCloud Music Library to sync across devices.
How to Set Up iCloud Music Library
Follow these steps to set up iCloud Music Library:
- On your iPhone, iPad, or iPod touch, open the Settings app and tap on your name at the top.
- Tap “iCloud”.
- Under Apps, turn on “Music”.
- On your Mac or PC, open iTunes.
- Click Account > Authorizations > Deauthorize This Computer.
- Sign in with your Apple ID in iTunes.
- Click Account > View My Account and make sure you have an iCloud Music Library subscription.
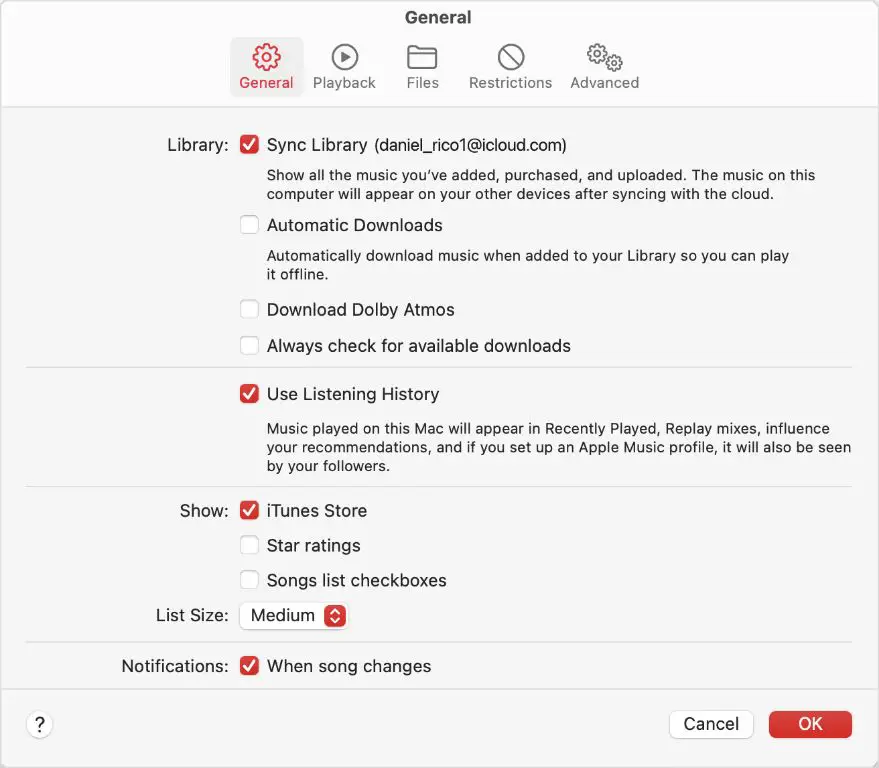
- In iTunes, go to Edit > Preferences > General and check “Sync Library”. Click OK.
- In iTunes, click File > Library > Update iCloud Music Library. This will upload your library to iCloud.
It may take some time for your entire music library to upload to iCloud depending on its size. Once finished, iCloud Music Library is now set up and ready to use!
How to Sync iTunes Music to Your iPhone
Once you’ve set up iCloud Music Library, your iTunes music will automatically sync to your iPhone and other connected devices. Here’s how it works:
- Any music purchased on your iPhone or added directly within the Apple Music app will be uploaded and added to your iCloud Music Library.
- Music downloaded to your iPhone from iCloud will also appear in iTunes on your computer.
- Playlists created in iTunes will sync to your iPhone.
- Playlists created on your iPhone in the Music app will sync to iTunes.
Your iPhone music library should now look the same as your iTunes music library on your computer. You can stream and download all your synced music to your iPhone from iCloud.
Stream vs. Download Music from iCloud
Your iPhone can either stream music from iCloud Music Library or download songs for offline playback:
- Streaming – When you stream, you listen to music directly from iCloud. Streaming saves storage space on your device but requires an internet connection.
- Downloading – Downloading music saves songs to your iPhone storage. This allows listening when offline but takes up storage space.
To manage downloads on your iPhone:
- Go to Settings > Music.
- Under Downloads, select Downloaded Music or follow Playlist Settings.
- Turn on/off “Automatic Downloads” or select playlists to download.
Disabling Automatic Downloads means you will stream by default unless you manually download specific songs or playlists for offline playback. Enabling it will automatically save any music you play to your device storage.
Using iCloud Music Library on iPhone
Once set up, iCloud Music Library works seamlessly in the background. All your music will be available in the Apple Music app on your iPhone. Here are some tips for using iCloud Music Library:
- Use the Library tab to access all your synced music from iTunes.
- Downloaded music will have a download icon and be available offline.
- Tap the ellipsis (…) next to a song for options like Add to Library, Add to Playlist, etc.
- Use the Search tab to find specific songs, artists, albums, or playlists.
- New music added to iTunes will appear in your library after some time.
- Delete a downloaded song on your iPhone to remove the local file while keeping it in iCloud.
All playlists, favorites, play counts, and other data from iTunes will sync to your iPhone so you have a seamless music experience.
Troubleshooting iCloud Music Library Syncing
If you are having issues getting your iTunes music to sync properly to your iPhone using iCloud Music Library, try these troubleshooting steps:
- Confirm iCloud Music Library is enabled on your devices – Check it is turned on under Settings > [your name] > iCloud > Music on iOS, and in iTunes > Preferences > General > Sync Library.
- Check internet connection – Your devices will need to be connected to Wi-Fi or cellular data to sync.
- Update iOS and iTunes – Make sure you’re running the latest versions of iOS and iTunes.
- Restart devices – Toggle iCloud Music Library off and then back on, and restart your devices.
- Log out then in to iCloud – Sign out of iCloud on devices, restart, then sign back in.
- Enable Download over Cellular – Turn this on under Music settings on iPhone to allow syncing when not on Wi-Fi.
- Wait for changes to sync – It can sometimes take hours for changes to sync across devices via iCloud.
If you notice missing songs or albums, make sure they have been properly added to your iTunes library. Any music not located within iTunes will not be available in iCloud Music Library.
Sometimes restarting devices or toggling iCloud Music Library off and on can help trigger the library to re-sync. Allow some time after making changes for iCloud to fully update across devices.
Conclusion
In summary, iCloud Music Library provides an easy way to sync your iTunes music collection to your iPhone. By setting it up and enabling the service on your devices, you can automatically access your full music library anywhere. Songs and playlists will stay up to date across all your connected devices.
To recap the key steps:
- Import your music into the iTunes app on a Mac/PC.
- Enable iCloud Music Library in iTunes and on your iOS devices.
- Use the Apple Music app on iPhone to stream or download your music.
- Manage downloads by toggling Automatic Downloads on/off.
- Give changes time to sync across devices via iCloud.
Following this guide, you can successfully set up iCloud Music Library to always have access to your iTunes music collection on your iPhone. Enjoy your synced music!
