Partitioning your hard drive is the process of dividing your hard disk into separate, discrete sections called partitions. There are a few key reasons why you may want to partition your hard drive:
Quick Answers
Here are some quick answers to common questions about partitioning your hard drive:
What is disk partitioning?
Disk partitioning is the act of splitting a hard disk drive into multiple logical storage units called partitions.
Why partition a hard disk?
Reasons to partition a hard disk include organizing data, separating operating systems, creating dedicated partitions for backups, and enhancing security.
How many partitions can you have?
There is no set limit, but a practical maximum is usually considered to be 4 primary partitions per disk due to partitioning scheme limitations.
What are the different types of partitions?
The main types are primary, extended, and logical. Most systems have up to 4 primary or 3 primary plus 1 extended partition.
Benefits of Partitioning Your Hard Drive
Here are some of the key benefits of partitioning your hard disk:
- Organize your data – Partitions allow you to segment types of data and files onto different partitions. For example documents on one partition, media files on another.
- Isolate your operating system – Installing your OS on its own partition protects your data from OS errors and makes reinstalling the OS simpler.
- Enhance security – If one partition gets infected with malware, it won’t affect other partitions.
- Improve performance – Apps can access data faster on multiple partitions as compared to a single partition.
- Dedicated partition for backups – Having a partition just for backups provides redundancy and protects backups if another partition fails.
Considerations Before Partitioning
Before you partition your hard disk, here are some important considerations:
- Partitioning will erase all existing data on the drive.
- Make sure you have backed up any important data first.
- Smaller partitions can result in wasted disk space.
- Determine your partition sizes and structure carefully.
- Partitioning is complex – consider hiring a professional if you are unsure.
How to Partition a Hard Drive in Windows
Here are the steps to partition a hard drive in Windows:
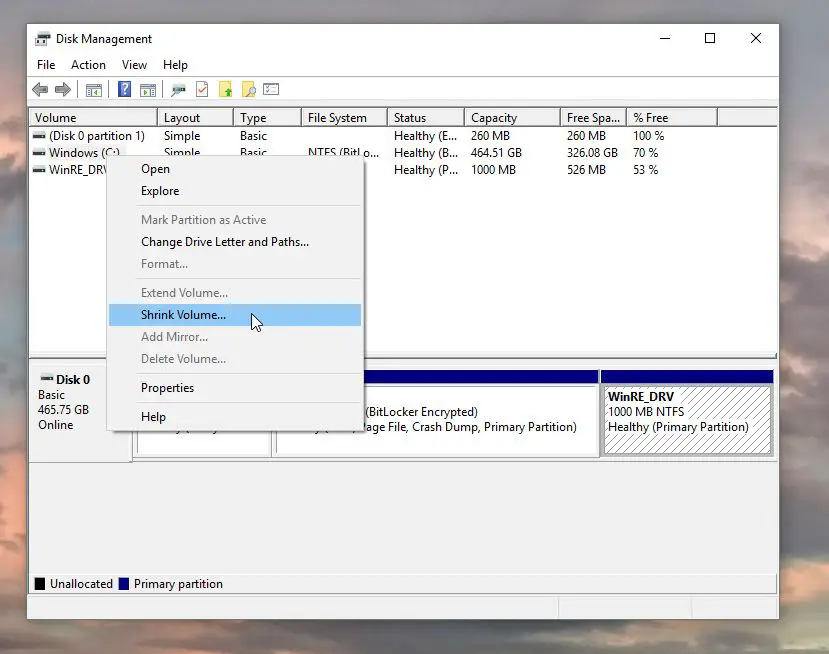
- Open the Disk Management utility. Press Windows key + R, type “diskmgmt.msc” and hit Enter.
- Right-click the disk you want to partition and select “Shrink Volume”. Shrink the volume to make space for new partitions.
- Right-click the unallocated space and select “New Simple Volume”. Go through the wizard to create a new partition.
- Repeat steps 2 and 3 to create multiple partitions as needed.
- To set a partition as active (bootable), right-click it and select “Mark Partition as Active”.
- Check all new partitions, format them, and assign drive letters.
The Disk Management utility allows you to resize, create, delete, format and set partitions from one interface.
Tips for Partitioning in Windows
- Create an OS partition between 30GB – 60GB for Windows and programs.
- Keep a backup partition around 20% of the total disk size.
- For better performance, keep at least 15-20% free space on each partition.
- The boot partition must be marked as active and be primary, not logical.
- Use NTFS file system for Windows partitions.
How to Partition a Hard Drive in Mac OS X
Here are the steps to partition a hard drive on Mac OS X:
- Open Disk Utility (Applications > Utility > Disk Utility). Select the disk you want to partition.
- Click on the Partition tab. Select Volume Scheme as GUID Partition Table.
- Click the + button to add a new partition. Set name, format, and size.
- Click Apply when done. This will partition the disk with your new layout.
- To set bootability, click Options and select GUID Partition Scheme.
Disk Utility allows you to non-destructively partition disks using a graphical interface.
Tips for Partitioning on Mac
- Use the Mac OS Extended format for boot and data partitions.
- The boot partition should be at least 20GB in size.
- Keep 15-20% free space on each partition for optimal performance.
- Set the boot partition as GUID Partition Scheme for bootability.
- Max out partitions to 4 for MBR or GPT disks.
How to Partition a Hard Drive in Linux
Here are the steps to partition a hard drive in Linux:
- Use fdisk, gdisk, or cfdisk utility to launch a partitioning tool.
- Select device to partition (eg. /dev/sda). Press n to create new partition.
- Set the partition type, size, beginning sector etc. as needed.
- To make partition bootable, toggle bootable flag on the partition.
- Write the partition table to disk when done with w command.
- Use mkfs command to create filesystem on new partitions.
Command line disk utilities like fdisk provide flexibility for partitioning in Linux.
Tips for Partitioning in Linux
- Set boot partition as primary, not logical, and mark bootable flag.
- ext4 is commonly used filesystem format for Linux partitions.
- Swap partition twice the size of RAM for hibernation support.
- Mount partitions under /mnt directory to access after partitioning.
- Use parted utility for flexibility in partitioning from terminal.
Example Partitioning Scenarios
Here are some common examples of hard disk partitioning scenarios:
Single OS Installation
| Partition | Size | Type |
|---|---|---|
| C:\ | 100GB | Primary (Active) |
Simplest scenario with only 1 partition for OS, programs and data.
Dual Boot with Data Partition
| Partition | Size | Type |
|---|---|---|
| C:\ | 50GB | Primary (Active for OS1) |
| D:\ | 50GB | Primary (Active for OS2) |
| E:\ | Remaining size | Logical |
OS partitions kept separate with shared data partition.
Triple Boot Workstation
| Partition | Size | Type |
|---|---|---|
| C:\ | 50GB | Primary (Active for OS1) |
| D:\ | 50GB | Primary (Active for OS2) |
| E:\ | 50GB | Primary (Active for OS3) |
| F:\ | Remaining size | Logical |
Three boot partitions with data partition.
Partition Alignment
Partition alignment refers to aligning the start and end of partitions to cylinder, track or sector boundaries on your hard disk. Aligned partitions can improve performance by optimizing reads/writes:
- Alignment avoids disk performance problems caused by reads/writes spanning multiple sectors.
- Improper alignment causes such misaligned reads/writes, hurting I/O performance.
- Tools like fdisk ensure proper alignment by aligning partitions to MiB or GiB boundaries.
- Unaligned partitions can suffer up to 20% performance degradation for HDDs, and even more for SSDs.
Modern tools automatically optimize alignment, but it helps to understand alignment principles when manually partitioning.
Partitioning SSDs vs HDDs
Partitioning considerations differ between SSDs and HDDs due to their technology differences:
- Partition numbers – SSDs do well with more partitions due to faster lookup times.
- Partition sizing – Larger partitions make better use of HDD capacity while SSDs lack capacity constraints.
- File system – NTFS better for HDDs while SSDs work well with NTFS and more SSD-centric file systems.
- Wear leveling – SSDs require wear leveling not needed by HDDs, so more partitions can distribute writes.
- TRIM support – SSDs benefit from TRIM which HDDs do not have.
Tailoring your partitioning scheme based on the drive technology used can optimize performance.
Common Partition Types
Here are some common partition types you may encounter when partitioning a drive:
- Primary – Basic partition type that can be bootable.
- Extended – Container for logical partitions.
- Logical – Created inside extended partitions.
- Swap – Used for virtual memory/hibernation in Linux.
- FAT32 – File system commonly used for USB drives.
- NTFS – Modern Windows file system.
- exFAT – Optimized FAT filesystem for flash drives.
- ext4 – Standard Linux filesystem.
- Btrfs – Advanced Linux filesystem.
- APFS – Modern filesystem for macOS.
Partition Table Schemes
Partition tables dictate how partitions are organized and numbered on a drive. Here are key schemes:
- MBR – Older style limited to 4 primary partitions with no redundancy.
- GPT – Modern method with backup partition table and practically unlimited partitions.
- Apple Partition Map – Legacy partition table used on older Macintosh computers.
- BSD disklabel – Traditional BSD UNIX partition scheme.
- Sun Volume Table – Historic UNIX partition table for Sun workstations.
GPT is recommended for modern systems. MBR remains compatible with older BIOS-based computers.
Partition Management Software
Here are some utilities for managing partitions:
| Windows | Mac OS | Linux |
|---|---|---|
| Disk Management | Disk Utility | fdisk |
| DiskPart | diskutil | gdisk |
| AOMEI Partition Assistant | iPartition | parted |
| MiniTool Partition Wizard | Drive Genius | cfdisk |
| EaseUS Partition Master | Carbon Copy Cloner | sfdisk |
These tools provide user friendly and powerful partition management capabilities.
Conclusion
Partitioning your hard disk is a useful technique to organize data, isolate your OS, enhance performance, and improve security. Carefully consider your objectives, OS, and drive type when planning partition layouts. Modern tools make partitioning easier, but always remember to backup your data first before changing partition structures. With the right partitioning scheme tailored to your needs, you can optimize your hard disk usage.
