iTunes is Apple’s digital media player, library and mobile device management software included on every Mac computer. iTunes libraries contain all your music, movies, TV shows, apps, and other content purchased or imported into iTunes. By default, iTunes uses a single library stored in your user account to manage all your content. However, iTunes supports using multiple libraries to keep different content separate.
For example, you may want to create separate iTunes libraries for personal and work content. Or have different libraries for different family members using the same Mac. iTunes even allows switching between multiple libraries to access different content on the fly.
Managing multiple iTunes libraries is a built-in but somewhat hidden feature on Mac. This guide will walk through how to view, open, create, switch between, back up and troubleshoot issues with multiple iTunes libraries on the same Mac computer.
Viewing Available iTunes Libraries
The first step to switching between iTunes libraries on Mac is to view which libraries are available. To see all of your iTunes library options:
- Open the Music app on your Mac
- Click on Music in the top left corner
- Hover over Library and a drop-down menu will appear
This menu will show you the available iTunes libraries on your system. The currently selected library will have a checkmark next to it. Libraries that have been moved or are no longer connected will appear grayed out.
You can also hold the Option key when opening the Music app to be prompted to choose a library. This allows you to view and select from available iTunes libraries on your system.
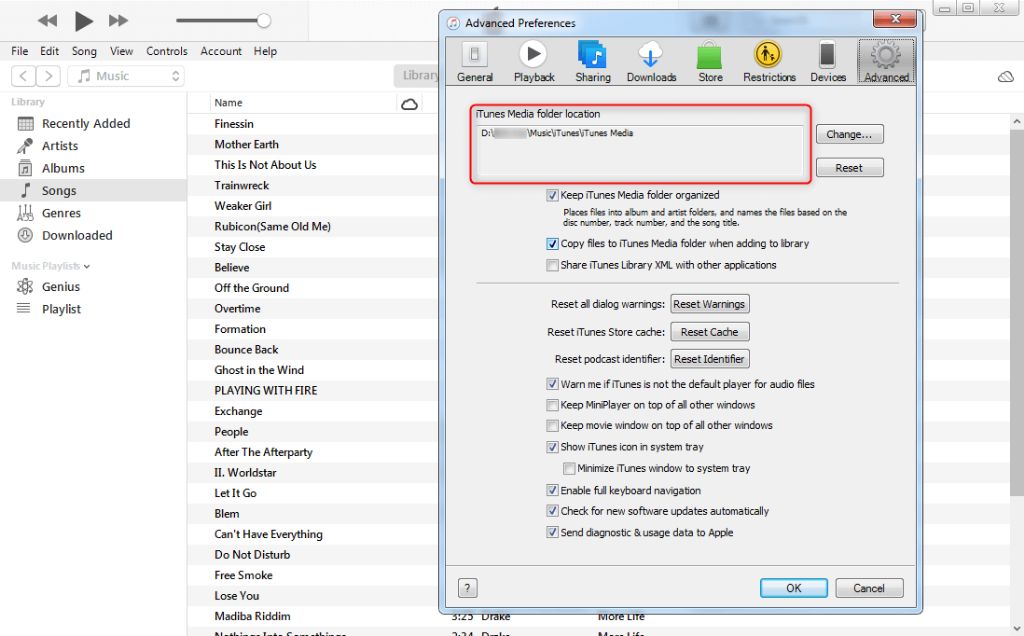
Additionally, your iTunes media folder location can be found by going to Music > Preferences > File Handling on a Mac. This shows the file path where your iTunes library content is stored on your device.
Knowing the locations of your different iTunes libraries allows you to easily open and switch between them as needed. It also helps troubleshoot any libraries that may be unavailable or missing.
Opening a Different iTunes Library
Here are the steps to open a specific iTunes library on your Mac computer:
- Quit iTunes if it is currently open. This ensures the default library doesn’t open automatically.
- Hold down the Option key (or Alt key) while launching iTunes. You can do this by clicking the iTunes icon in the Dock while holding the Option key or by double-clicking the iTunes application icon in Finder while holding the Option key.
- A dialog box will appear prompting you to “Choose iTunes Library.” Select the library file (.itl) you want to open. The iTunes library files are usually stored in ~/Music/iTunes.
- iTunes will open using the library file you selected. To confirm, choose iTunes > Preferences and check the location under “iTunes Media folder location.”
This allows you to easily open different iTunes libraries stored on your Mac. Just remember to hold the Option key when launching iTunes to choose the specific library file.
Source: https://europe.bloombiz.com/go.cgi?t9x32enr43.pais.su/vr72395dqf.htm
Setting the Default iTunes Library
When you have multiple iTunes libraries on your Mac, you can choose which one opens by default when you launch iTunes.
To set the default iTunes library:
- Quit iTunes if it is open.
- Hold down the Option (or Alt) key on your keyboard and launch iTunes.
- In the resulting dialog box, click on “Choose Library” and navigate to the library you want to open by default.
- Select the desired library and click Open.
- This will set the chosen library as the new default.
Now when you open iTunes normally, it will automatically open the library you set as the default rather than prompting you to choose (1).
To revert back to the original iTunes library, repeat the steps but select the original library file.
Creating a New iTunes Library
Here are the steps to create a new iTunes library on your Mac:
- Open iTunes and go to File > Library > New Library.
- Enter a name for the new library and choose the location where you want to save it. The default location is in your Music folder.
- Click Save. This will create the new iTunes library file with the .itl extension in the chosen location.
- When prompted, choose to Relocate the iTunes Media folder so that it matches the new library location. This ensures your media files are stored together with the library.
- iTunes will switch to the new empty library. You can now add content to it by dragging and dropping tracks or by using the import options.
The steps are simple but creating a separate iTunes library allows you to organize your content into different collections. For example, you could have one library for audio books, another for classical music, etc. Just remember to back up the libraries regularly.
For more details on managing multiple libraries, see this Apple support page: https://crabaranur.tistory.com/14
Copying Content Between Libraries
You can easily copy content like music, apps, playlists, and more between different iTunes libraries on your Mac. This allows you to consolidate content from multiple libraries into a single one. Here are the steps:
Open the iTunes library containing the content you want to copy. Select the songs, albums, playlists or other items you want to copy. Drag the selected items to the open window of the destination iTunes library. The items will be copied over. You can also copy content by going to File > Library > Organize Library and selecting ‘Consolidate files’. This will copy the files over without duplicates.
For apps, you will need to redownload them from the App Store into the new library, your purchase history allows you to do this for free. Movies and TV shows work similarly, allowing you to download previous purchases to the new library.
To copy an entire iTunes library, go to File > Library > Export Library, then import it into the destination library via File > Library > Import Playlist. This exports all content including media files into a single file.
Backing Up iTunes Libraries
It’s important to regularly back up your iTunes library to prevent losing your music, movies, apps, and other content. The best practices for backing up an iTunes library include:
Using iCloud – You can enable iCloud Music Library in iTunes preferences to store your music library in iCloud. This will automatically sync your library across devices logged into your Apple ID. However, note that iCloud has storage limits, so may not be ideal for large libraries.
External hard drive – Connect an external hard drive to your Mac and go to Finder > Music > iTunes to locate your iTunes folder. Copy this folder to your external drive. This creates a complete backup you can restore from if needed. For optimal backups, use a high-capacity external SSD.
Time Machine – Apple’s built-in Time Machine software can automatically backup your entire Mac, including your iTunes library. Simply set up Time Machine and connect an external hard drive. Time Machine will regularly back up your files.
Test restoring – After backing up your library, test restoring a few files from the backup to ensure it worked properly before deleting anything.
Encrypt backups – Use encryption when backing up your iTunes library to keep your data secure.
Back up regularly – Don’t just rely on one backup. Back up your iTunes library on a regular basis in case an external drive fails.
Troubleshooting Tips
Here are some solutions for common issues when switching between iTunes libraries on Mac:
If you don’t see all your purchased or imported songs in your library, check the download status and make sure “Sync Library” is enabled in your Apple Music account settings (for more details see the Apple support article If songs are missing from your music library after you turn on Sync Library).
If your default library won’t stick, quit iTunes, hold the Option key while launching iTunes again, and select your desired default library. You can also set the default in iTunes preferences.
If you’re having trouble importing an old iTunes library, make sure the XML file is valid and contains the .itl extension. If copying the iTunes folder, ensure all files are present.
Check Apple Music subscription status if you suddenly can’t see your tracks. Make sure Sync Library is on and give it time to download your library if you recently resubscribed.
For additional help, see Apple’s guides on using Sync Library and importing an iTunes library into Music.
Automation Tools
There are several third-party applications available to help automate and manage multiple iTunes libraries on Mac. These tools provide features like playlist and library management, syncing, conversion, backup, and more.
Some popular automation tools include:
- SynciOS – Allows consolidating, merging, and splitting iTunes libraries. Provides a central interface to manage and sync multiple libraries.
- TuneUp – Scans iTunes libraries to fix mislabeled song info, add album art, remove duplicates, and organize files. Can integrate with iTunes or Windows Media Player.
- iTunes Library Manager – Helps organize large iTunes libraries by searching and tagging files. Can recover missing album art and metadata.
- iTunes Library Copy – Transfers music between different libraries while preserving playlists, play counts, ratings, and other data.
Using dedicated software to manage iTunes libraries can save considerable time compared to manually editing and syncing music collections across devices.
Conclusion
Switching between iTunes libraries on Mac gives you more flexibility in organizing and separating your content. Having multiple iTunes libraries allows you to store different types of media separately, like one for music and another for movies or audiobooks. It also enables sharing libraries with other users on the same Mac.
The key steps are viewing available libraries, opening the one you want, and setting the default if needed. Creating new libraries and copying content between them is straightforward as well. Back up your libraries regularly to avoid losing data.
Overall, managing multiple iTunes libraries is seamless on Mac once you know the basic menu options. Take advantage of this feature to customize iTunes for your needs. With a few clicks, you can easily open and switch between libraries to access just the content you want.
