What is iCloud and iTunes Match?
iCloud is Apple’s cloud storage service that allows you to store your photos, documents, music, and more and access them on all your Apple devices. iCloud keeps everything up to date across devices so you always have the latest version of your content (Source 1).
iTunes Match is a paid add-on service to iCloud specifically for music. It allows you to store your entire music library in iCloud, even songs that weren’t purchased through iTunes. iTunes Match will scan your library and match what it can to songs already available in iTunes. For anything it can’t match, it will upload those songs to iCloud so you can access them anywhere (Source 2).
The main difference is that iCloud is for general storage across all your content types, while iTunes Match focuses specifically on music storage and syncing. iCloud is free (up to a certain storage limit) while iTunes Match requires a paid subscription.
Requirements for Syncing
To sync your iTunes library with iCloud, there are a few requirements you’ll need to meet:
You’ll need the latest version of iOS on your iPhone, iPad, or iPod Touch and the latest version of iTunes on your Mac or PC. Older versions may not fully support syncing with iCloud.
Both your device and computer will need an active WiFi or internet connection to sync. Syncing requires your device and computer to communicate with Apple’s iCloud servers.
You’ll need to have iCloud enabled on all devices you want to sync. This allows your devices to securely store and retrieve data from iCloud.
Finally, you’ll need an active iTunes Match subscription, which gives you access to the iCloud Music Library feature. iTunes Match starts at $24.99 per year and can be purchased directly within iTunes.
Turn on iCloud Music Library
The first step to syncing your iTunes library with iCloud is turning on iCloud Music Library. To do this on desktop:
1. Open iTunes preferences. Go to the General tab.[1]
2. Check the box for “iCloud Music Library”. This will sync your iTunes library to iCloud so it is accessible on all your devices.
Enabling iCloud Music Library uploads your music library to iCloud and makes it available across all your devices. This includes any music you’ve purchased from iTunes, ripped from CDs, or added from other sources.[2]
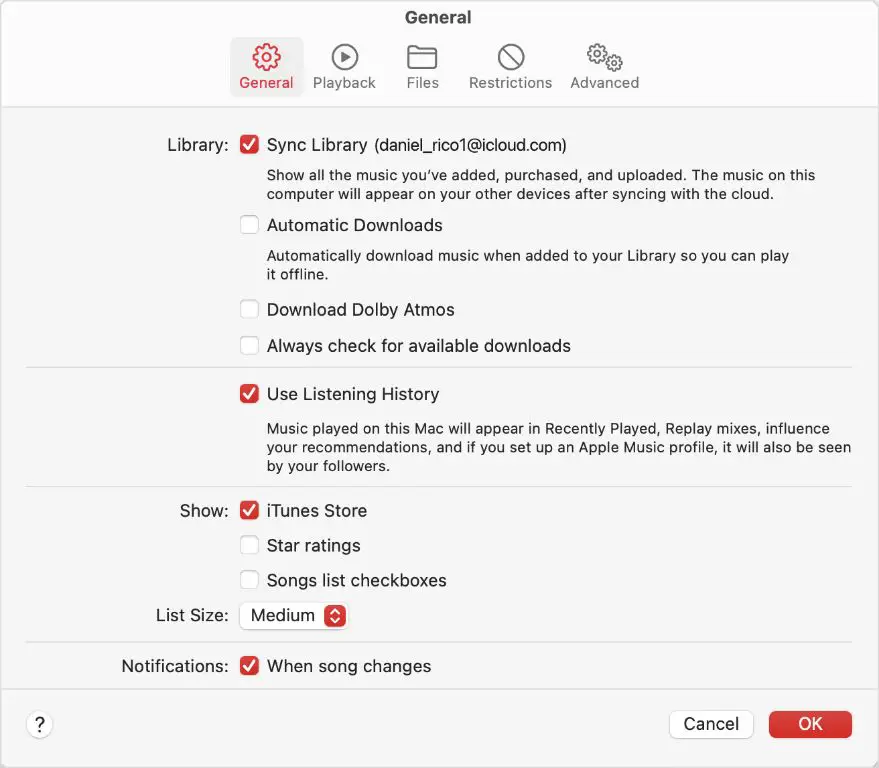
Enable Sync Library
To enable syncing your iTunes library with iCloud, you first need to turn on the Sync Library feature in iTunes on your computer. Here are the steps:
- Open iTunes on your Mac or Windows PC.
- Click on the Music tab in the top menu bar.
- Under iCloud Music Library, check the box next to “Sync Library”.
Enabling this setting allows iTunes to upload your music library to iCloud and make it available across your devices. Any new music you add in iTunes will be automatically uploaded and synced.[1]
With Sync Library turned on, any changes you make to your iTunes library such as adding, editing or deleting songs will also sync across your other devices like iPhone, iPad, or iPod Touch.
Upload your Music
Once you enable iCloud Music Library in iTunes, any songs in your iTunes library that are not already in the iTunes Store will begin uploading to iCloud. This allows you to access your full music library from any device logged into your iCloud account.
The time it takes to upload your music to iCloud depends on a few factors:
- Your internet connection speed – Faster upload speeds will allow songs to upload quicker
- Size of your library – The more songs you have to upload, the longer it will take
- Non-iTunes songs – Uploading your own ripped or downloaded music takes longer than matched iTunes songs
You can monitor the upload progress in iTunes. The Uploads view shows pending uploads and allows you to pause and resume uploading. It’s normal for uploading to take anywhere from several hours to a few days for very large libraries.
Songs purchased from the iTunes Store do not need to upload since they already exist in iCloud. iTunes will simply match these songs to your iCloud Music Library.
Download Music to Devices
Your Apple Music library will automatically download to all of your devices when connected to the internet and signed into the same Apple ID. This allows you to access all of your music across your iPhone, iPad, Mac, PC, Apple TV, and other devices. Songs will download to your devices as long as the “Sync Library” setting is enabled in iTunes.
You can also selectively choose which music to download if you don’t want to fill up all of your device storage. Go to iTunes Preferences > Downloads on a Mac or Edit > Preferences > Downloads on a PC and specify your download rules. For example, you can choose to only download certain playlists, genres, or artists that you listen to frequently. Any content that isn’t downloaded will still be available to stream from iCloud when you have an internet connection.1
Stream Music from iCloud
One of the key benefits of syncing your music library with iCloud is the ability to stream your music from iCloud. This means you can listen to any song in your iCloud music library without taking up storage space on your device.
When you enable iCloud Music Library, all of your music gets uploaded and stored in iCloud. You can then stream this music on demand to any device where you’re signed into your Apple ID and have an internet connection. So whether you’re using your iPhone, iPad, Mac, PC, or Apple TV, you’ll have access to your full music collection to stream from the cloud.
Streaming music saves local storage space on your devices compared to downloading all your music. And you don’t have to manually manage which songs to download – you can simply tap to play any song directly from iCloud.
The streaming quality depends on your internet connection speed. On cellular connections, Apple Music will use an efficient AAC format optimized for mobile. On WiFi, it will stream Lossless Audio (CD-quality) if available for the song.
So by leveraging iCloud Music Library, you get the flexibility to stream your music from the cloud while conserving device storage. Just make sure you have an active internet connection to take advantage.
Access Music Anywhere
One of the main benefits of using iCloud Music Library is the ability to access your music from any device where you are signed into your Apple ID. Once you enable iCloud Music Library, your entire music collection is available across all your devices like iPhone, iPad, Mac, Apple Watch, Apple TV, and HomePod [1]. This allows you to stream any song in your library whenever you want without needing the files stored locally.
In addition to streaming, you can also download songs, albums, or playlists for offline listening by tapping the download icon next to the content. This is useful for situations when you won’t have an internet connection. Downloads are managed on a per-device basis, so make sure to download content before traveling or commuting for uninterrupted playback. With iCloud Music Library, your music collection is always available no matter where you are.
Troubleshooting Tips
If you are having issues syncing your iTunes library with iCloud, here are some troubleshooting tips to try:
Make sure you have the latest versions of iOS and iTunes. Outdated software can prevent syncing from working properly. Go to Settings > General > Software Update on your iPhone or iPad to update iOS. On your computer, open the App Store and download the latest version of iTunes.
Check that your internet connection is working properly. Syncing requires an active internet connection, so make sure Wi-Fi or cellular data is enabled.
Ensure you have enough available storage space on your devices. Syncing a large music library can take up substantial storage, so delete unused apps, photos, or media to free up space.
Retry the syncing process. Sometimes restarting the sync or toggling iCloud Music Library off and back on can resolve temporary glitches. On your iPhone, go to Settings > [your name] > iCloud > iCloud Music Library.
Summary
To recap, here are the main steps to sync your iTunes library with iCloud:
- Turn on iCloud Music Library in your device settings.
- In iTunes, enable Sync Library on the preferences page.
- Allow iTunes time to upload your music to iCloud.
- Once uploaded, you can download your music to other devices.
- Stream your music directly from iCloud.
Syncing your iTunes library with iCloud provides several key benefits:
- Access your entire music collection on all your devices without taking up storage space.
- Add new music on one device and have it automatically sync across devices.
- Stream your music on demand so you don’t have to store it locally.
- Use advanced features like iTunes Match to supplement your collection.
- Enjoy a seamless music experience at home and on the go.
