Syncing your iPhone playlist to iTunes is a great way to back up your music library and access it across multiple devices. With just a few clicks, you can get all of your favorite songs, albums, and playlists from your iPhone onto your computer’s iTunes library. Here’s a step-by-step guide on how to sync your iPhone playlist to iTunes.
Preparing Your iPhone and iTunes for Syncing
Before syncing your iPhone playlist to iTunes, you’ll want to make sure both devices are ready to transfer music back and forth. Follow these tips:
- Update to the latest version of iOS – Go to Settings > General > Software Update on your iPhone.
- Update to the latest version of iTunes – Open iTunes on your computer and click Help > Check for Updates.
- Connect your iPhone to your computer – Use the USB cable that came with your iPhone.
- Make sure syncing is enabled in iTunes – In iTunes, click the iPhone icon. Under Summary, check “Sync Music” and select “Entire music library.”
With syncing enabled and your iPhone connected, you’re ready to transfer your iPhone playlist to iTunes.
Syncing Your Entire iPhone Music Library
The quickest way to get all of your iPhone music onto your computer is to sync your entire iPhone music library. This will copy all of your songs, albums, artists, and playlists from your iPhone right into iTunes.
To sync your entire iPhone music library:
- Connect your iPhone to your computer using the USB cable.
- Open iTunes on your computer.
- Click on the Phone icon near the top left of the iTunes window.
- On the Summary sync page, check the box for “Sync Music.”
- Underneath, select “Entire music library.”
- At the bottom right, click “Apply.”
iTunes will now sync all of the music content from your iPhone into your iTunes library. This includes all of your playlists which will be copied over with their names and song arrangements intact.
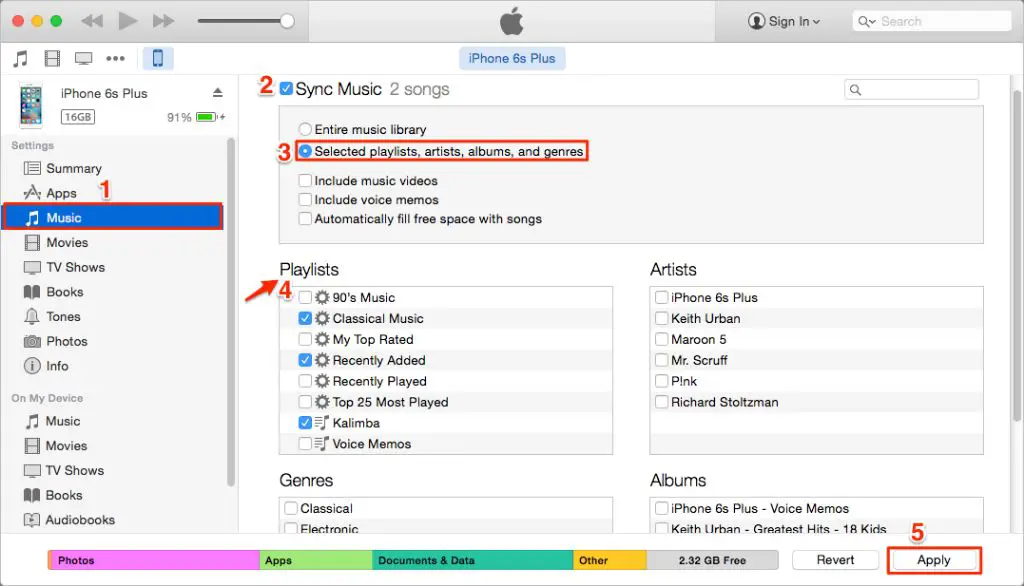
Syncing Specific Playlists
If you only want to sync certain playlists from your iPhone to iTunes, you can choose to selectively sync playlists instead of your entire music library.
To sync specific iPhone playlists to iTunes:
This will transfer only the chosen playlists from your iPhone to iTunes. It will not sync any other music content like songs, albums or artists that aren’t included in those playlists.
Syncing Music Automatically
You can set iTunes to automatically sync your iPhone music any time you connect your device. This saves you the hassle of manually initiating a sync every time.
To set up automatic music syncing:
- Open iTunes Preferences from the iTunes menu (Mac) or Edit menu (Windows).
- Click the Devices tab.
- Check “Prevent iPods, iPhones and iPads from syncing automatically.”
- Underneath, check “Sync this iPhone/iPad automatically.”
- Click OK.
Now whenever you connect your iPhone, it will immediately and automatically sync your selected music to iTunes. You don’t have to initiate a manual sync every time.
Syncing Music Without Erasing
By default, syncing your iPhone music library will replace your iTunes music library with the content from your iPhone. All of your existing iTunes music will be erased.
To avoid erasing your iTunes library, change the sync settings:
- In iTunes, click your iPhone.
- Check “Sync Music.”
- Select a sync option like “Entire music library” or “Selected playlists.”
- Click the Options button next to “Music.”
- Uncheck “Erase and Sync.”
- Check “Sync only checked songs and videos.”
- Click OK.
This will sync your iPhone music into your iTunes library rather than replacing it. Any existing iTunes music will remain intact.
Syncing Music from iTunes to iPhone
Syncing music also works both ways. You can transfer music from your iTunes library onto your iPhone.
To sync iTunes music to your iPhone:
- Connect your iPhone and open iTunes.
- Click your iPhone icon.
- Check “Sync Music”
- Select options like “Selected playlists” or “Purchased songs from Apple Music.”
- Click Apply.
This will copy music from your iTunes library onto your iPhone. You get to choose exactly which playlists, artists, albums or other categories to transfer.
Syncing Music Over Wi-Fi
Starting with iOS 12.4 and iTunes 12.9, you can sync your iPhone music over Wi-Fi instead of using a cable. This means you can sync even if you don’t have your iPhone physically connected to your computer.
To enable Wi-Fi syncing:
- Connect your iPhone to iTunes with a cable one time.
- In iTunes, click your iPhone icon and check “Sync with this iPhone over Wi-Fi.”
- Also check “Sync this iPhone automatically.”
- Click Apply.
After that, you can sync whenever your iPhone is on the same Wi-Fi network as your computer. iTunes will automatically detect and sync it in the background.
Troubleshooting iPhone Playlist Syncing
If you’re having issues getting your iPhone playlist to sync properly with iTunes, here are some troubleshooting tips:
- Make sure your devices are on the same Wi-Fi network if syncing over Wi-Fi.
- Double check that syncing is enabled in the iTunes summary page for your device.
- Restart both your iPhone and iTunes app if music fails to transfer.
- Confirm your USB sync cable is not damaged and securely plugged in.
- Update to the latest iOS and iTunes versions.
- Try rebooting your computer and disable security or VPN software temporarily.
- As a last resort, restore your iPhone to factory settings and set up syncing from scratch again.
If you run into issues getting playlists to sync correctly from your iPhone to iTunes, these tips should help identify and resolve the problem so you can get your music libraries syncing smoothly.
Alternative Ways to Transfer iPhone Playlist
Besides syncing your iPhone playlists directly through iTunes, there are a couple alternative methods to transfer playlists from your iPhone over to your computer:
- iTunes File Sharing – You can access your iPhone files and manually drag playlists out of your iPhone in iTunes.
- Email playlists – Open the playlists on your iPhone, tap the Share button, and email them to yourself.
- AirDrop – Use AirDrop to wirelessly transfer playlist files from your iPhone to your computer.
- Third-party apps – Apps like iMazing, iExplorer and PhoneView give you access to sync and export your iPhone playlists.
While syncing through iTunes is the official method, these alternatives provide other helpful ways to get playlists off your iPhone and onto your computer.
Key Takeaways
Here are some key tips to remember about syncing your iPhone playlist to iTunes:
- Enable syncing in iTunes device summary page.
- Sync entire music library or selected playlists.
- Set up automatic syncing for convenience.
- Avoid erasing iTunes music by changing sync settings.
- Sync works both ways between iPhone and iTunes.
- Newer iOS lets you sync music over Wi-Fi.
- Troubleshoot issues with syncing tips.
- Alternate transfer methods include file sharing, email, AirDrop.
Syncing your iPhone playlist to iTunes provides a great backup of your music library and lets you easily transfer playlists between devices. Following this guide, you’ll be syncing your iPhone music seamlessly in no time.
Frequently Asked Questions
How long does it take to sync iPhone to iTunes?
Syncing an iPhone to iTunes usually takes just a few minutes if syncing over USB. Over Wi-Fi it may take a bit longer depending on internet speeds. For small music libraries under a few thousand songs, syncing typically completes in 5 minutes or less.
Does syncing iPhone to iTunes erase everything?
Syncing will erase all content on your iPhone or iTunes library by default. To prevent losing existing data, change the sync settings to “Sync only checked songs and videos” and disable “Erase and Sync.” This will only copy over the selected music without deleting anything.
Can I manually manage iPhone music without syncing?
Yes, in iTunes you can manually manage music on your iPhone without syncing. Just go to song list, playlists, etc. and manually drag music to the iPhone icon. This will copy songs over individually without affecting existing content.
Why isn’t my iPhone syncing music to iTunes?
If your iPhone won’t sync music to iTunes, try checking your USB cable, updating software, turning sync on in settings, restarting devices, ensuring Wi-Fi is connected, or removing security/VPN apps temporarily. If issues persist, reset the iPhone and re-configure syncing.
Where do iPhone playlists get stored in iTunes?
iPhone playlists you sync to iTunes are stored in the iTunes application under the Playlists tab. All synced iPhone playlists will appear here alphabetically with their original playlist names.
Conclusion
Syncing your iPhone playlist to iTunes is a super easy way to keep your music library safely backed up and accessible across devices. Whether you prefer syncing wirelessly over Wi-Fi or with a cable, you can easily get playlist data transferred between your iPhone and computer with just a couple clicks. Just remember to adjust sync settings to avoid erasing existing libraries and you’ll be all set. Follow the steps in this guide and you’ll have your playlists synced in no time.
