Dell computers come with a software application called Dell Update that automatically checks for and installs the latest drivers, firmware, and other updates from Dell. This helps keep your system up-to-date, but it can also lead to annoying notifications popping up regularly about available updates.
These notifications often interrupt your work and can feel disruptive. Some users may want to disable the notifications while still keeping the Dell Update application itself. This allows you to manually check for updates when convenient, without the constant interruption of notifications.
In this guide, we’ll walk through the steps to turn off Dell update notifications in Windows 10 and 11. This includes disabling the pop-up alerts, background notifications, and auto-checking features. You can target specific types of updates to ignore or disable notifications entirely. We’ll also cover how to re-enable notifications if you change your mind later.
Locate the Dell Update Application
The Dell Update application can be found in different locations depending on your operating system.
On Windows 10 and 11, the easiest way to open Dell Update is to search for it in the Start Menu. Simply click on the Windows icon in the bottom left corner, type “Dell Update”, and select the Dell Update app from the search results.
You can also find Dell Update by going to Start > All Apps > Dell > Dell Update. The Dell Update app will likely be in a Dell folder with other Dell-branded applications.
For Windows 7, go to Start > All Programs > Dell > Dell Update to locate the application.
On Mac computers, launch Finder and go to Applications > Dell > Dell Update to find the app.
If you are having trouble locating Dell Update, you can also search your computer for a file called DellUpdate.exe on Windows or Dell Update.app on Mac. This is the installer file for the application.
Lastly, if Dell Update is still missing, you may need to download and install it fresh from the Dell Support website.
Open the Application Settings
To open the settings menu for Dell Update, first launch the application. Dell Update will appear in the system tray on the bottom right of your screen. Right click on the Dell Update icon in the system tray and select ‘Settings’ from the context menu.
You can also open the application settings by clicking on the Dell Update icon in the system tray, which will open the main application window. At the top of the window, click the ‘Settings’ button to open the settings menu.
Once in the settings menu, you will see various configuration options for Dell Update. This allows you to customize update scheduling, notifications, ignored updates, and more. Make any changes to these settings as desired to modify the behavior of Dell Update on your system.
For additional details, refer to Dell’s support article on accessing Dell Update settings: Dell Command | Update Version 3.1 User’s Guide
Uncheck Automatic Updates
Disabling automatic updates prevents Dell from automatically downloading and installing new updates without your permission. Here are the step-by-step instructions for turning off this feature:
- Open the Dell Update application on your computer. You can find it by searching for “Dell Update” in the Windows Start menu.
- Once in the application, click the Settings icon in the top right corner.
- This will open the Settings menu for the Dell Update application.
- Look for the “Automatic Checks” option and uncheck the box next to “Allow Automatic Updates.”
- If available, also uncheck the “Automatic install” option to prevent updates from installing without your approval.
- Click “Apply” to save these changes.
With automatic updates disabled, you will have to manually check for and install any new Dell updates. This gives you full control over which updates get installed and when. Just remember to periodically open Dell Update and click “Check for Updates” to see if any new ones are available.
For reference, see instructions directly from Dell: How To Stop Windows Updates from Downloading and Installing
Disable Notification Pop-Ups
One of the most annoying aspects of automatic Dell updates is the notification pop-ups that appear when new updates are available. These alerts can interrupt your work and be distracting. To disable the update notification pop-ups in Dell Command Update:
1. Open the Dell Command Update application. This is usually located in the Start Menu.
2. Click on the Settings icon in the top right corner.
3. In the Settings window, go to the “Notification” section.
4. Uncheck the box next to “Notify me when updates are available.”
With this box unchecked, Dell Command Update will no longer display pop-up notifications when new updates are detected. The program will still check and install updates automatically if you leave that enabled, but you won’t get visual notifications about it. This prevents the distracting and annoying update pop-ups from appearing while you’re trying to work.
If you ever need to re-enable the update notifications, simply return to the Notification section of the Settings window and check the box again.
Source: Dell Support Forum
Prevent Background Updating
Dell computers run background processes to automatically check for and install software updates. This can use system resources and interrupt your work. To prevent Dell from automatically downloading and installing updates in the background:
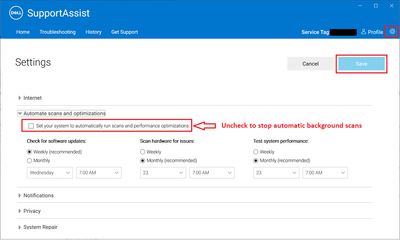
Open the Dell Update application. Go to the Settings tab and uncheck the box for “Automatically check for updates” (1). This will stop Dell from periodically connecting to the internet to look for available updates. You can also disable “Notify me when updates are available” to prevent pop-up notifications (2).
Some updates may still try to install in the background though. To fully disable background updating, you need to edit the Windows Registry. Press Windows + R to open the Run dialog and type “regedit”. Navigate to HKEY_LOCAL_MACHINE\SOFTWARE\Policies\Microsoft\Windows\WindowsUpdate\AU (3). Create a new DWORD value called “NoAutoUpdate” and set it to 1 to disable background updates.
After making registry edits, restart your Dell computer for the changes to take effect. Dell will no longer automatically download or install updates without your permission. You’ll need to periodically check for and install critical updates yourself through the Dell Update application.
Sources:
(1) https://www.dell.com/community/en/conversations/supportassist-for-pcs/how-to-stop-dell-command-update-from-auto-running-in-background/647fa233f4ccf8a8de7a1076
(2) https://www.dell.com/support/kbdoc/en-us/000194492/how-to-stop-windows-updates-from-downloading-and-installing
Ignore Specific Updates
You can choose to ignore certain updates rather than disabling updates entirely. This allows you to continue receiving other important updates while avoiding specific ones you don’t want installed.
To ignore specific updates in Dell Command Update:
- Open the Dell Command Update application.
- Click on the Settings icon in the top right.
- Under “Updates,” click on “Driver and Application Updates.”
- Locate the update(s) you wish to ignore.
- Click the three dots next to the update name and select “Ignore this update.”
- The update will now be ignored and not automatically installed.
You can also manually install ignored updates later if desired by checking for updates in Dell Command Update. Ignoring updates does not uninstall or delete them, it simply skips installing them automatically.
Selectively ignoring certain updates can be useful if a particular Dell update is causing problems or you don’t want specific changes applied to your system. Just be sure to continue applying other critical security and driver updates.
Manually Check for Updates
You can manually scan your Dell computer for available updates at any time instead of waiting for automatic notifications. This allows you to check for and install updates on-demand.
To manually check for Dell updates on Windows 10 or 11:
- Open the Start menu and search for “Dell Update.” Click on the “Dell Update” application to open it.
- In the Dell Update application, click the “Check for updates” button. This will initiate a scan of your system for available Dell driver and firmware updates.
- If any updates are found, they will be listed on the screen. Click the “Install All” button to download and install the available updates.
- Dell Update will automatically install the updates in the background. Once finished, your system will be fully up-to-date.
Manually checking for updates with Dell Update ensures your drivers, firmware, and other system components are always up-to-date. This can help resolve issues caused by outdated software and improve your computer’s performance.
Re-Enable Updates
If you decide you want to turn notifications back on after previously disabling them, follow these steps:
- Open the Dell Update application.
- Click on the Settings icon in the top right corner.
- Under “Automatically check for updates”, click on “Check for updates” and select “Daily” or “Weekly” from the dropdown menu.
- Check the box next to “Notify me when updates are found and ready to install”.
- Click Apply to save the changes.
Dell Update will now automatically check for new updates daily or weekly, depending on what you selected. You will also receive notifications again when new updates are ready to be installed [1].
Conclusion
Customizing Dell update notifications allows you to have more control over your system updates. The main steps are to open the Dell Update application, uncheck the option for automatic updates, disable pop-up notifications, stop background updating, and ignore specific updates. Doing this lets you choose when you want to check for the latest driver and firmware versions on your schedule.
The benefits of customizing Dell updates include avoiding unwanted interruptions from notifications popping up while you’re working, preventing background processes from slowing down your computer, and skipping problematic updates that may cause issues on your particular system. Overall, adjusting the default update settings gives you more say over how and when your Dell computer gets updated.