Accidentally deleting an important file on your Mac can be incredibly frustrating. Thankfully, macOS offers a few different ways to undo a deletion and recover your lost data. In this guide, we’ll walk through the various methods you can use to undo a delete on Mac.
Use Command + Z to Undo a Delete
The fastest and easiest way to undo a deletion on Mac is to use the keyboard shortcut Command + Z. This keyboard shortcut will undo your most recent action, whether it’s deleting a file, emptying the trash, or other common operations.
To use Command + Z:
- Immediately after accidentally deleting a file, press Command + Z on your keyboard.
- The delete action will be undone, and the file will be restored to its original location.
This keyboard shortcut works for any files deleted from the Finder or desktop. It essentially reverts your Mac’s state back one step.
However, Command + Z only works if you undo the delete right away. Once you perform another action, Command + Z will only undo that action rather than the deletion.
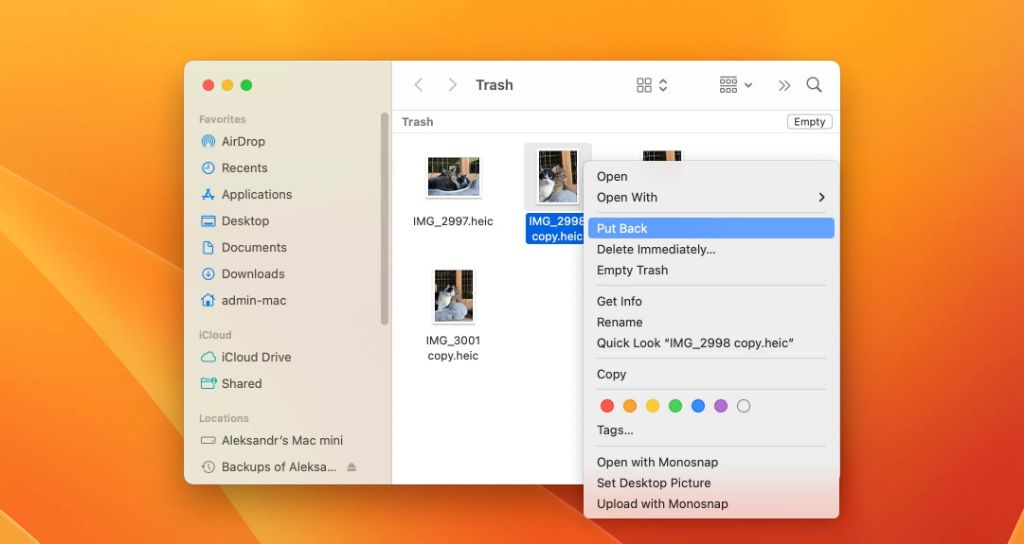
Restore Files from Trash
If you’ve already emptied the Trash, you may still be able to recover deleted files by restoring them from the Trash.
To restore files from Trash:
- Open the Trash by clicking the Trash icon in your Dock or going to Finder > Trash.
- Look for the item(s) you want to restore.
- Select the item(s) then click File > Restore [item] from the menu bar. You can also right-click on an item and select Restore.
- The selected item(s) will be restored to their original location.
Files and folders remain in the Trash for 30 days after they are deleted. After 30 days, they are permanently deleted. So if you need to restore something from the Trash, be sure to do it within this 30 day period.
Use Time Machine to Recover Deleted Files
If you have Time Machine backups enabled, you may be able to recover deleted files by going back to a previous backup.
To use Time Machine to restore a deleted file:
- Open the Time Machine app on your Mac. You can find it using Spotlight or by going to Applications > Time Machine.
- Either enter Time Machine by clicking Enter Time Machine, or browse your backups from the Time Machine browser.
- Navigate to the folder or disk where the file used to be located.
- Look through the timeline on the right to browse old backups until you find the deleted file.
- Select a backup version of the file and click Restore to copy it back to its original location.
This allows you to rollback to a state before the file was deleted. Time Machine keeps hourly backups for 24 hours, daily backups for a month, and weekly backups until your backup drive is full.
Recover Deleted Files with Data Recovery Software
If the file has been permanently deleted from your Mac and Time Machine doesn’t have a backup, you may need dedicated data recovery software to get it back.
Data recovery software scans your Mac’s hard drive and attempts to recover files marked for deletion. Some options to try include:
- Disk Drill: Paid app with free trial version. Recovers 200MB data free.
- EaseUS Data Recovery Wizard: Free and paid versions available.
- Stellar Data Recovery: Free and paid versions available.
- Data Rescue: Paid app with free trial.
To use data recovery software:
- Download and install the data recovery app.
- Scan the disk/drive where the file was originally located.
- Preview found files and select the ones to recover.
- Choose a location to save the recovered files.
The scan will take some time. The success rate depends on how long ago the file was deleted and whether any new data has overwritten the space it occupied. But data recovery software offers the best chance of getting back permanently deleted files.
Restore from a Backup
If you have a full backup of your Mac through Time Machine, cloud backup services, or bootable clones, you may be able to fully restore deleted files by restoring your entire system from the backup.
This option is time-consuming but ensures you can get back deleted files as well as your entire system configuration.
To restore from a bootable backup:
- Connect the backup drive to your Mac.
- Restart your Mac and hold Command + R to boot to the Recovery partition.
- Choose to Restore from the backup.
- Follow the onscreen prompts to restore your Mac system from the chosen backup.
Once the restore completes, your deleted files should be present again in their original locations.
Avoid Accidental Deletions
No recovery method is perfect, so it’s also helpful to take steps to avoid accidental deletions in the first place:
- Be careful when emptying the Trash – Always check the contents before emptying the Trash to ensure you don’t need any files.
- Enable Time Machine – Time Machine can help you easily “undo” a delete by restoring from a previous backup.
- Back up important files – Maintain backups of critical files both on and off your Mac.
- Add an extra step to deletion – Enable settings that require you to confirm a file deletion by holding the Command key.
- Unhide system files – Show hidden files so you don’t accidentally delete them.
Following these tips will reduce the chances of you deleting important files by accident. But should it still happen, use the steps outlined in this guide to get those files back where they belong.
Frequently Asked Questions
Can I recover permanently deleted files on Mac without software?
It is very difficult to recover permanently deleted files on a Mac without data recovery software. Files that have been permanently deleted are no longer stored in the file system catalog and their data clusters on the drive can be overwritten at any time. Special data recovery software is required to scan the drive and rebuild file fragments that belonged to deleted files.
How long are deleted files stored on a Mac?
When you delete files on a Mac, they get stored in the Trash folder. Files in the Trash remain there for 30 days before being permanently deleted. After 30 days, macOS deletes the files to free up drive space. During those 30 days, you can restore files from the Trash back to their original locations.
Can you recover permanently deleted files from Time Machine?
If a file was permanently deleted without being added to the Trash first, then Time Machine backups can help you recover that file, provided Time Machine was active before the file was deleted. Each hourly backup captures the entire state of your drive, so you can restore a previous version from before the deletion occurred.
What is the fastest way to recover deleted files on Mac?
The fastest way to recover recently deleted files on Mac is to use Command + Z immediately after the deletion to undo it. If that doesn’t work, the next quickest method is restoring files from the Trash folder if they’ve been deleted within the past 30 days. For recovering older deleted files, Time Machine and data recovery software are the next best options.
Can you recover files after emptying Trash on Mac?
It is possible to recover files even after emptying the Trash on a Mac, but it becomes much more difficult. If you have a Time Machine backup, you may be able to restore deleted files from an older snapshot. Your best chance lies with data recovery software, which can scan the drive and find data from permanently deleted files – provided the space hasn’t already been overwritten.
Conclusion
Accidentally deleting files is an easy mistake to make, but thankfully there are ways to recover deleted files on Mac, even after emptying the Trash. The easiest methods are using Command + Z immediately after the delete or restoring from the Trash within 30 days. For recovering permanently deleted files, Time Machine and data recovery software provide the most options. Just be sure to act quickly before the deleted data gets overwritten.