What is Recovery Mode?
Recovery Mode on Mac is a built-in troubleshooting tool that allows you to repair disks, reinstall macOS, restore from backups, and more (https://mackeeper.com/blog/mac-recovery-mode/). It starts up separate from the normal macOS operating system and provides access to Disk Utility for repairs and macOS Utilities for reinstallation.
The main reasons to boot into Recovery Mode include (https://setapp.com/how-to/use-recovery-mode-on-mac):
- Reinstalling or reconfiguring macOS if there are system issues
- Using Disk Utility to verify, repair, or erase disks that are having problems
- Restoring from a Time Machine backup
- Resetting passwords for user accounts
- AccessingTerminal for advanced troubleshooting
Recovery Mode provides an essential way to diagnose and fix many issues by starting up the Mac into a special environment separate from the main operating system.
When the Macintosh HD is Locked
A locked Macintosh HD means that the drive containing your files and operating system is inaccessible and cannot be modified. There are a few common reasons why the Macintosh HD drive may become locked:
FileVault encryption – Enabling FileVault full disk encryption on your Mac will lock the boot drive when the computer is turned off, requiring your login password to unlock it.
Firmware password – Setting a firmware password in your Mac’s settings will lock the drive at boot until the correct password is entered.
Corruption – File system corruption or drive failure can sometimes lead to the drive becoming unreadable and locked. This usually requires repairs or data recovery.[1]
Unauthorized access – The drive may be locked if unauthorized modifications were attempted, as a security measure.
Start up issue – If the Mac is interrupted while starting up, it can fail to mount and unlock the boot drive.
Essentially, a locked Macintosh HD prevents access to the files, apps and system on the drive until it can be successfully unlocked and mounted again.
Booting into Recovery Mode
To boot into Recovery Mode on Mac, you need to restart your Mac and hold down the appropriate keyboard shortcut at startup. The keyboard shortcut depends on the Mac model you have:
- On Intel-based Macs: Hold down Command + R as the Mac restarts to boot into macOS Recovery over the internet. This will load the latest macOS version compatible with your Mac.
- On M1 Macs: Hold down the power button at startup until you see the startup options, then select macOS Recovery. This loads the version of macOS the Mac originally shipped with.
- On any Mac: Hold Command + Option + R to boot into internet recovery which downloads the latest macOS version compatible with your Mac.
Let go of the keys once you see the spinning globe or Apple logo appear. This indicates the Mac is starting up into Recovery Mode.1
Unlocking the Drive
If you see the message “Enter a password to unlock the disk Macintosh HD,” it likely means your drive is encrypted with Apple’s FileVault encryption. To unlock it, you will need to enter the correct password at the FileVault login screen.
Here are the steps to unlock FileVault encryption in Recovery Mode:
- Restart your Mac and hold down Command + R to boot into Recovery Mode.
- At the FileVault login screen, enter the password for your account.
- If you’ve forgotten the password, you can reset it through your Apple ID account.
If your drive is locked by a firmware password rather than FileVault, you will need to remove the firmware password to unlock it. To do this:
- Boot into Recovery Mode and launch Terminal from the Utilities menu.
- Type
firmwarepasswd -deleteand hit enter. - Restart your Mac again normally and the firmware password should be removed.
With the firmware password deleted, you should then be able to access your drive normally in Recovery Mode without any unlock prompt.
Resetting Passwords
If you forgot your account password on your Mac, you can reset it using Recovery Mode. Here are the steps:
- Restart your Mac and hold down the Command and R keys to boot into Recovery Mode.
- Select Utilities > Terminal from the menu bar.
- In the Terminal window, type
resetpasswordand press Enter. - Follow the onscreen instructions to reset your account password.
You can also reset your Mac’s firmware password from Recovery Mode. The firmware password prevents your Mac from starting up without entering the password. To remove it:
- Boot into Recovery Mode.
- Select Utilities > Firmware Password Utility.
- Enter your current firmware password and click Remove Firmware Password.
This will disable the firmware password and allow you to start up your Mac normally again.
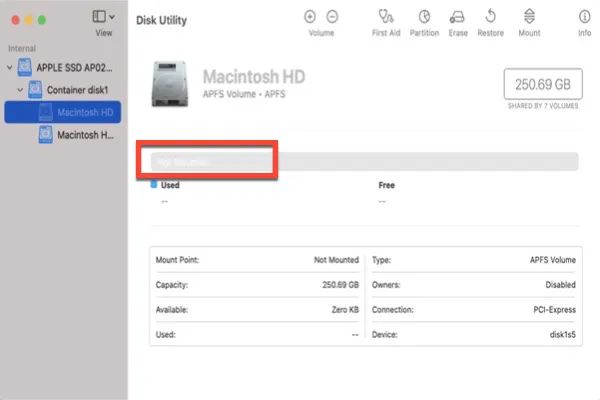
Disk Utilities
One of the most useful tools for unlocking and repairing your Macintosh HD is Apple’s Disk Utility program. Disk Utility can be accessed in macOS Recovery mode to verify and repair disk issues that may be preventing your drive from being unlocked properly.
To use Disk Utility to repair your drive:
– Boot into Recovery mode by holding Command + R while restarting your Mac.
– Select Disk Utility from the macOS Utilities window.
– Select your Macintosh HD drive on the left side of the Disk Utility window.
– Click First Aid in the top center and choose “Run” to begin scanning your drive.
– Disk Utility will check for and repair any disk errors or permissions issues.
– After repairs are complete, you can restart your Mac and see if you can unlock the drive normally.
For more details, see Apple’s guide on using Disk Utility to repair disks.
Running First Aid from Recovery mode is the most thorough way to verify and fix underlying disk problems that may prevent you from unlocking the drive. Disk Utility can automatically fix many issues that might otherwise require fully erasing the disk.
Reinstalling macOS
If your Mac is experiencing issues that prevent you from booting normally, reinstalling macOS using Recovery Mode can often fix software problems and get your computer working again without losing data. Here’s how to reinstall the operating system from Recovery Mode:
First, you’ll need to download the latest version of macOS that is compatible with your Mac. This can be done from another Mac or PC.
With the macOS installer ready, restart your computer and hold down the Command + R keys immediately after you hear the startup chime. This will boot your Mac into Recovery Mode.
From the Recovery window, select the option to reinstall macOS. The installer will launch and you can follow the onscreen prompts. It will erase and replace your existing operating system, but leave your files and data intact.
Once the installation is finished, your Mac should reboot normally into the new version of macOS. If any issues persist, you may need to restore from a Time Machine backup or contact Apple support for further troubleshooting.
Reinstalling the OS using Recovery Mode is a reliable way to refresh your Mac without losing your data when experiencing system issues or crashes.
Restore from Time Machine
If your Mac is experiencing problems due to a system issue, you may be able to restore from a Time Machine backup in Recovery Mode to revert your Mac to a previous state.
Here are the steps to restore from a Time Machine backup in Recovery Mode:
- Start up your Mac and immediately press and hold Command + R to boot into Recovery Mode.
- Select “Restore from Time Machine Backup” from the macOS Utilities window.
- Connect the Time Machine backup drive to your Mac.
- Select the backup you want to restore from. This allows you to revert your Mac to a previous point in time.
- Click Continue to begin the restore process. This will erase your current macOS install and restore the OS and data from the Time Machine backup.
In order for this process to work, you need a bootable Time Machine backup created on an external hard drive. The backup disk must be connected directly to your Mac while in Recovery Mode to restore from it. Time Machine backups include system files, applications, settings, and data.
Troubleshooting Tips
If the Macintosh HD drive will not unlock, there are a few troubleshooting steps you can try:
Attempt to boot into Recovery Mode again using different startup key combinations like Command-R, Command-Option-R, Shift-Option-Command-R. Sometimes one of these may work if another doesn’t.
Reset NVRAM by holding Command-Option-P-R at startup and letting it chime multiple times before releasing. This clears out settings that may be preventing the drive from unlocking.
Try connecting the Mac to another Mac in Target Disk Mode and running First Aid from that Mac’s Disk Utility. This bypasses the primary Mac’s software issues.
If you have access to another bootable drive, boot from that and run Disk Utility’s First Aid on the locked drive from there. This determines if the issues are related to boot drive vs system files.
Start up in verbose mode (Command-V at boot) and carefully note any text around the time the unlock dialog appears. This provides clues to the cause.
If multiple attempts don’t work, it’s best to contact Apple support for further troubleshooting assistance.
When to Contact Apple Support
If you have tried all of the troubleshooting steps and solutions mentioned in this guide and still cannot unlock your Macintosh HD drive, it’s time to contact Apple Support.
There may be underlying hardware issues preventing you from unlocking the drive. For example, the hard drive itself could be failing, or there could be a problem with the logic board.
These types of hardware problems require diagnosis and repair by Apple technicians. Do not attempt to open up and repair your Mac yourself, as this could void your warranty.
You can contact Apple Support in several ways:
- Visit an Apple Retail Store and speak to a Genius Bar technician
- Call 1-800-MY-APPLE in your country
- Initiate a support request at support.apple.com
Be prepared to provide your Mac’s serial number and describe the steps you already attempted to unlock the drive. The Apple technician can run diagnostics tests and determine if hardware repair or replacement is required.
In some cases, Apple Support may recommend fully reformatting your drive and reinstalling macOS from recovery mode as a last resort. But this should only be done with guidance from Apple, as you may lose all data on the drive.
With hands-on troubleshooting and possible hardware repair from Apple experts, you should be able to get your Macintosh HD unlocked so you can once again access the data.
