Wiping your Mac and deleting everything can be a necessary step if you are selling or giving away your computer. A complete wipe removes all of your personal data, accounts, settings, apps, and files from the Mac. This guide will walk you through the steps to fully erase and reset your Mac to factory default settings.
Quick Answers
Here are quick answers to common questions about wiping a Mac:
- A factory reset completely erases all data and resets software back to default settings
- Resetting is recommended before selling or gifting your Mac to protect personal data
- Apple provides a built-in erase feature to wipe your Mac clean
- An erase typically takes 1-2 hours to fully complete
- All files, accounts, apps, settings are deleted – make backups first
- Erase and reinstall latest MacOS to wipe clean and refresh your Mac
Back Up Important Data
Before wiping your Mac, it’s essential to back up any important files, photos, documents and other data you want to keep. An erase will permanently delete everything on the Mac, so back up data to an external hard drive or cloud storage.
Some options for backing up your Mac include:
- Time Machine – Apple’s built-in backup software
- An external storage device such as a hard drive
- Cloud backup services like iCloud, Dropbox or Google Drive
- Manually copying files to another device or drive
Make sure your backups are complete before proceeding with wiping your Mac. Any data left on the Mac will be erased during the reset process.
Sign Out of Accounts
Before erasing your Mac, sign out of all accounts to disconnect the device from your personal data:
- Sign out of iCloud – Go to Apple menu > System Preferences > Apple ID and click “Sign Out”
- Sign out of iTunes – Open iTunes, go to Account > Authorizations > Deauthorize this Computer
- Sign out of App Store – Go to App Store > View My Account and click “Sign Out”
- Sign out of iMessage – Go to Messages > Preferences > Accounts
- Sign out of social, email, and other accounts logged in on your Mac
This will ensure no personal data or accounts remain linked to the Mac before wiping.
Disable Find My Mac
If you have Find My Mac enabled, this will need to be turned off before wiping your Mac. Find My Mac helps locate and secure your Mac if lost or stolen. But it also prevents erasing and reinstalling macOS.
To disable Find My Mac:
- Go to System Preferences > Apple ID
- Click iCloud
- Deselect “Find My Mac”
With Find My Mac disabled, you can proceed to erase your Mac.
Erase Your Mac Completely
With your data backed up and accounts logged out, you’re ready to erase your Mac. This will completely wipe the hard drive or SSD, deleting all data in the process.
Here is how to erase your Mac and restore factory default settings:
- Restart your Mac and immediately press Command + R keys to boot into Recovery mode
- Select Disk Utility > Continue
- Choose your startup disk and click “Erase”
- Enter a name for the erase (like “Macintosh HD”), use “APFS” format, and “GUID Partition Map” scheme
- Click “Erase” to confirm – this will fully wipe your startup drive and may take 1-2 hours
- Exit Disk Utility when finished erasing
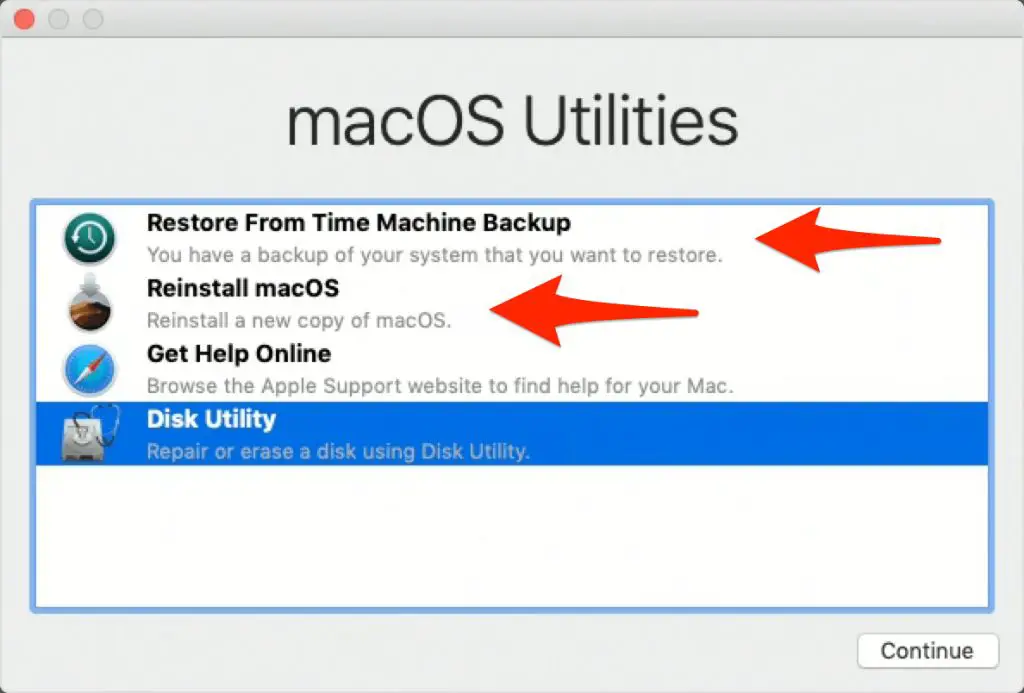
- Choose Reinstall macOS from the Utilities window and click Continue
- Follow the prompts to reinstall a fresh copy of macOS
The erase process will wipe all data from your Mac and reinstall a clean, up-to-date version of macOS. Be patient during the erase as it may take over an hour depending on your drive size.
Alternative Erase Options
macOS includes some additional erase options:
- Fast Erase – Quickly erases directory info, less secure
- 7-Pass Erase – Repeatedly overwrites drive, more secure
However, the standard erase recommended above is sufficient for most needs before selling or gifting a Mac.
Reinstall Apps and Settings
With a freshly erased Mac, you’ll need to reinstall apps, settings, and other software. Here are some tips:
- Sign into App Store to download apps you previously purchased
- Transfer important documents and data from your backup
- Customize System Preferences for settings like desktop, mouse, trackpad
- Personalize with wallpaper, Dashboard widgets, Dock items
- Install software like web browsers, productivity suites, etc
Take time to fully set up your erased Mac for a new owner or your own use. Transfer key data from backups and install apps to restore your workflow.
Checking Erase Status
To confirm your Mac was fully erased, check in a few places:
- Disk Utility – Confirms drive formatted and partitioned
- Finder – Should only show base OS, no user files/folders
- User accounts – Previous accounts no longer configured
- App Store – Apps not automatically downloaded
If you see any user data, accounts or apps still on the system, the erase was likely incomplete.
Selling or Gifting Your Mac
After fully wiping your Mac, it’s ready to be sold, gifted or recycled. Here are some final steps:
- Remove your iCloud account from the Mac
- Unlink any connected devices like iPads or iPhones
- Leave accessories like power adapter if selling
- Obtain proof of deletion for sensitive data disposal
- Consider meeting at a neutral location like a coffee shop if selling online
By doing a complete erase, you protect your personal data and give your Mac a fresh start. The new owner will appreciate receiving the computer reset to factory settings.
Conclusion
Wiping your Mac completely erases all contents from the startup drive, removing your personal data in the process. Be sure to fully back up your files, sign out of accounts, and disable Find My Mac beforehand.
Using macOS Recovery, you can erase your Mac and reinstall a fresh copy of the operating system. Take time to reconfigure settings, transfer data, and install apps to make the Mac functional again.
With a fully erased Mac, you can comfortably sell, gift or recycle the computer without worrying about sensitive personal data falling into the wrong hands. Just be sure to confirm the erase was successful before letting your Mac go.
