What is RAID 10?
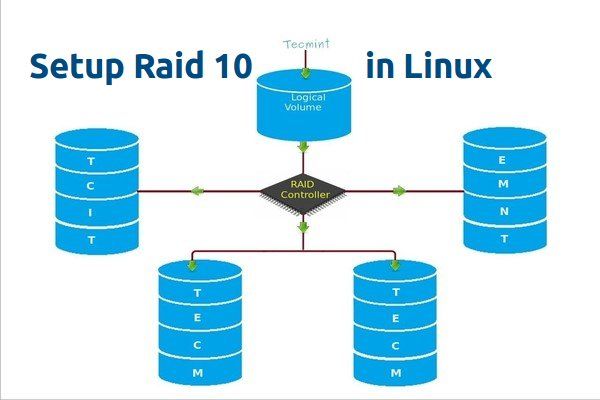
RAID 10, also known as RAID 1+0, is a RAID configuration that combines disk mirroring and disk striping to provide both high performance and redundancy for critical data storage. It requires a minimum of 4 drives.[1]
In RAID 10, data is mirrored across 2 drives (RAID 1), and then the mirrored pairs are striped across multiple drive pairs (RAID 0). This configuration provides performance benefits from RAID 0 striping, as well as redundancy benefits from RAID 1 mirroring. If one drive fails, its mirrored drive can continue to operate.
The key benefits of RAID 10 include:
- Increased read/write performance compared to RAID 1 or RAID 5.
- Ability to withstand multiple drive failures if the failed drives are in separate mirrored pairs.
- Fast rebuilding times since only the failed mirror drive needs to be rebuilt.
RAID 10 is commonly used for mission critical data storage and applications that require high performance and high availability. It’s more expensive than other RAID levels due to the extra drives required, but provides excellent performance and redundancy for important data.
RAID 10 Requirements
RAID 10 has some specific requirements for the hard drives used in order to properly configure the array:
You need at least 4 drives to create a RAID 10 array. This is because RAID 10 utilizes drive mirroring, which requires drives to be paired up. With less than 4 drives, mirroring cannot occur.
The drives used in the array should be the same size and speed. RAID 10 provides improved performance by striping data across drives, so mixed drive sizes and speeds can cause performance issues. The overall storage capacity of the array will be limited to the size of the smallest drive.
From https://www.pitsdatarecovery.net/what-is-raid-10/
RAID Controller Considerations
When setting up a RAID array, one of the key considerations is whether to use a hardware or software RAID controller 1, 2. Hardware RAID controllers are physical cards that are installed in a PCIe slot on the motherboard and handle all RAID calculations and operations. Software RAID controllers rely on the CPU and operating system drivers to manage the RAID configuration.
Hardware RAID controllers offer better performance and reduces load on the CPU. However, they are more expensive and may not work if you change motherboards. Software RAID controllers are cheaper and work across platforms, but tax the CPU more. When choosing a RAID controller, it’s important to check compatibility with your specific hardware configuration and operating system 3.
Drive Partitioning
When setting up RAID 10, it’s important to partition each drive identically before creating the array. This involves creating primary partitions on each drive that span the full capacity of the drive. Here are the key steps for partitioning drives for RAID 10:
1. Use disk management utility or diskpart to view unallocated space on each drive.1
2. Create a primary partition on each drive to consume the full unallocated space.2
3. Make sure each partition is identically sized to match the smallest drive capacity.
4. Repeat steps for all drives that will be part of the RAID 10 array.
This approach ensures that the full capacity of each drive is available to the array and symmetry is maintained across all drives, which optimizes performance.
Creating the Array in the RAID Software
Once the drives have been partitioned and are ready, the next step is to use the RAID management software to create the RAID 10 array.
First, open the RAID configuration utility. This may be a dedicated software program or built into the system BIOS. Locate the option to create a new array.
When prompted, select the RAID 10 option. This will stripe and mirror the array for optimal performance and redundancy.
Next, choose the partitions you created earlier to add to the array. Make sure to select all of the partitions you want to include.
Finally, initialize and build the array. The process of writing the configuration metadata and building the stripes and mirrors can take some time depending on the size and number of drives.
Once complete, the RAID 10 array is ready for formatting and use. The management software will likely report the new consolidated logical volume that is presented from the array.
Formatting the Array
Once the RAID 10 array is created, the next step is to format it with a filesystem so that it can store data. Some common filesystems used for RAID 10 arrays include:
- NTFS – Typically used for Windows servers
- ext4 – Common for Linux servers
- XFS – High performance filesystem often used for media servers
- Btrfs – Advanced filesystem with snapshots and checksums
Formatting will write the selected filesystem metadata to the RAID 10 array volumes, preparing them to store files and folders. This is an essential step as the disks will not be accessible or mountable until properly formatted.
Most RAID management utilities will provide the ability to format the array directly within the application. This ensures the filesystem parameters are optimized for the particular RAID level and configuration. The format process can take some time to complete depending on the size of the array and disks.
Some key points when selecting a filesystem for RAID 10:
- Match the filesystem to your operating system platform.
- Consider performance needs – some filesystems like XFS are optimized for throughput.
- Determine if advanced features like snapshots or checksums are beneficial.
- Review filesystem block and cluster sizes for alignment to your workload.
Properly formatting the RAID 10 array is a crucial step that enables the disks to be mounted and utilized within the operating system.
Mounting the Array
After creating the RAID 10 array, you may need to manually mount it so that it can be accessed by the operating system. This involves creating a mount point and using the mount command.
First, create a directory that will serve as the mount point for the array. This can be anywhere in your directory structure, but is commonly created in /mnt. For example:
sudo mkdir /mnt/raid10
Next, use the mount command to mount the RAID 10 array at this location. Specify the device name of the RAID array. For example if it is /dev/md0:
sudo mount /dev/md0 /mnt/raid10
The RAID 10 array is now mounted and accessible at /mnt/raid10. You can view it, write to it, and interact with it like any other filesystem.
Some Linux distributions may automatically mount the RAID array, in which case manual mounting is not necessary. You can check if it is already mounted by looking for it in the output of the mount command.
It’s also recommended to add an entry in /etc/fstab to persistently mount the RAID array on reboot. See your distribution’s documentation for details on adding fstab entries.
[source1]
Checking and Verifying
After configuring RAID 10, it’s important to check the status and verify the redundancy to ensure the array is set up properly. There are a few ways to check:
On Windows, you can use Disk Management. Right click the Start menu and select “Disk Management”. This will show all disks and volumes, including the RAID 10 array. Check that the array shows as “Healthy”.
You can also check in Command Prompt with the command:
diskpart
list volume
This will list all volumes and their status.
For more detail, install the controller management software that came with your RAID controller card. This will give full status and verification that the RAID 10 is redundant across all disks.1
On Linux, the mdadm tool can provide RAID status. Use:
sudo mdadm --detail /dev/mdX
Where X is the array number. This will verify the RAID level, disk status, and redundancy.
Monitoring tools like smartctl can also validate disk health and performance.
Regularly checking RAID status ensures the array is redundant and protects against data loss if a disk fails.
Adding Drives
When adding drives to a RAID 10 array, there are a few considerations to keep in mind.
First, you may want to add dedicated hot spares to allow for drive failures without losing redundancy. Hot spares are unused drives that the RAID controller can automatically rebuild onto in case of a failed drive. This avoids lengthy rebuilds using the remaining good drives. When adding hot spares, make sure they match or exceed the size of the array drives for compatibility. Refer to your RAID controller documentation on the recommended number of hot spares.
You can also expand the total capacity of the RAID 10 array by adding more matched drives in pairs. This expands the array size while maintaining the RAID 10 redundancy. However, the process varies based on your RAID controller model. Some support online capacity expansion without downtime, while others require a full backup, rebuild, and restore. Consult your RAID controller documentation on the proper expansion procedures to avoid data loss.
For example, according to the Dell community forums, the Dell MD3200 RAID controller supports expanding a RAID 10 array online without needing to rebuild it: https://www.dell.com/community/PowerVault/MD3200-expanding-raid-10-array-on-the-fly/td-p/3645858
With the proper RAID controller, expanding capacity on a RAID 10 array can be done seamlessly. But always consult documentation before attempting drive additions or expansions to avoid potential pitfalls.
Maintenance
It is important to regularly monitor the health of a RAID 10 array and be prepared to rebuild it in the event of a drive failure. Some best practices for maintenance include:
- Run consistency checks on the array at least once per month to check for any media defects or issues (Dell). This will help identify problems early.
- Keep spare drives on hand that can be used to immediately replace a failed drive and rebuild the array. The rebuild time will depend on the size of the drives and array.
- Monitor drive health metrics like reallocated sectors, pending sectors, and seek errors. Replace drives that are predicting failure.
- Consider scheduling periodic rebuilds of the array to refresh the drives and maintain redundancy.
- Follow the storage vendor’s specific recommendations for monitoring and maintaining the RAID array.
Even though RAID 10 offers fault tolerance through mirroring, rebuilding the array after a drive failure in a timely manner is critical to avoid data loss. Staying on top of maintenance best practices is key.
